6.1. Overview
- Basic Account Management
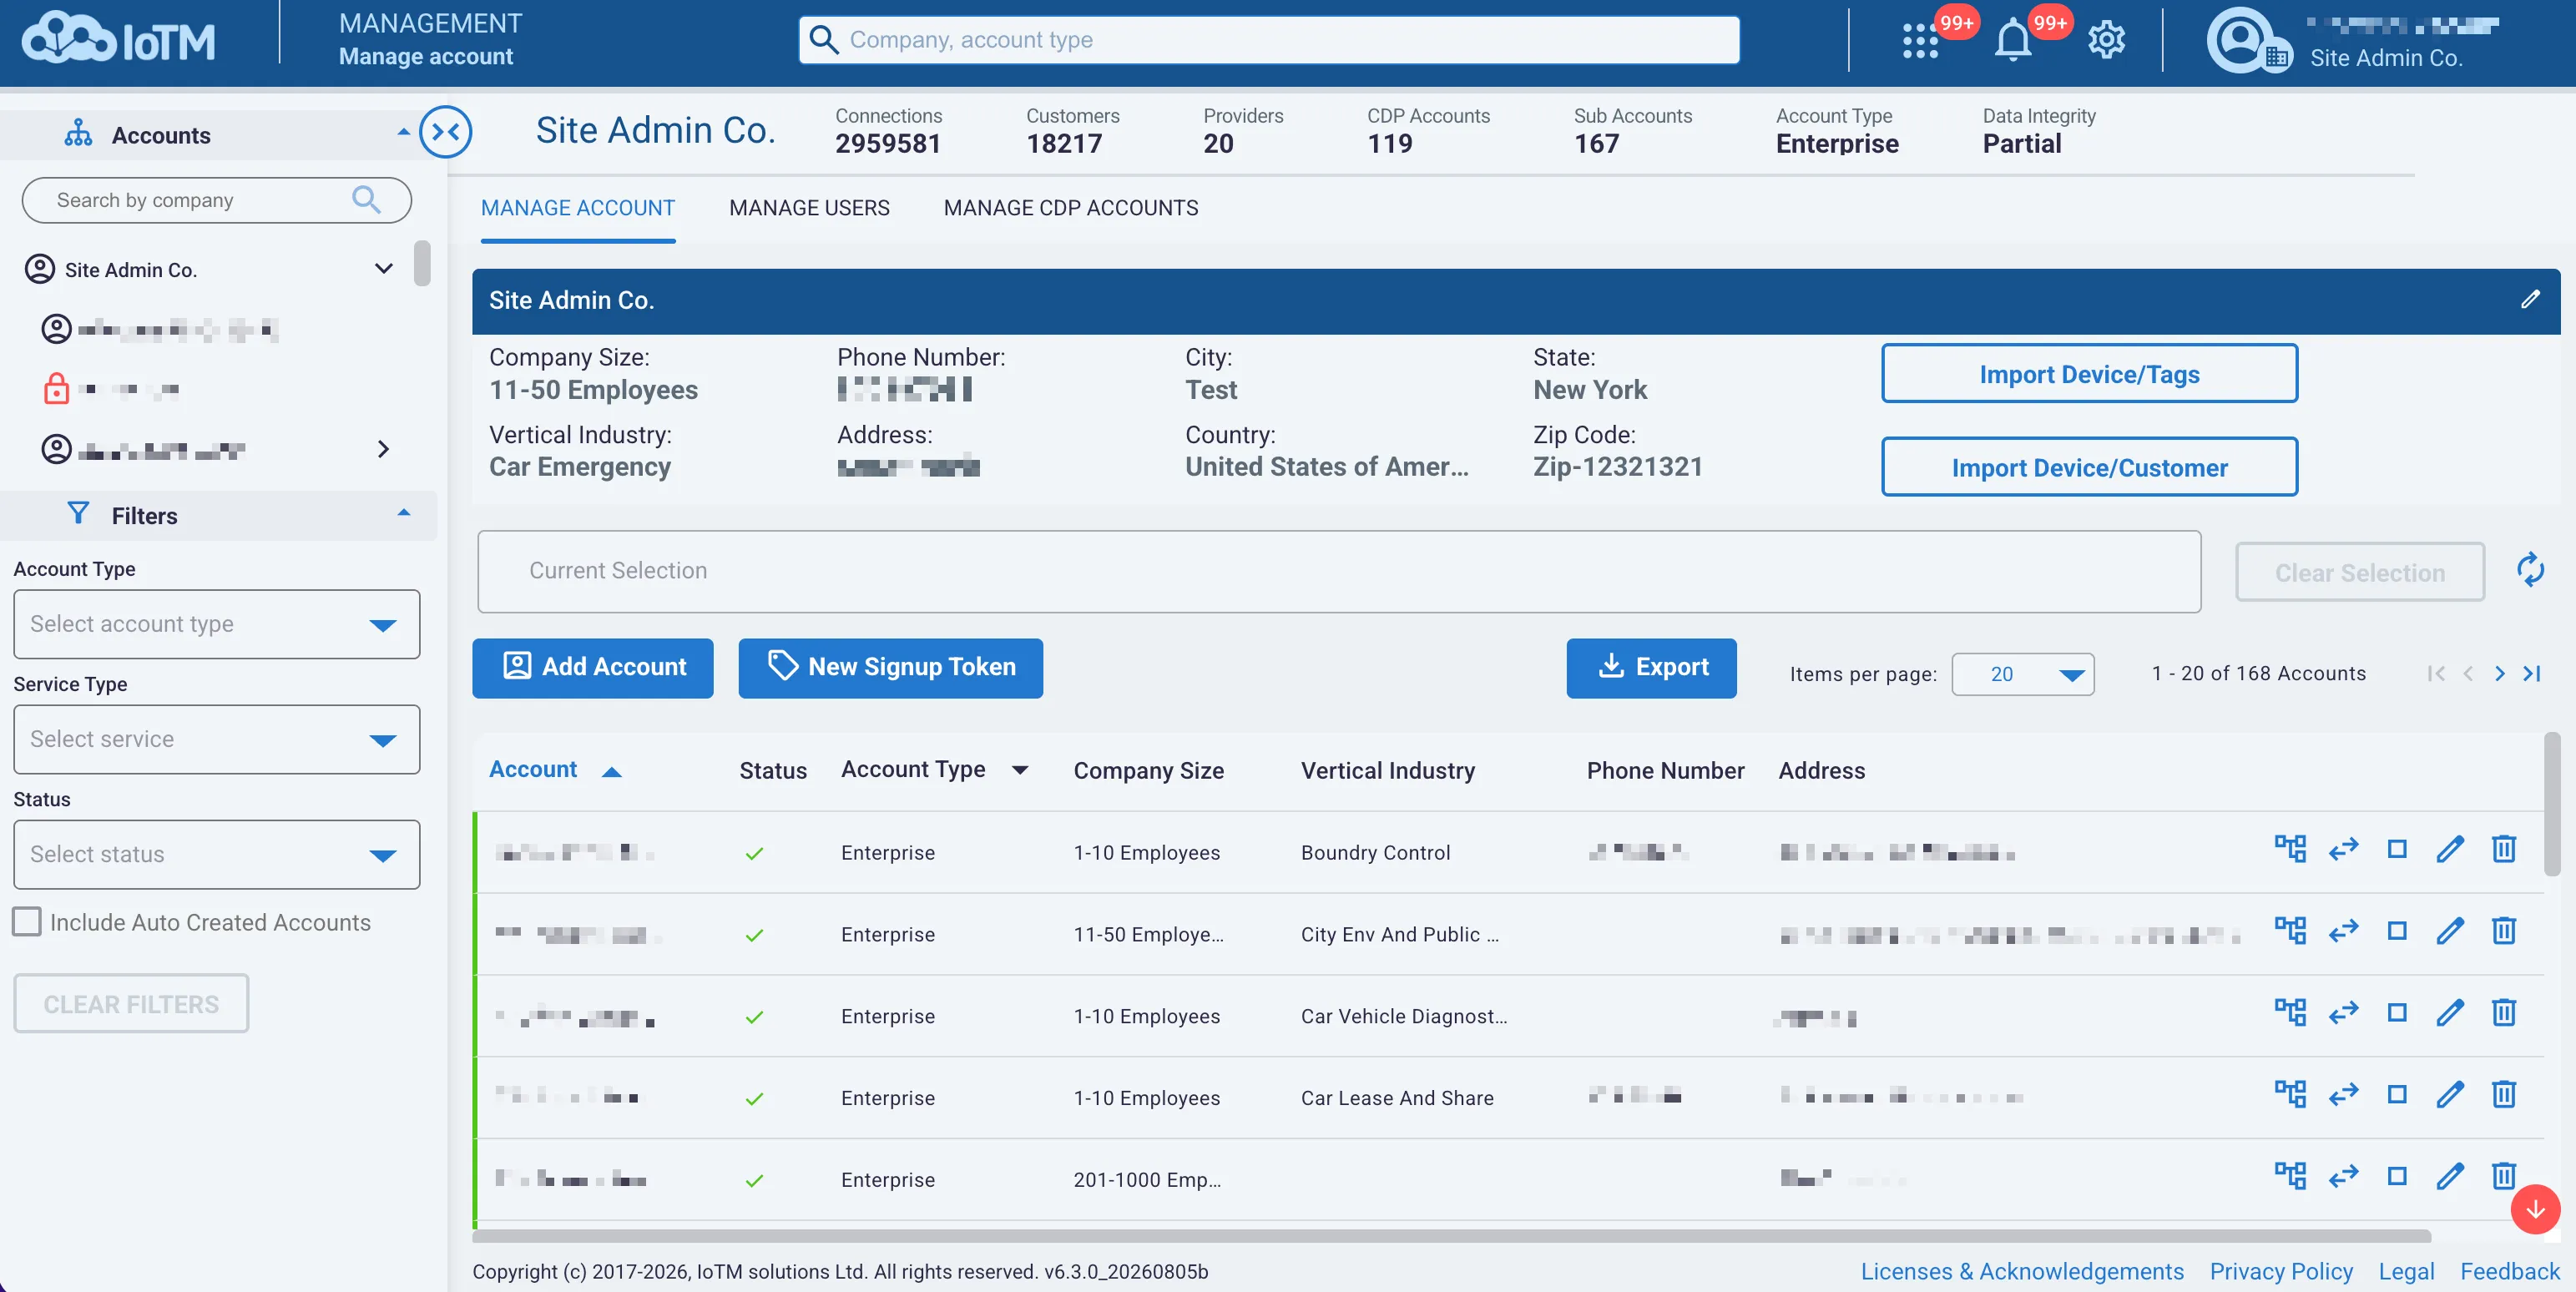
Account Management main view
Control descriptions
Control | Description |
|---|---|
Sub-account Tree and Tree Search | Shows a tree view of the sub-accounts and a "search as you type" line above the tree. Once a sub-account is selected from the tree, then it is filtered in, other accounts are filtered out, and edit actions are performed on the selected account. |
Sub-account Filter Pane | Offers common filters when searching for sub-accounts. |
Create sub-account | Opens the sub-account creation dialog. Out of the scope of this document. It is applicable mainly to IoTM re-sellers and Connectivity Service Providers (CSP). To learn about this functionality, please refer to IoTM First Level Support Guide - Resellers in the References Section. |
Generate signup token | Opens the self signup token generation dialog. Out of scope for this document. It is applicable mainly to IoTM re-sellers and Connectivity Service Providers (CSP). To learn about this functionality, please refer to IoTM First Level Support Guide - Resellers in the References Section. |
Account omni-search | Allows searching sub-accounts in the grid below it by company name or account API identifier (account username) (used to identify the account in API calls). You can use a partial search term as well. |
Import Buttons | Enable to import end customer device associations and free SIM subscriptions (connections) tagging in bulk as CSV files. |
Export data button | Downloads the details of the current accounts selection in Microsoft Excel © or CSV format. |
Edit sub-account | Edits sub-account details, security settings (2FA) and additional services access. |
Delete sub-account | Permanently deletes a sub-account (irreversible action). |
Suspend sub- account access | Suspends users' access to a sub-account and suspends all the service contracts associated with the sub-account without actually deleting it or its associated CDP accounts. This is reversible by the IoTM pod or the parent account administrator. |
Manage Account Details | Enables to manage the details and parameters of the account the user is logged into, or the account selected in the left-hand tree. |
Domain Switcher | Offers navigation between sub-accounts that are accessible to the parent account, as well as logout options and a shortcut to account management. Switching into another account will be very similar to logging into that account directly. It is always possible to go back to the home parent account by clicking the button with the "HOME" label on it to the left of the LOGOUT button. |
6.1. Navigating Accounts and Logging out
To navigate between accounts, including shortcutting to the Manage Accounts section, or to log out from any location on the platform, the user can click on the Domain Switcher round button located at the top right-hand side of the application bar. This allows one to easily switch between accounts without leaving the module that they are using - e.g., without exiting Connectivity Management or Analytics, etc. Switching to another account will automatically update the relevant data displayed in the respective section of the platform to the data relevant and visible to the account being switched into. It is very similar to directly logging into that target sub-account.
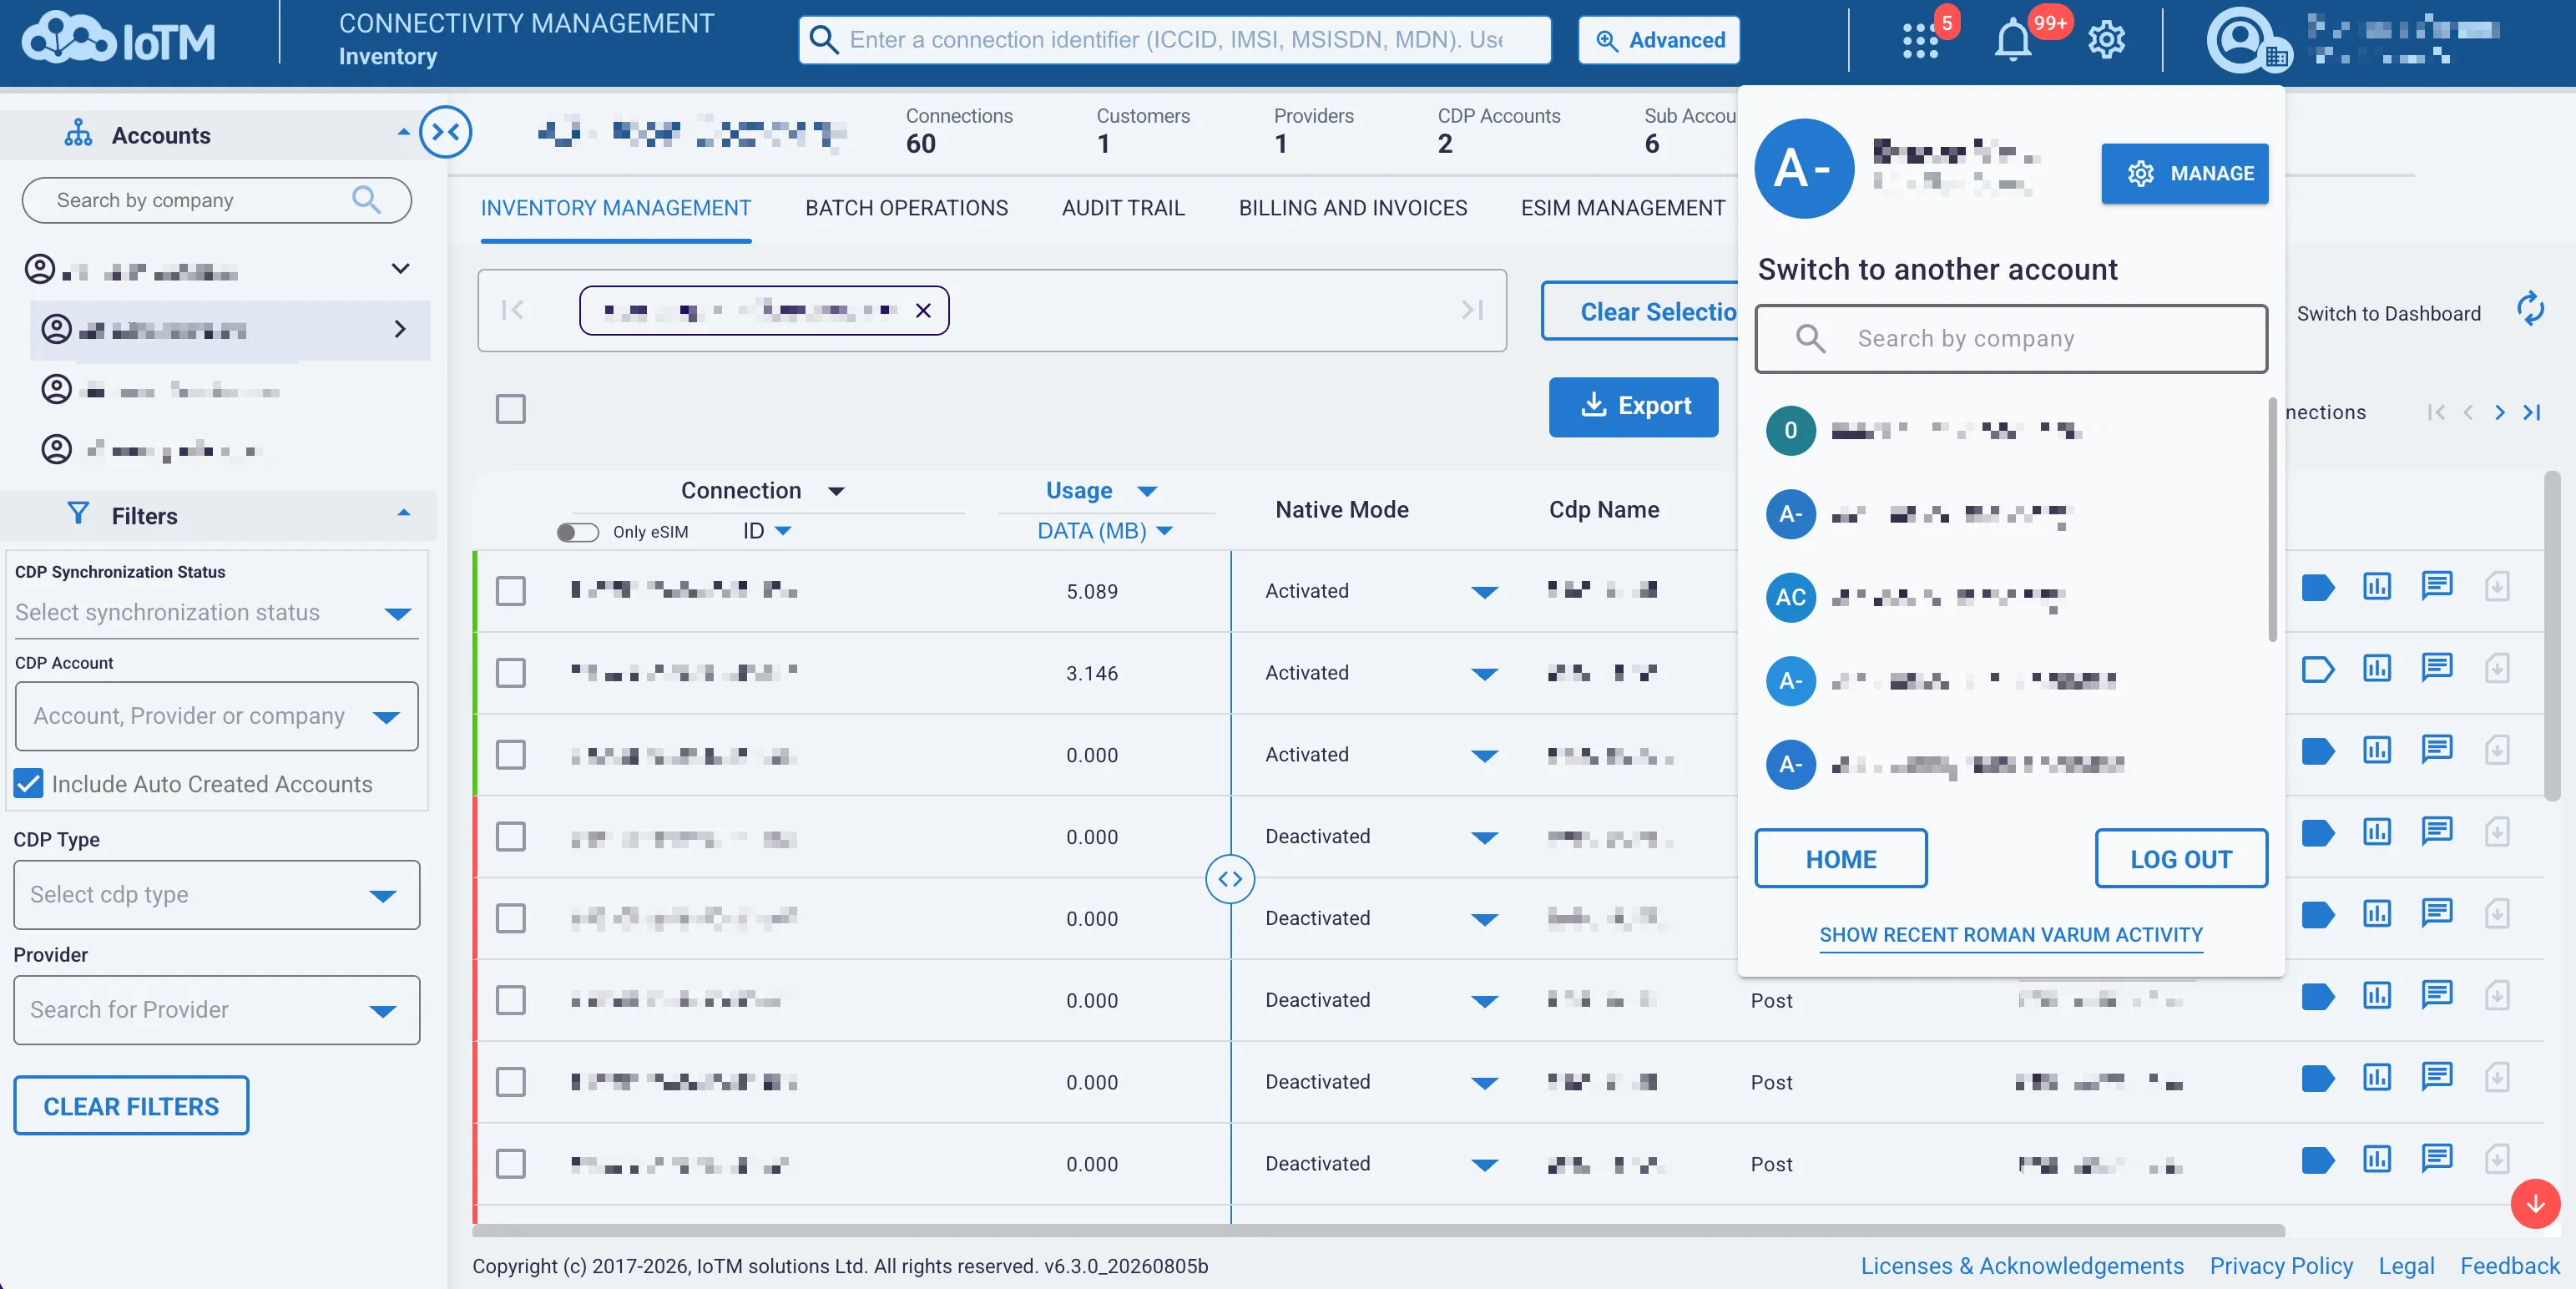
Account switching and account management controls
Control descriptions
Control | Description |
|---|---|
Manage | Shortcuts to the Manage Accounts section from anywhere on the platform. |
Search accounts | Shows a list of all the sub-accounts that the user can see and, if authorized, and also switch into. This is displayed with a "search as you type" line above the list. The user can click on an account to switch into it, and all the respective data in the portal will update automatically. It's important to note that different accounts may have access to different tools and applications within the platform. As a result, switching accounts could redirect you to the 'Launchpad' starting page - for instance, if the user switches to an account that isn't subscribed to Analytics while being on the Analytics page. In all cases, the currently selected account name will be displayed next to the avatar, below the username after switching into it. |
Home | This button will become enabled when the user finds themselves inside a sub-account. Clicking on 'Home' will switch the user back into the parent account. Switching is done on the existing session without the need to logout and log back in again. |
Log out (all devices) | This will log the user out of all existing sessions on all devices, except the current session. |
Log out | Clicking this will immediately log the user out of the current session. |
6.2. Managing Account Details
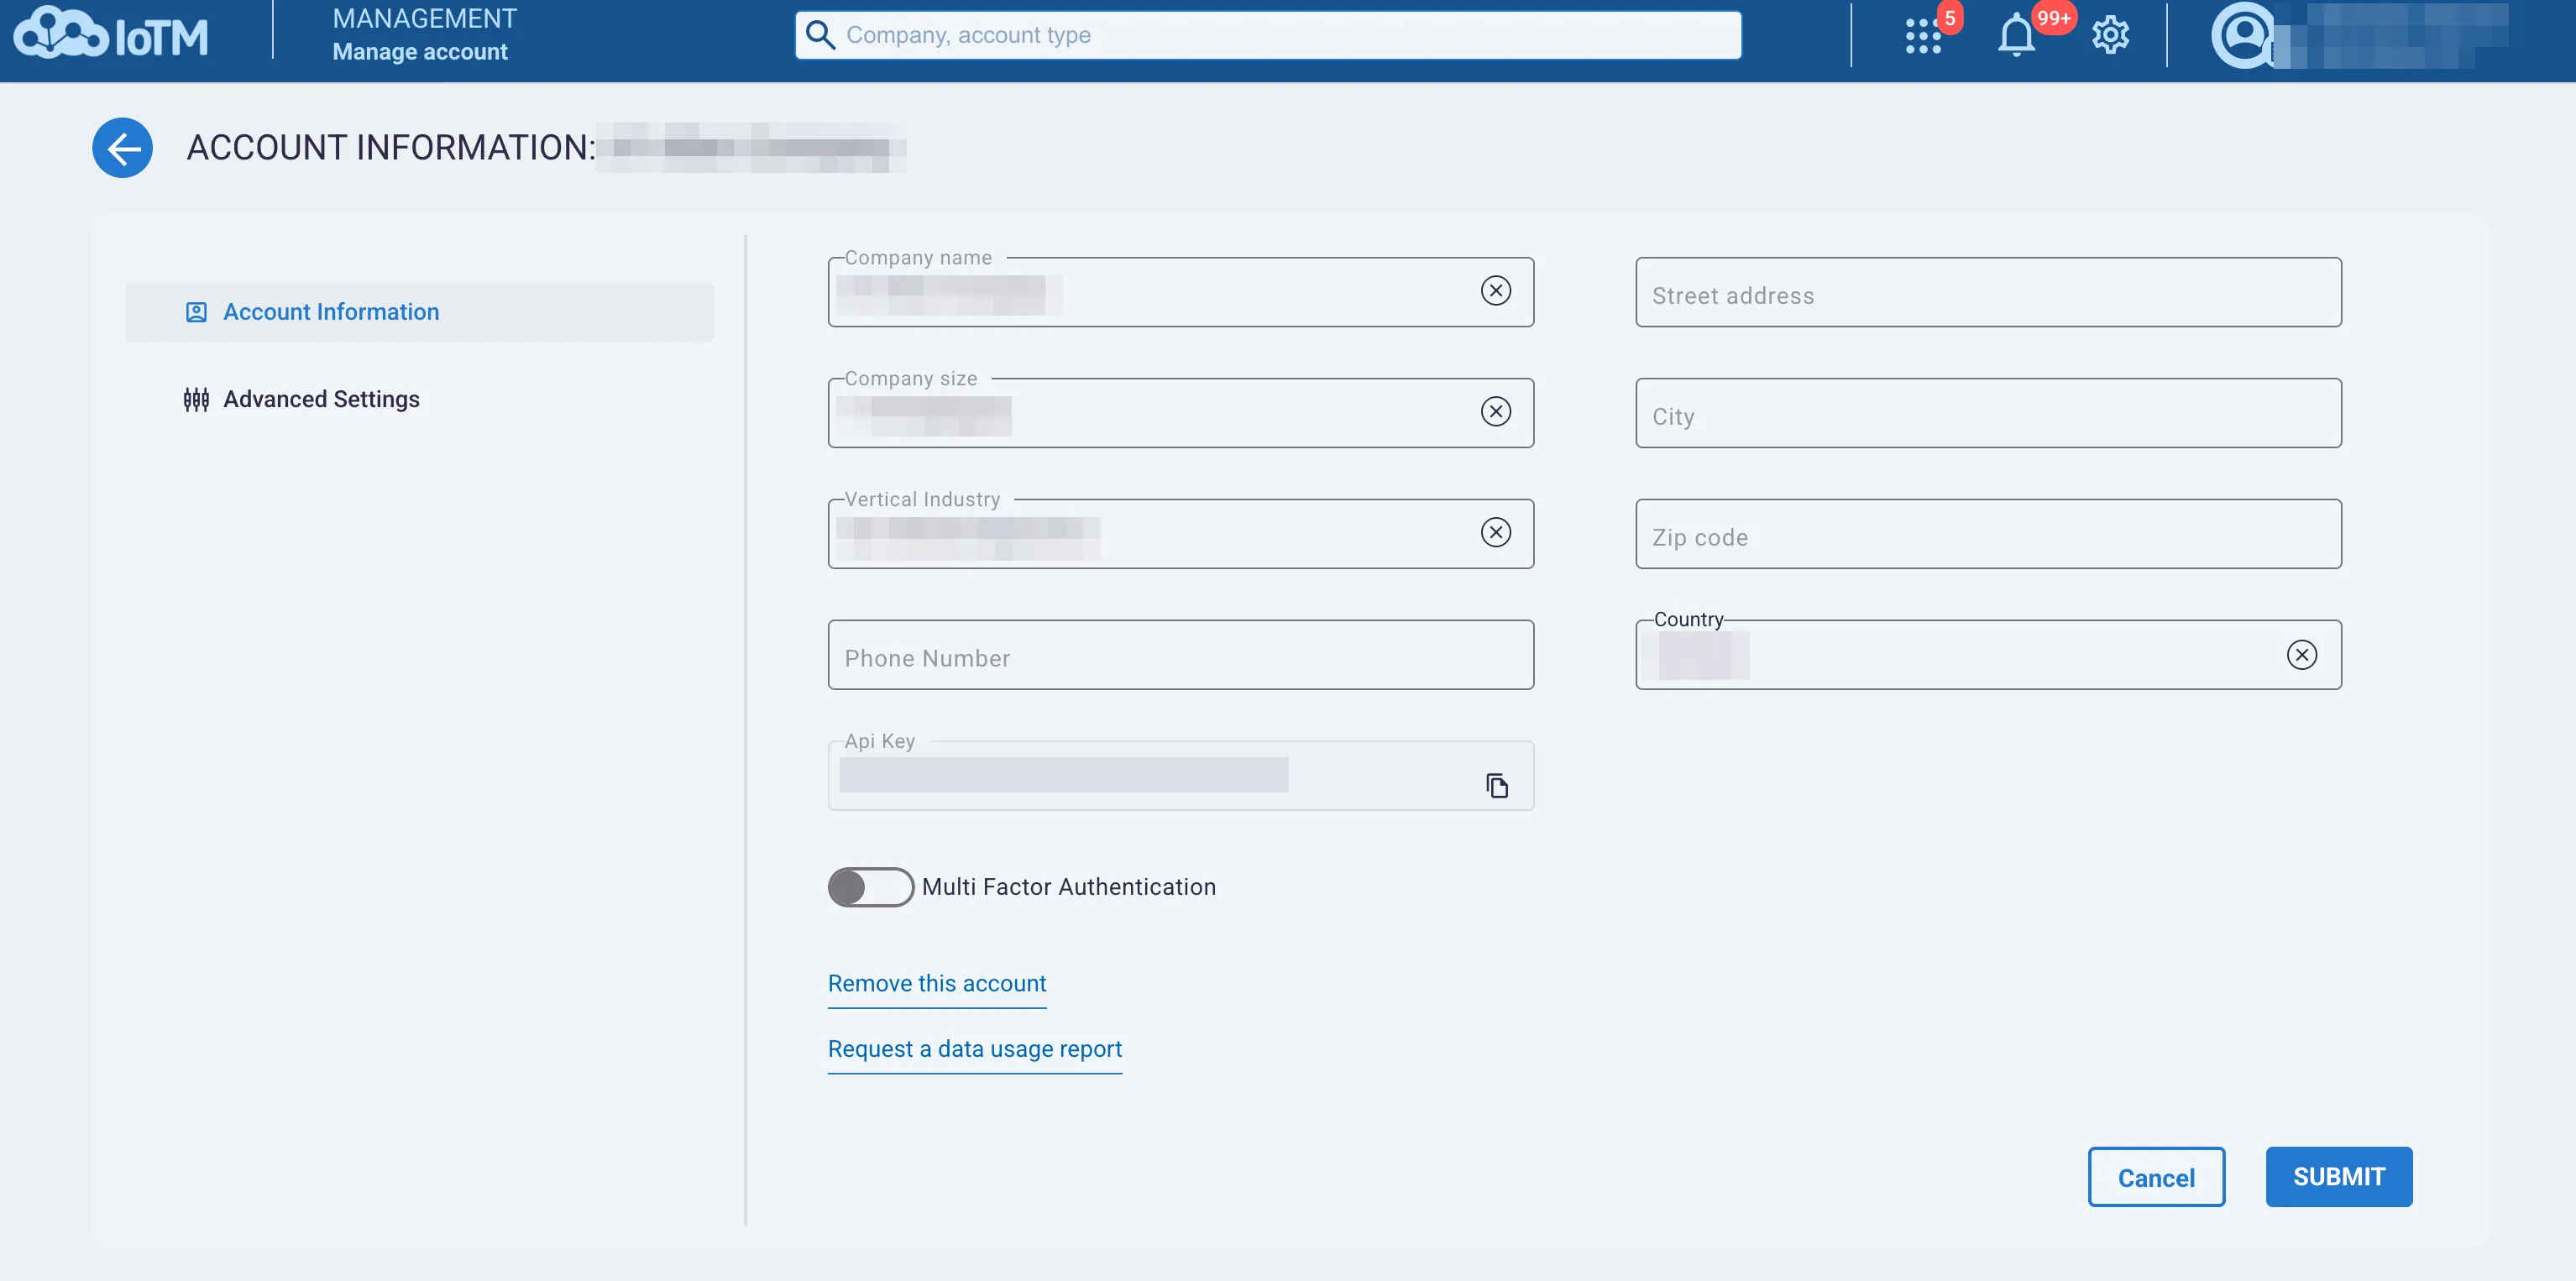
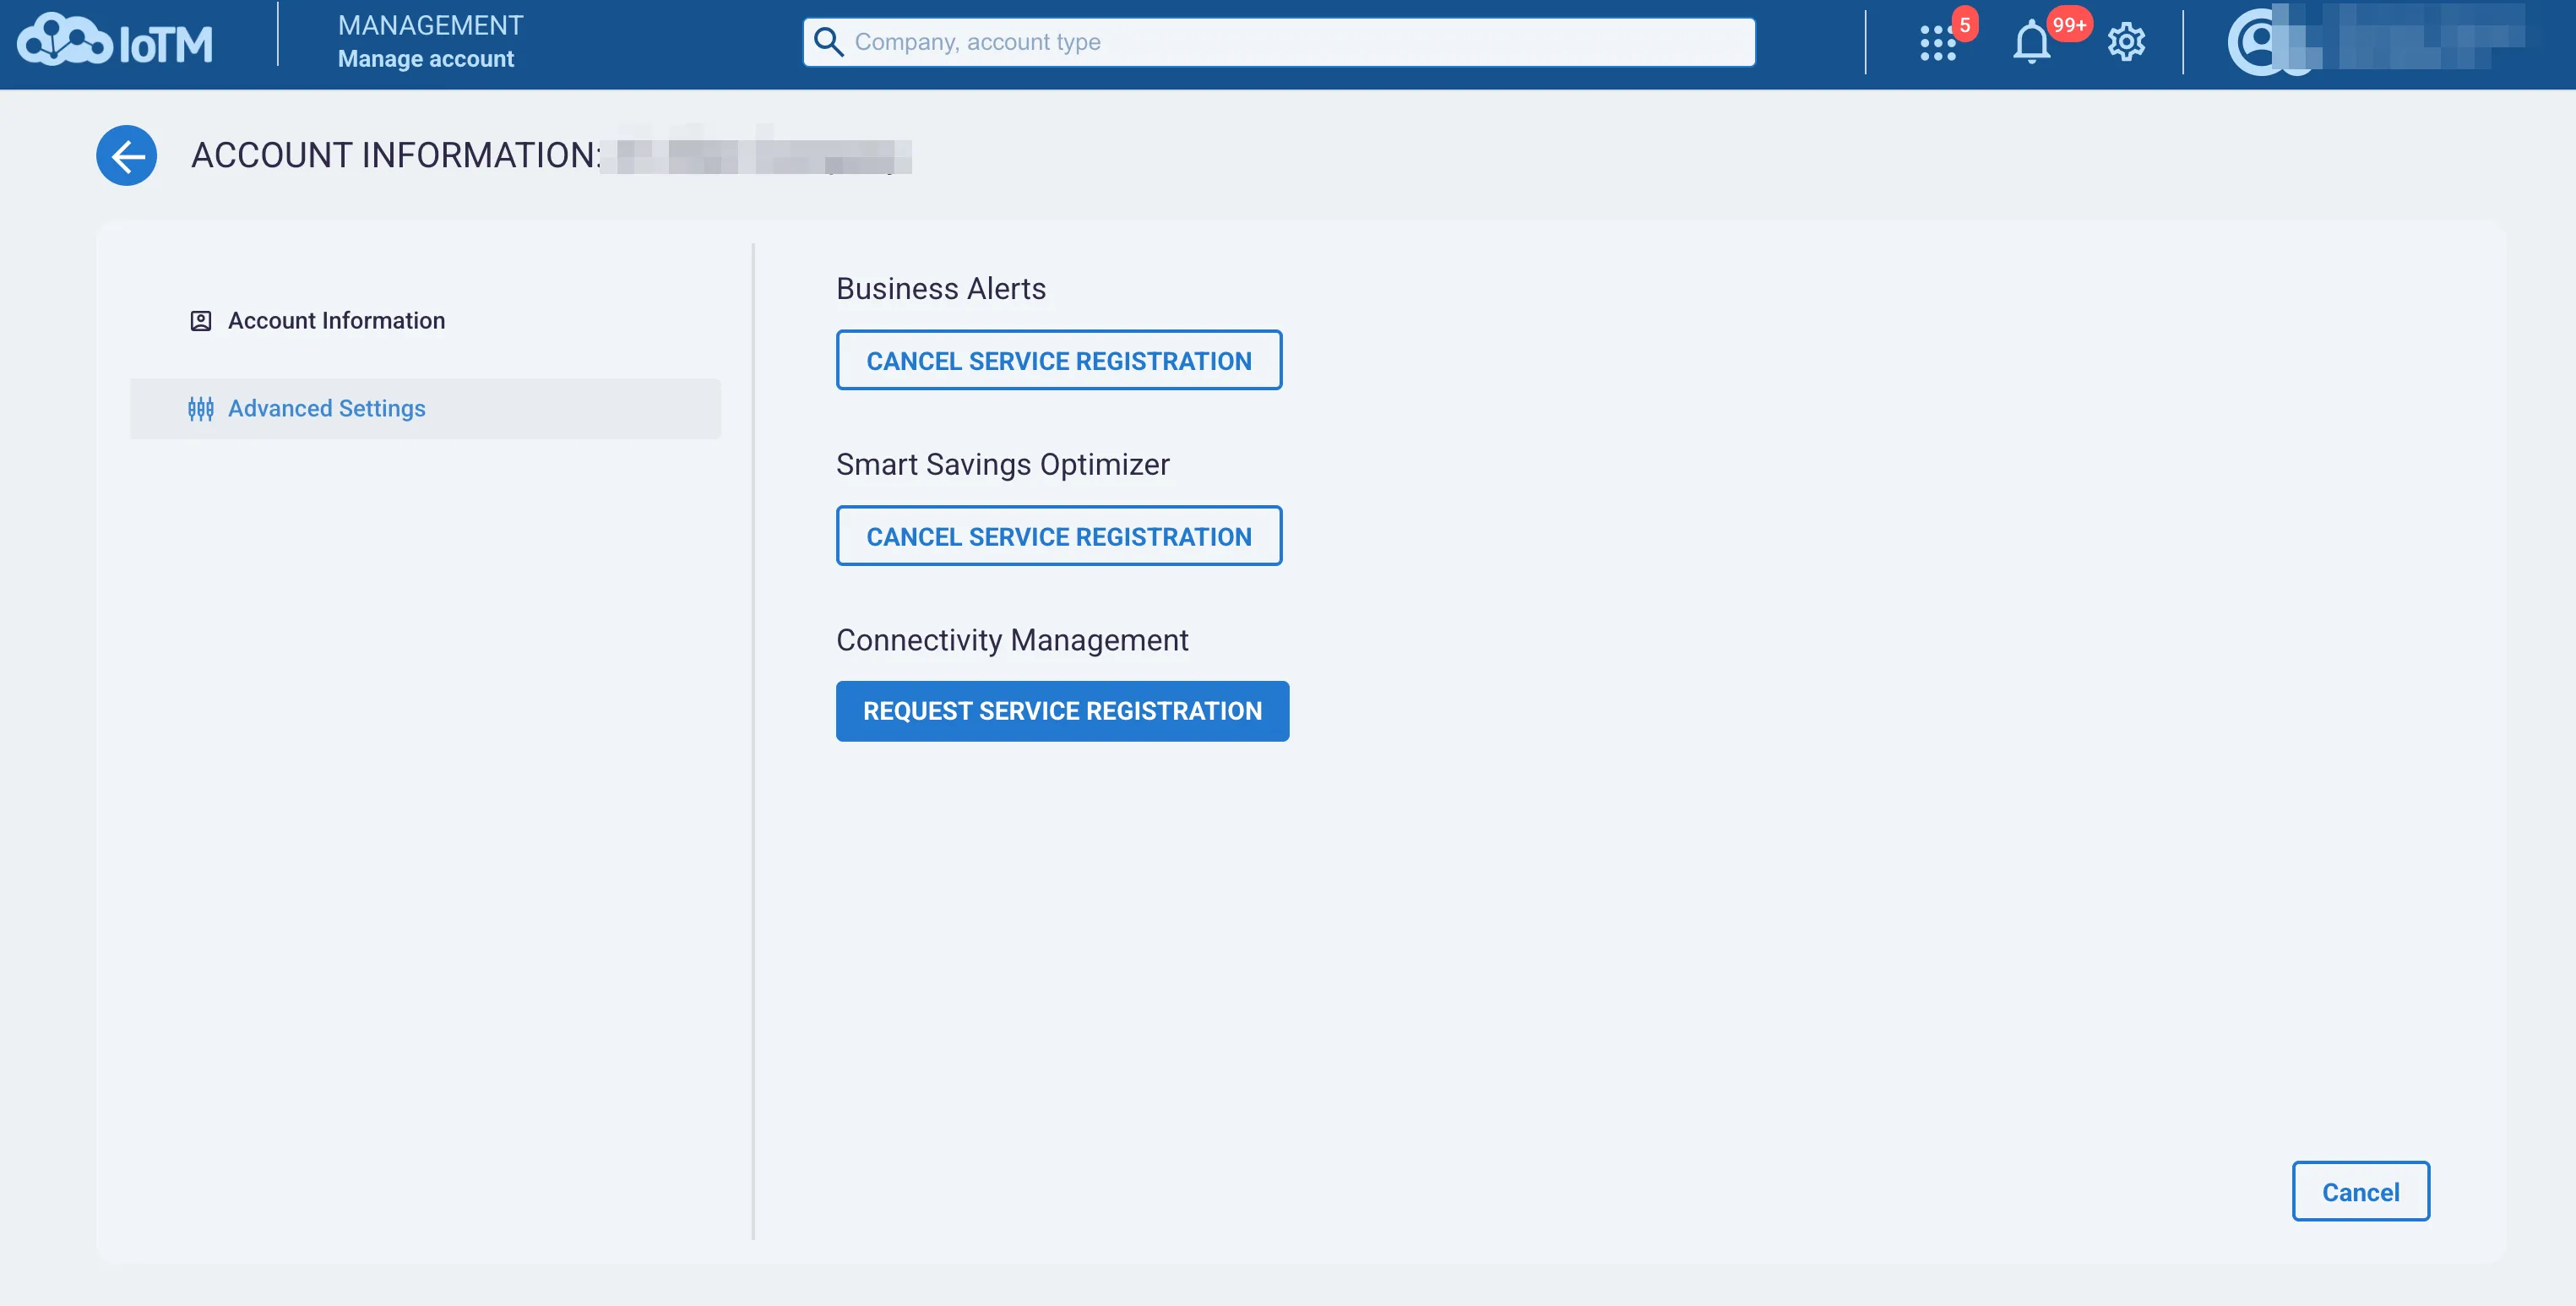
Account Information Dialog (Main account settings dialog). This dialog is only available to account administrator role users.
Control descriptions
Control | Description |
|---|---|
2FA security setting toggle | Enables and disables the 2-Factor authentication login method as described in Managing Multi-Factor Authentication & Security below. This affects 2FA at the account level. Therefore, if 2FA is enabled at the account level, it is explicitly enforced on all users in the account, and they cannot turn it off at the individual user level. If it is disabled, then each user can individually decide to activate 2FA or not. |
Details and Metadata | Details fields on the account, such as company name and other optional metadata like size and contact information. |
Delete the account | Permanently deletes the account after a confirmation process. This can only be done by an administrator role user. |
Request a GDPR data usage report | Triggers a data usage report. |
Account enrollment to other IoTM services | Buttons to enroll or request the enrollment of the account to IoTM services like business alerts and smart savings optimizer. |
API Key section | The API key generated for the account upon creation, clicking on the copy icon will copy the API key to your local computer clipboard so that you can use it in API calls. |
Cancel / Submit buttons | Buttons to either submit changes or cancel the dialog without applying any changes. |
6.3. Managing Multi-Factor Authentication & Security
2-Factor Authentication is a security method whereby login authentication is completed by information that is additional to simply entering a username and password at login. In IoTM's case, 2FA is a time limited 6-digit code. IoTM supports 2 forms of 2FA: Email and TOTP authenticator apps. In the case of email based 2FA, the code is issued after successfully authenticating the username and password, and it is valid for 10 minutes. In the case of paired TOTP authentication apps, it is re-generated every 30 seconds on an ongoing basis. Once you have the code on hand, you can either enter it in a dialog that follows the login dialog, or you can click on a call-to-action button in the email (in case of email 2FA) to complete the login process as described in the Logging In section above.
Multi-Factor Authentication can be enforced on two levels: account and user.
If MFA is active at the account level, then it is mandated for each user in the account, and it cannot be turned off at the user level. If the user does not have a paired TOTP authentication device like google authenticator or Twilio Authy etc., then their default 2FA authentication method will be by receiving an email to the address associated with their username.
If MFA is disabled at the account level, then a user can decide for themselves whether they want to activate MFA or not, and they can pair an authentication device if they choose to.
6.3.1. Enabling Account Level MFA
Navigate to the Account Management page and click on 'Edit Account':
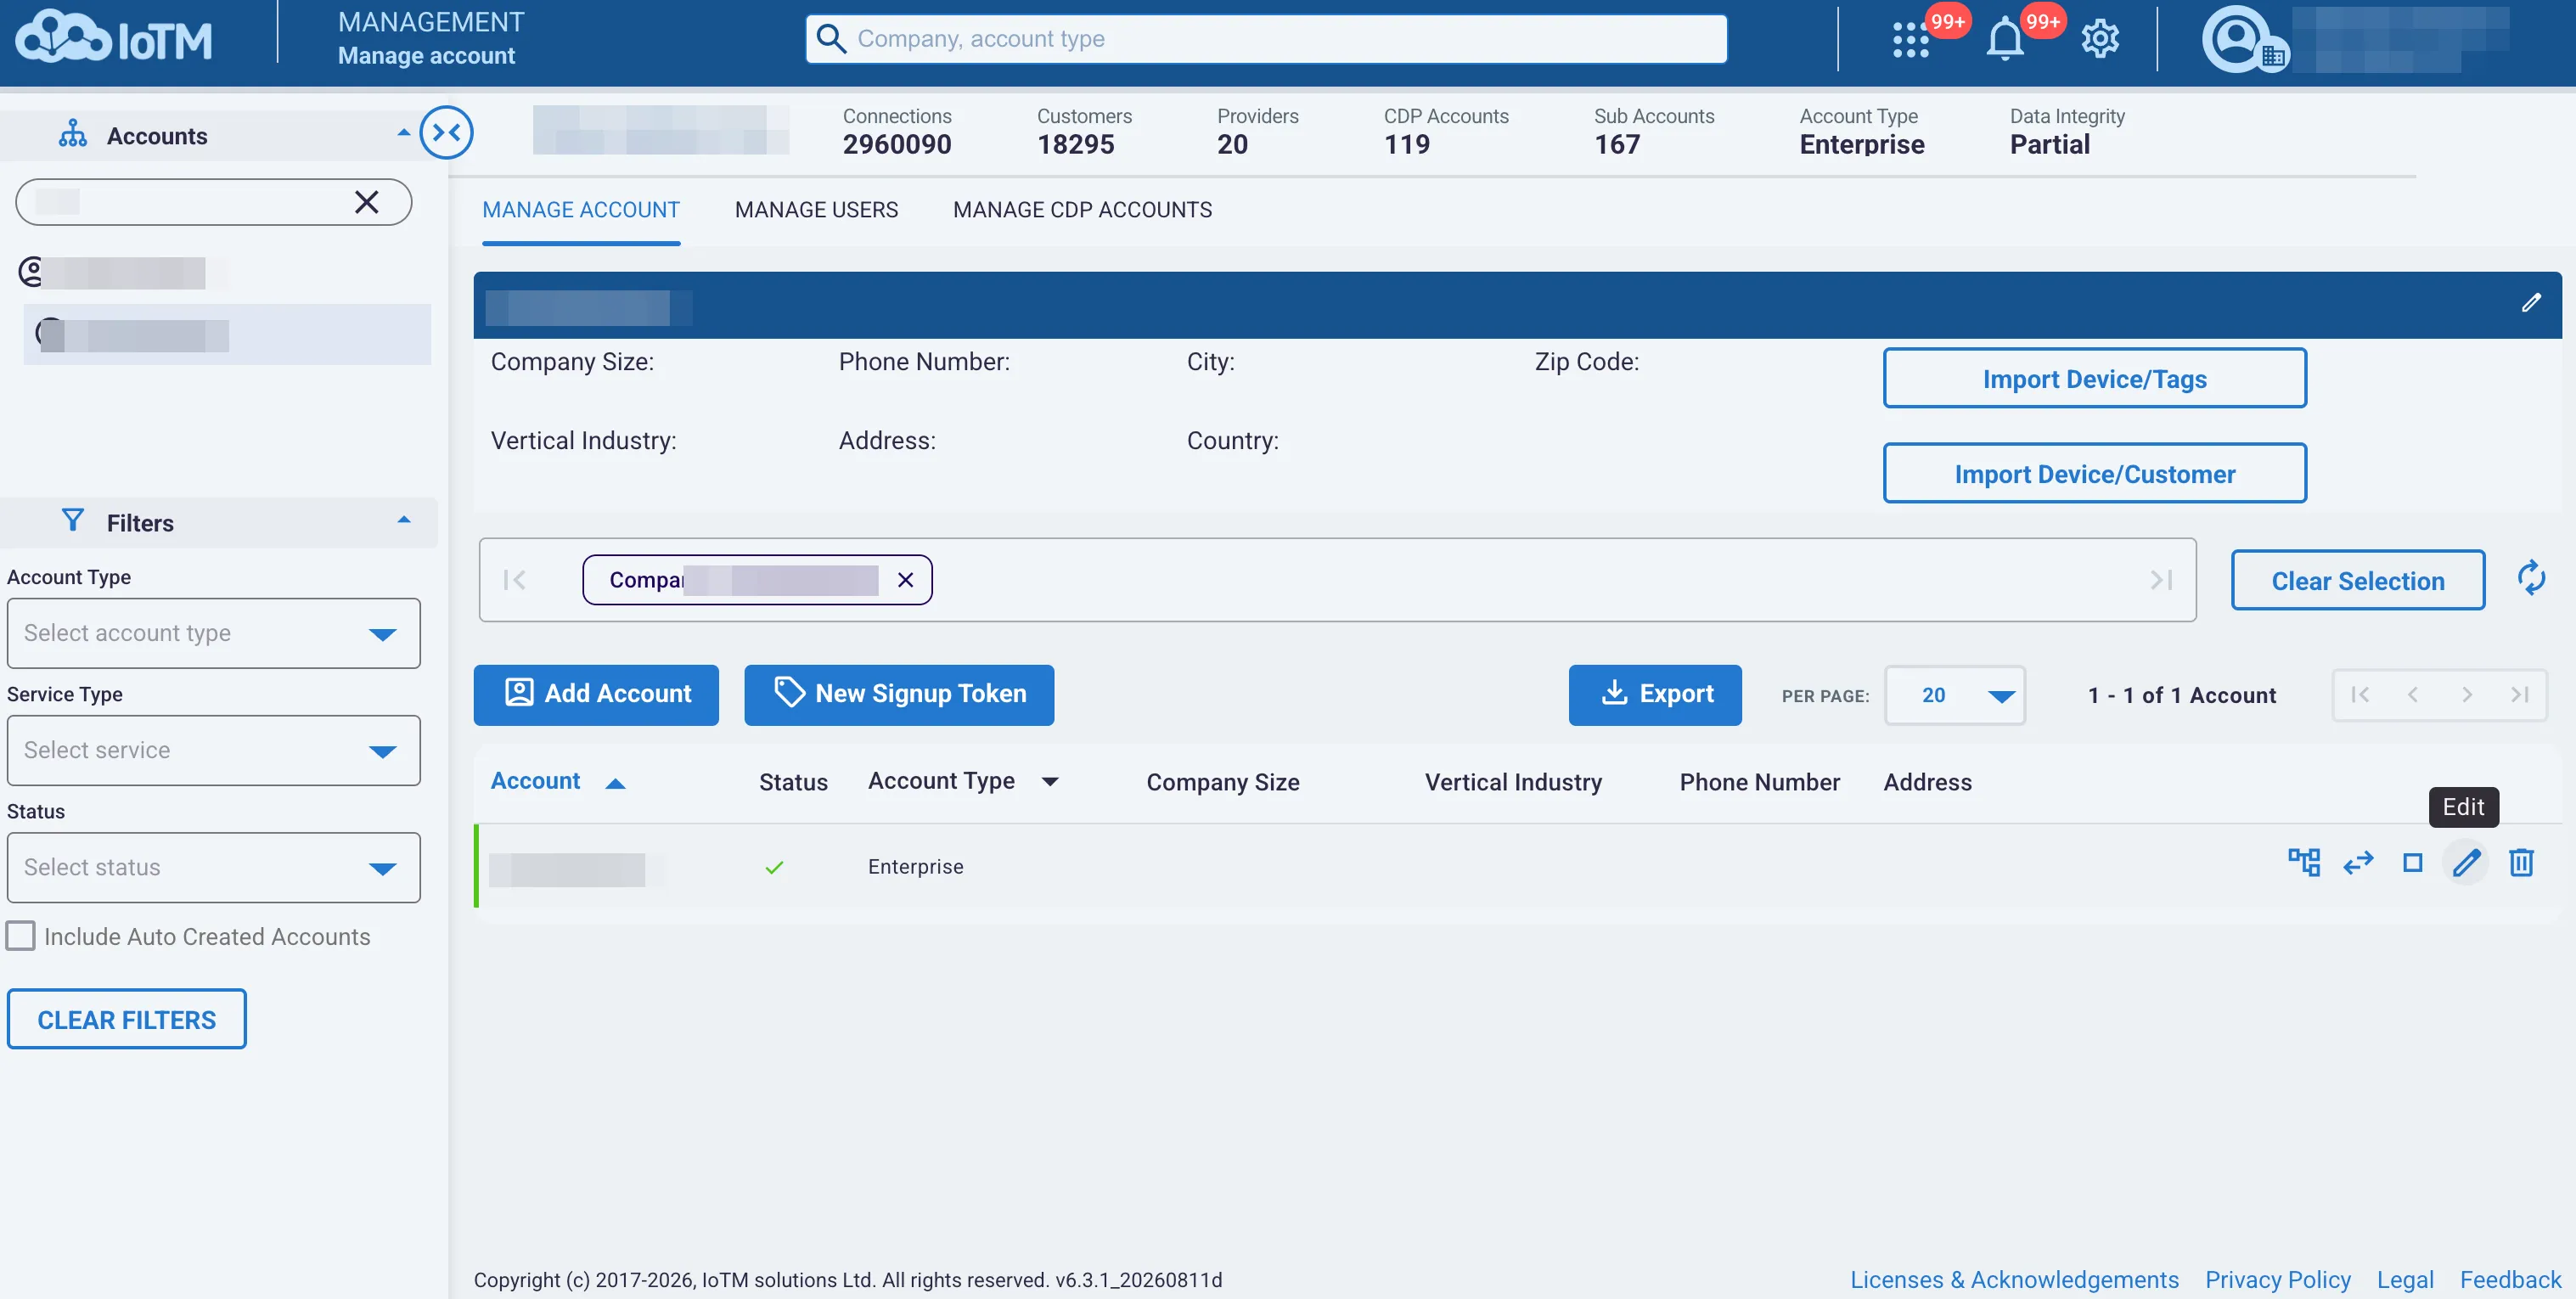
Account information dialog
To enable and force multi-factor authentication on all account users, you need to click on the grayed out toggle button, and you will see a confirmation dialog attached to the button explaining 2FA requirements and asking if you want to proceed. If you click YES, then 2FA will be enabled and enforced on all account users from now on.
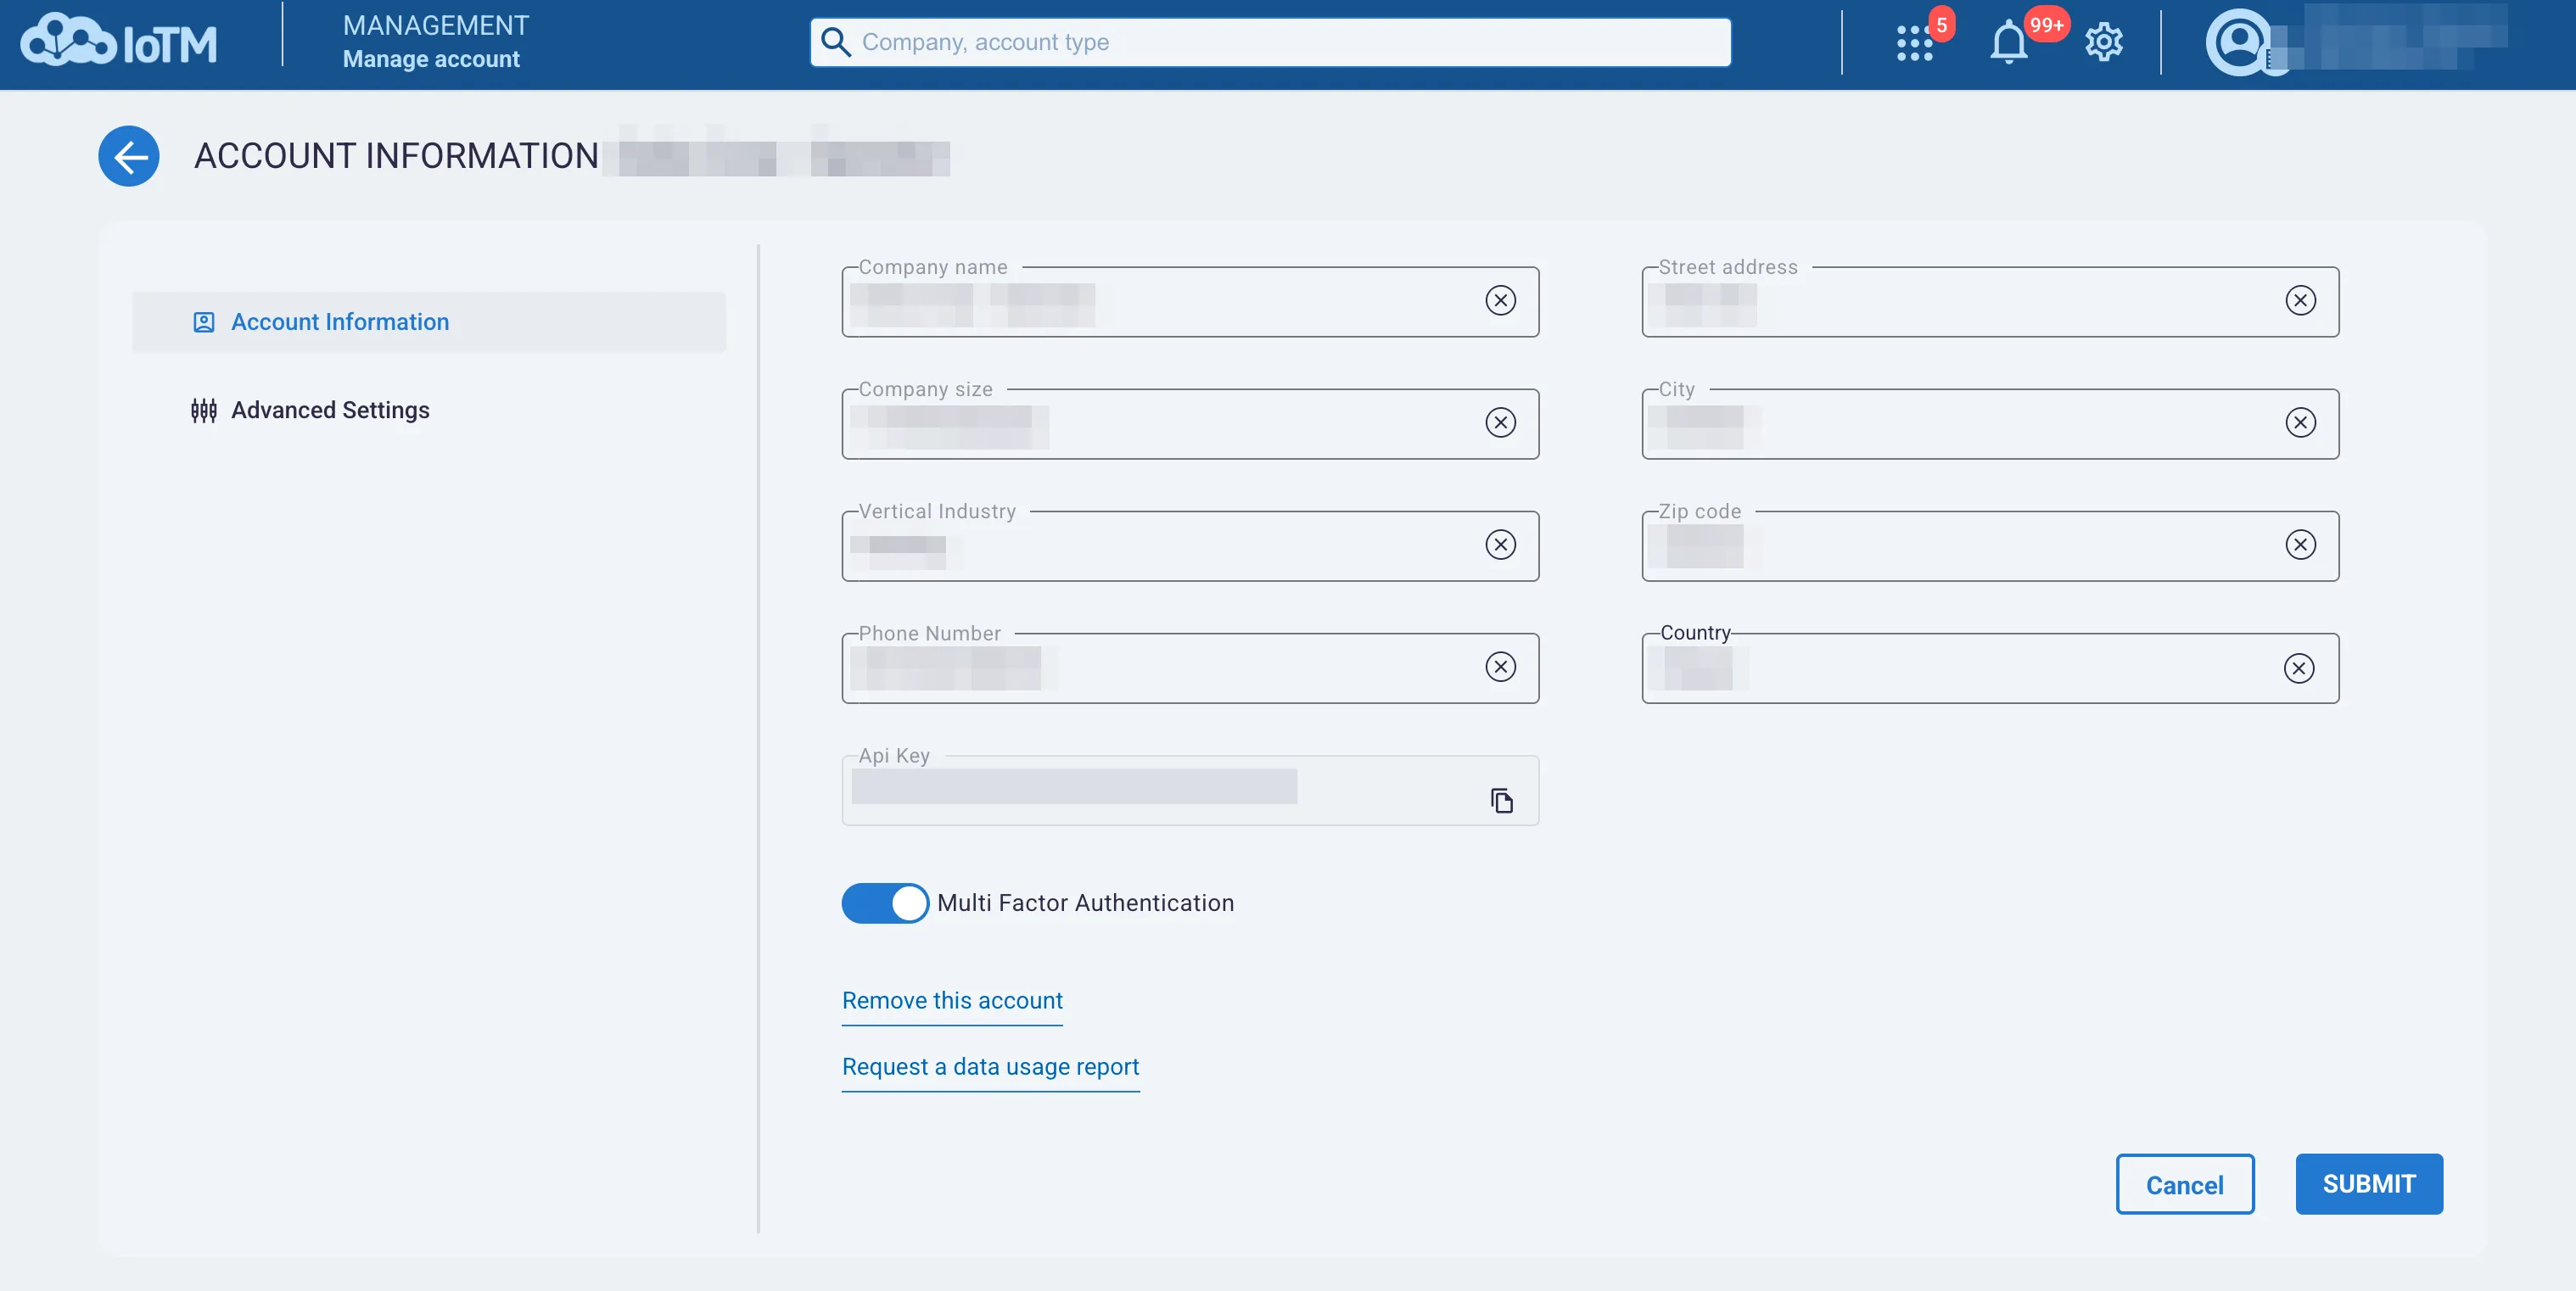
Enabling 2-Factor Authentication
Once the account level MFA is activated, the user level MFA cannot be turned off when editing the user:
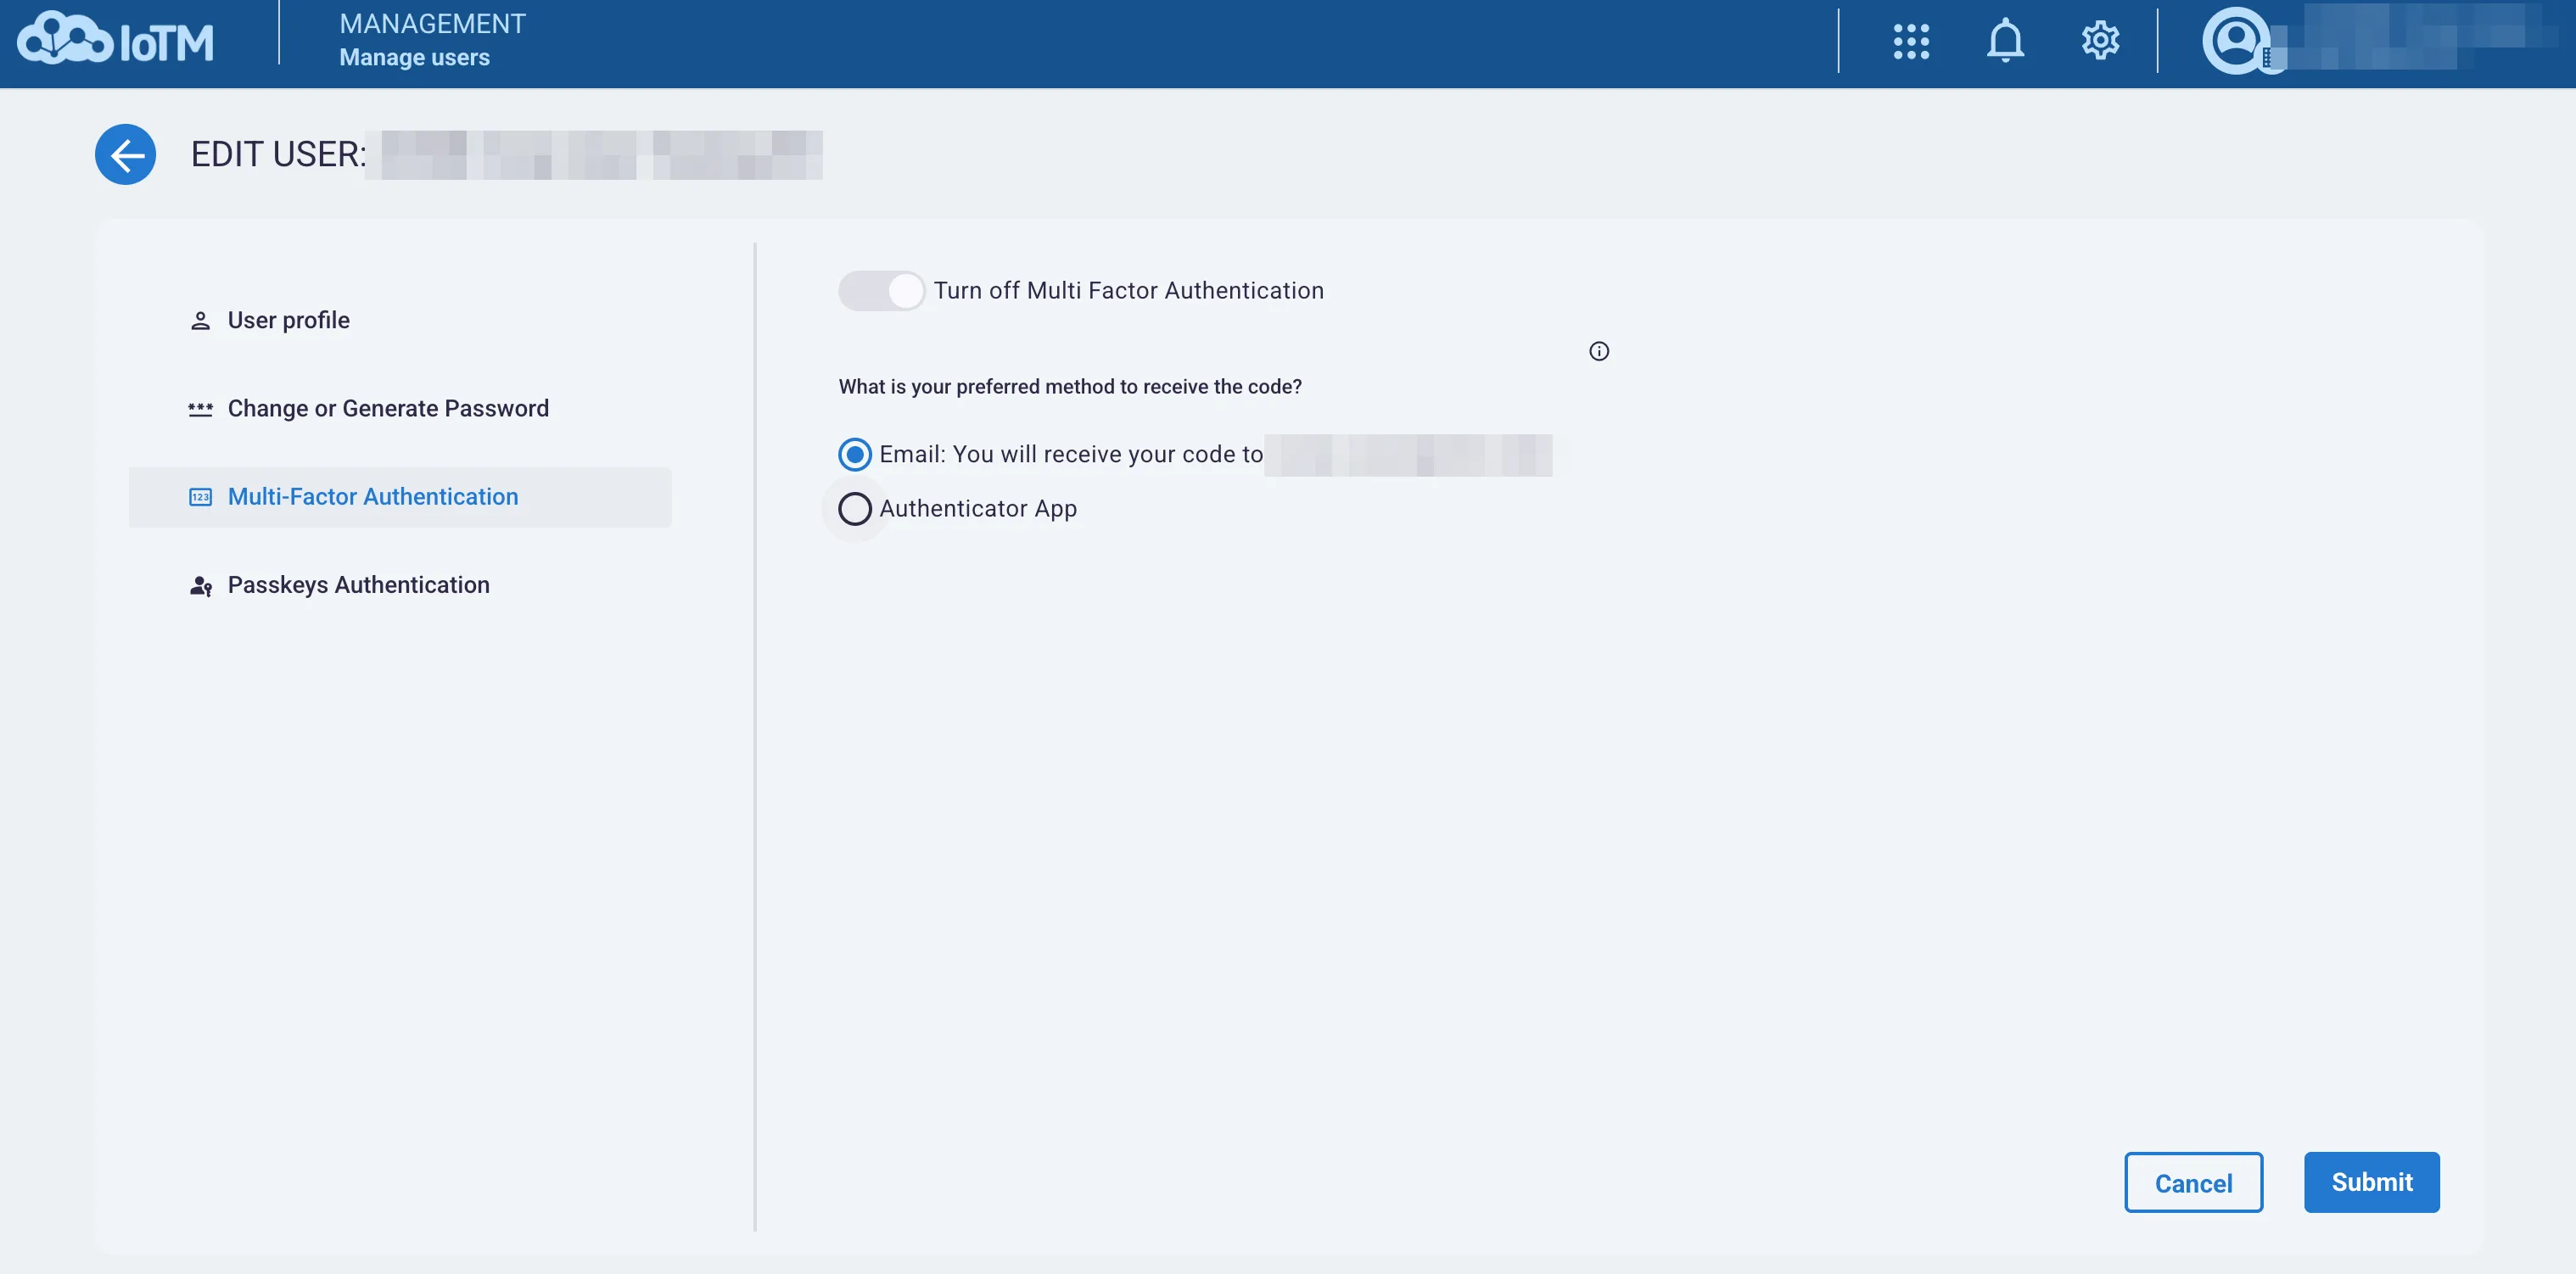
User MFA settings when account-level MFA is active
6.3.2. Disabling Account Level MFA
To disable account level multifactor authentication, you need to click on the enabled toggle button, and you will see a confirmation dialog attached to the button explaining the security disadvantages of disabling 2FA and asking if you want to proceed. If you click YES, then 2FA will be disabled from now on. When 2FA is disabled, it is no longer explicitly enforced on all account users, and each user can individually decide whether they would like to activate 2FA or not.
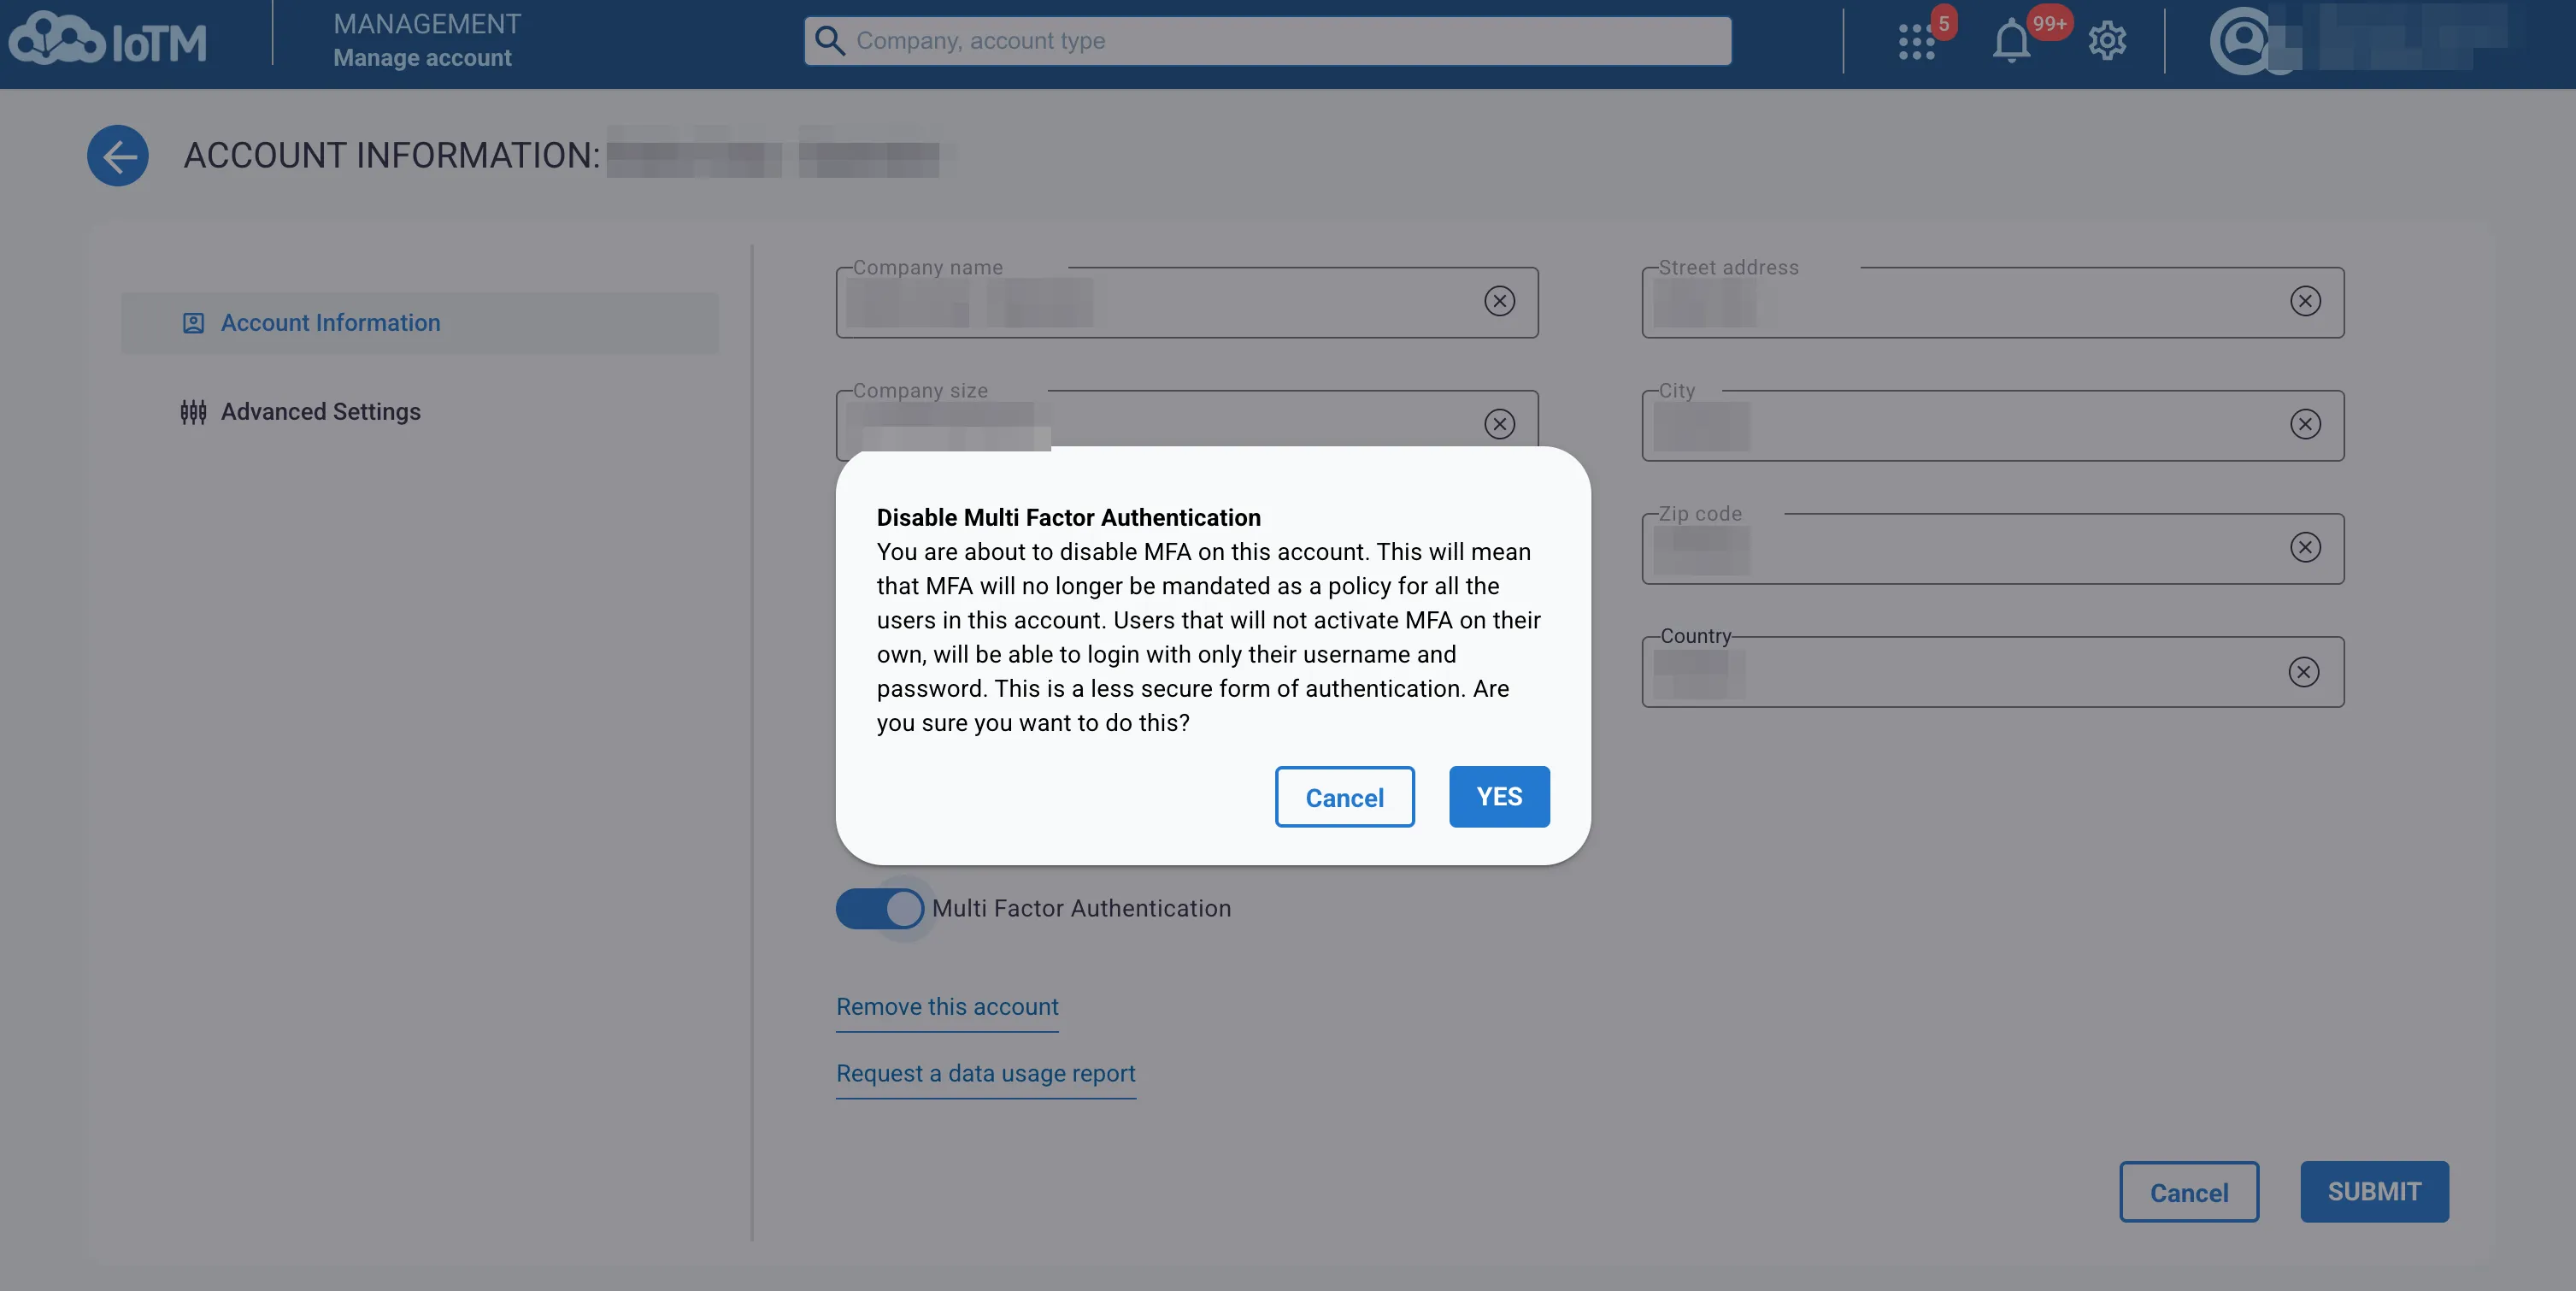
Disabling Multi-Factor Authentication
6.3.3. Enabling User Level MFA
Navigate to the User Management page and click on 'Edit User':
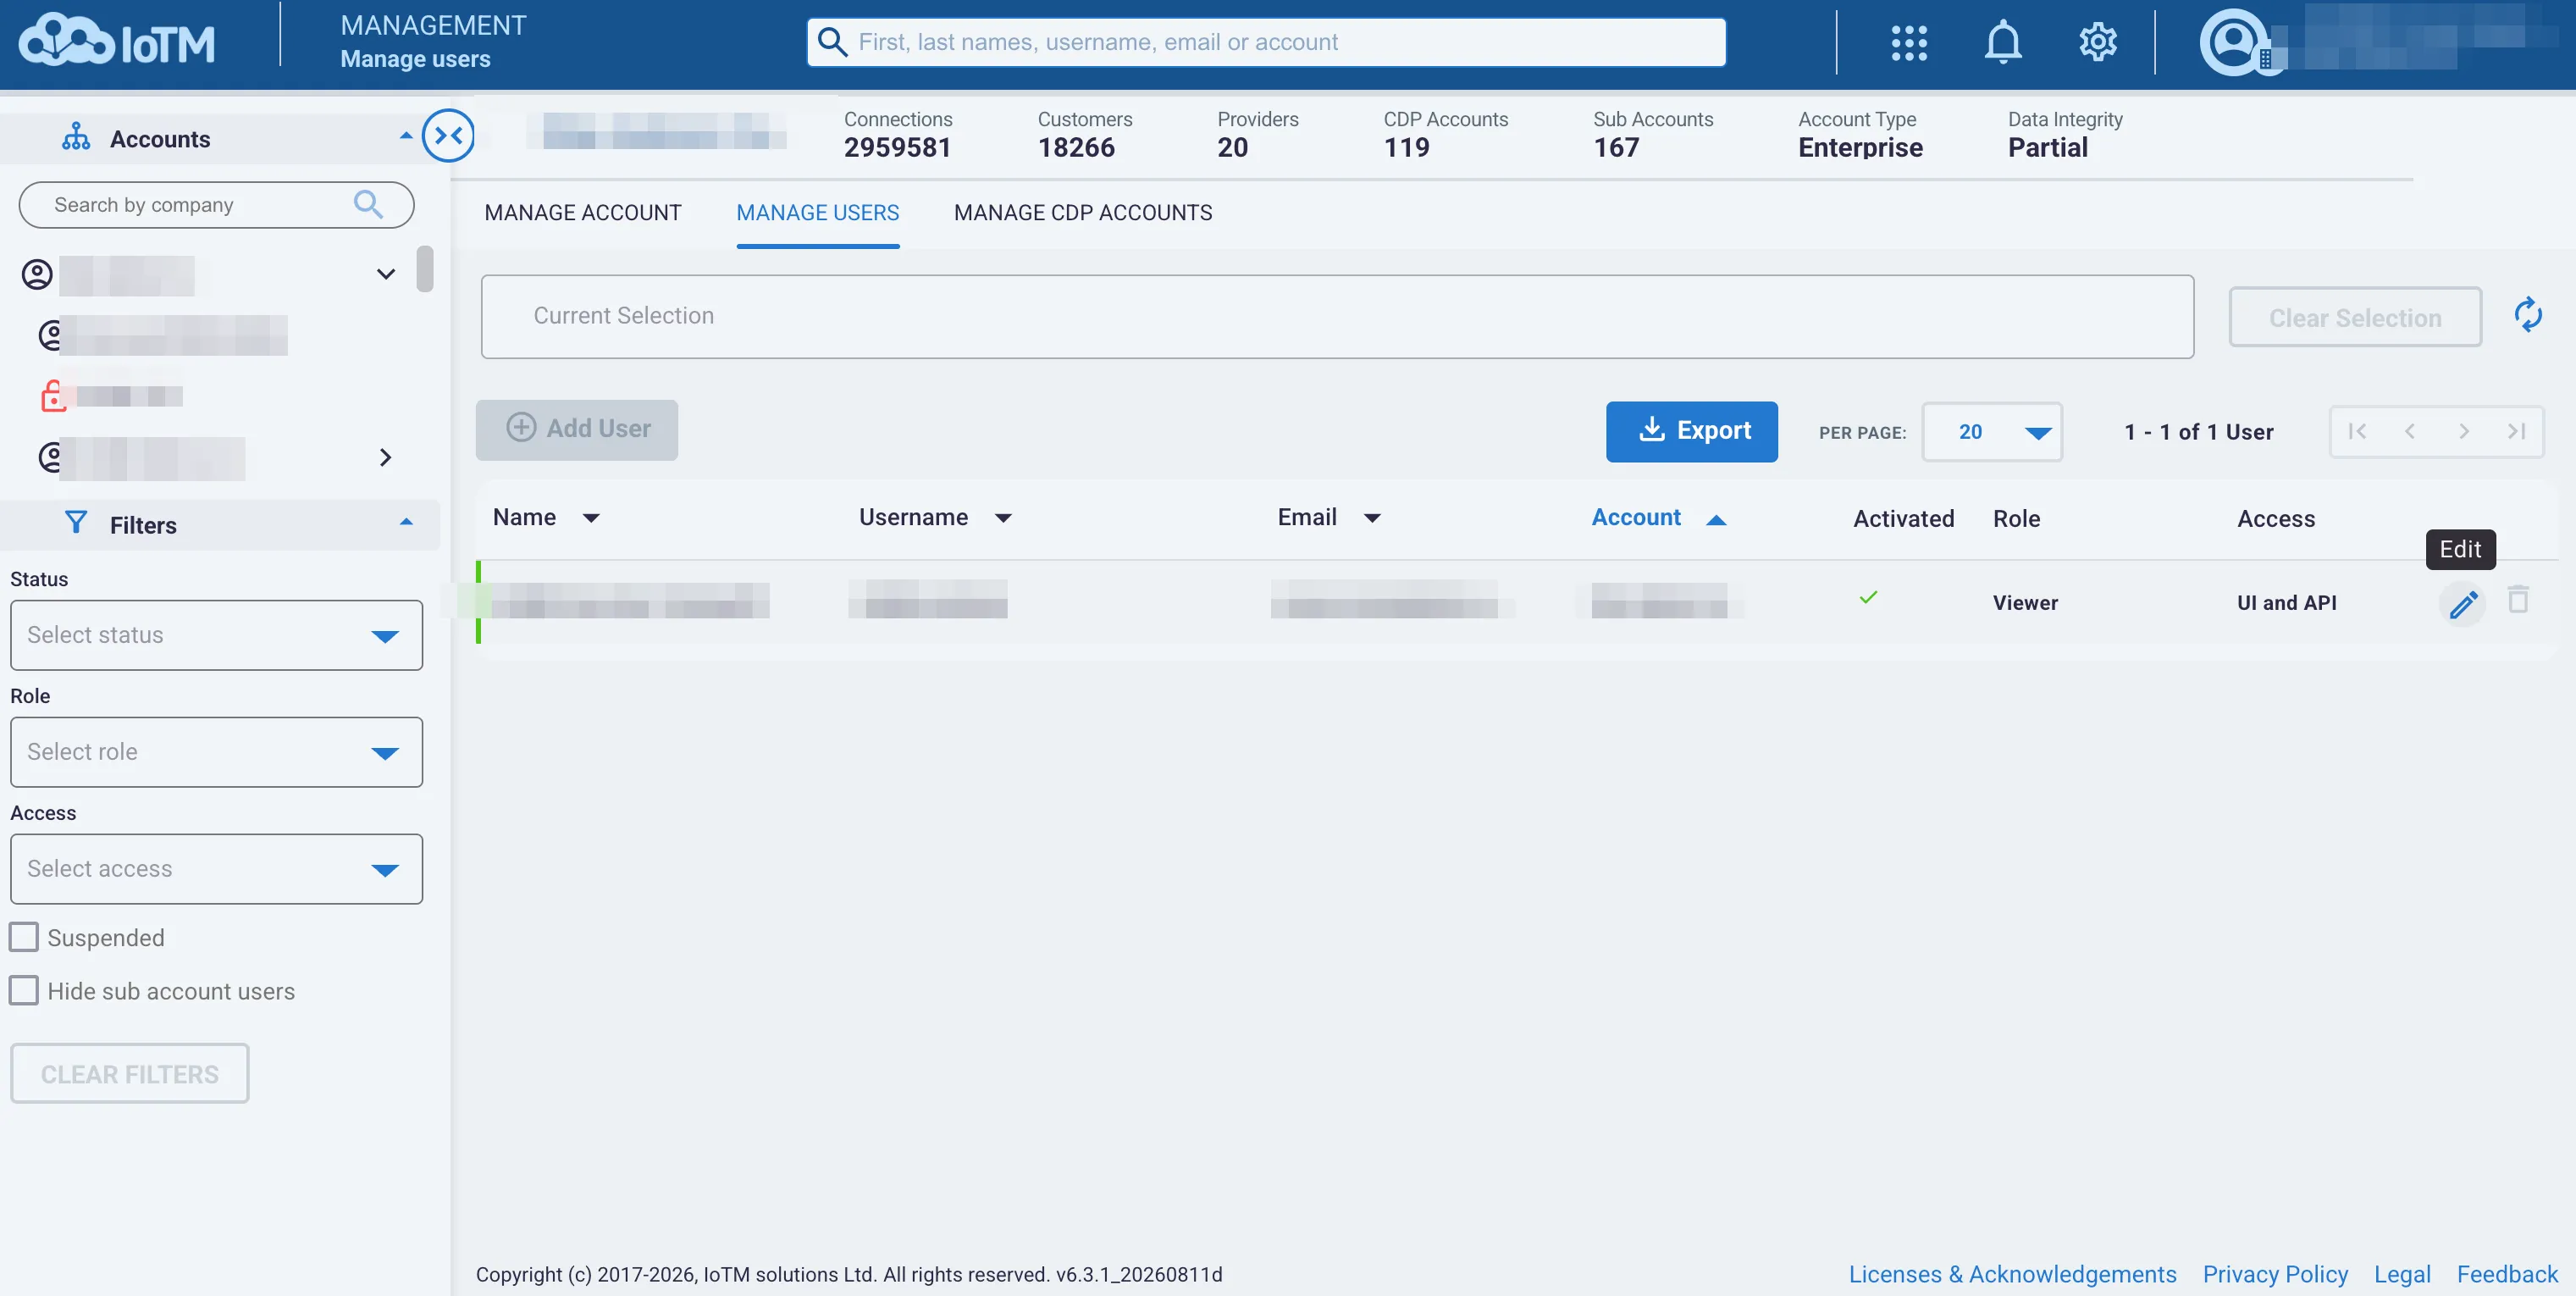
Opening a user for editing
If the account level MFA is inactive, the user will have the option to activate the user level MFA by switching the toggle. If account level MFA is active, then user level MFA will be active as well:
User-level MFA email option
Click save if email authentication - which is the default, - is the preferred option, or switch to set up Authenticator App:
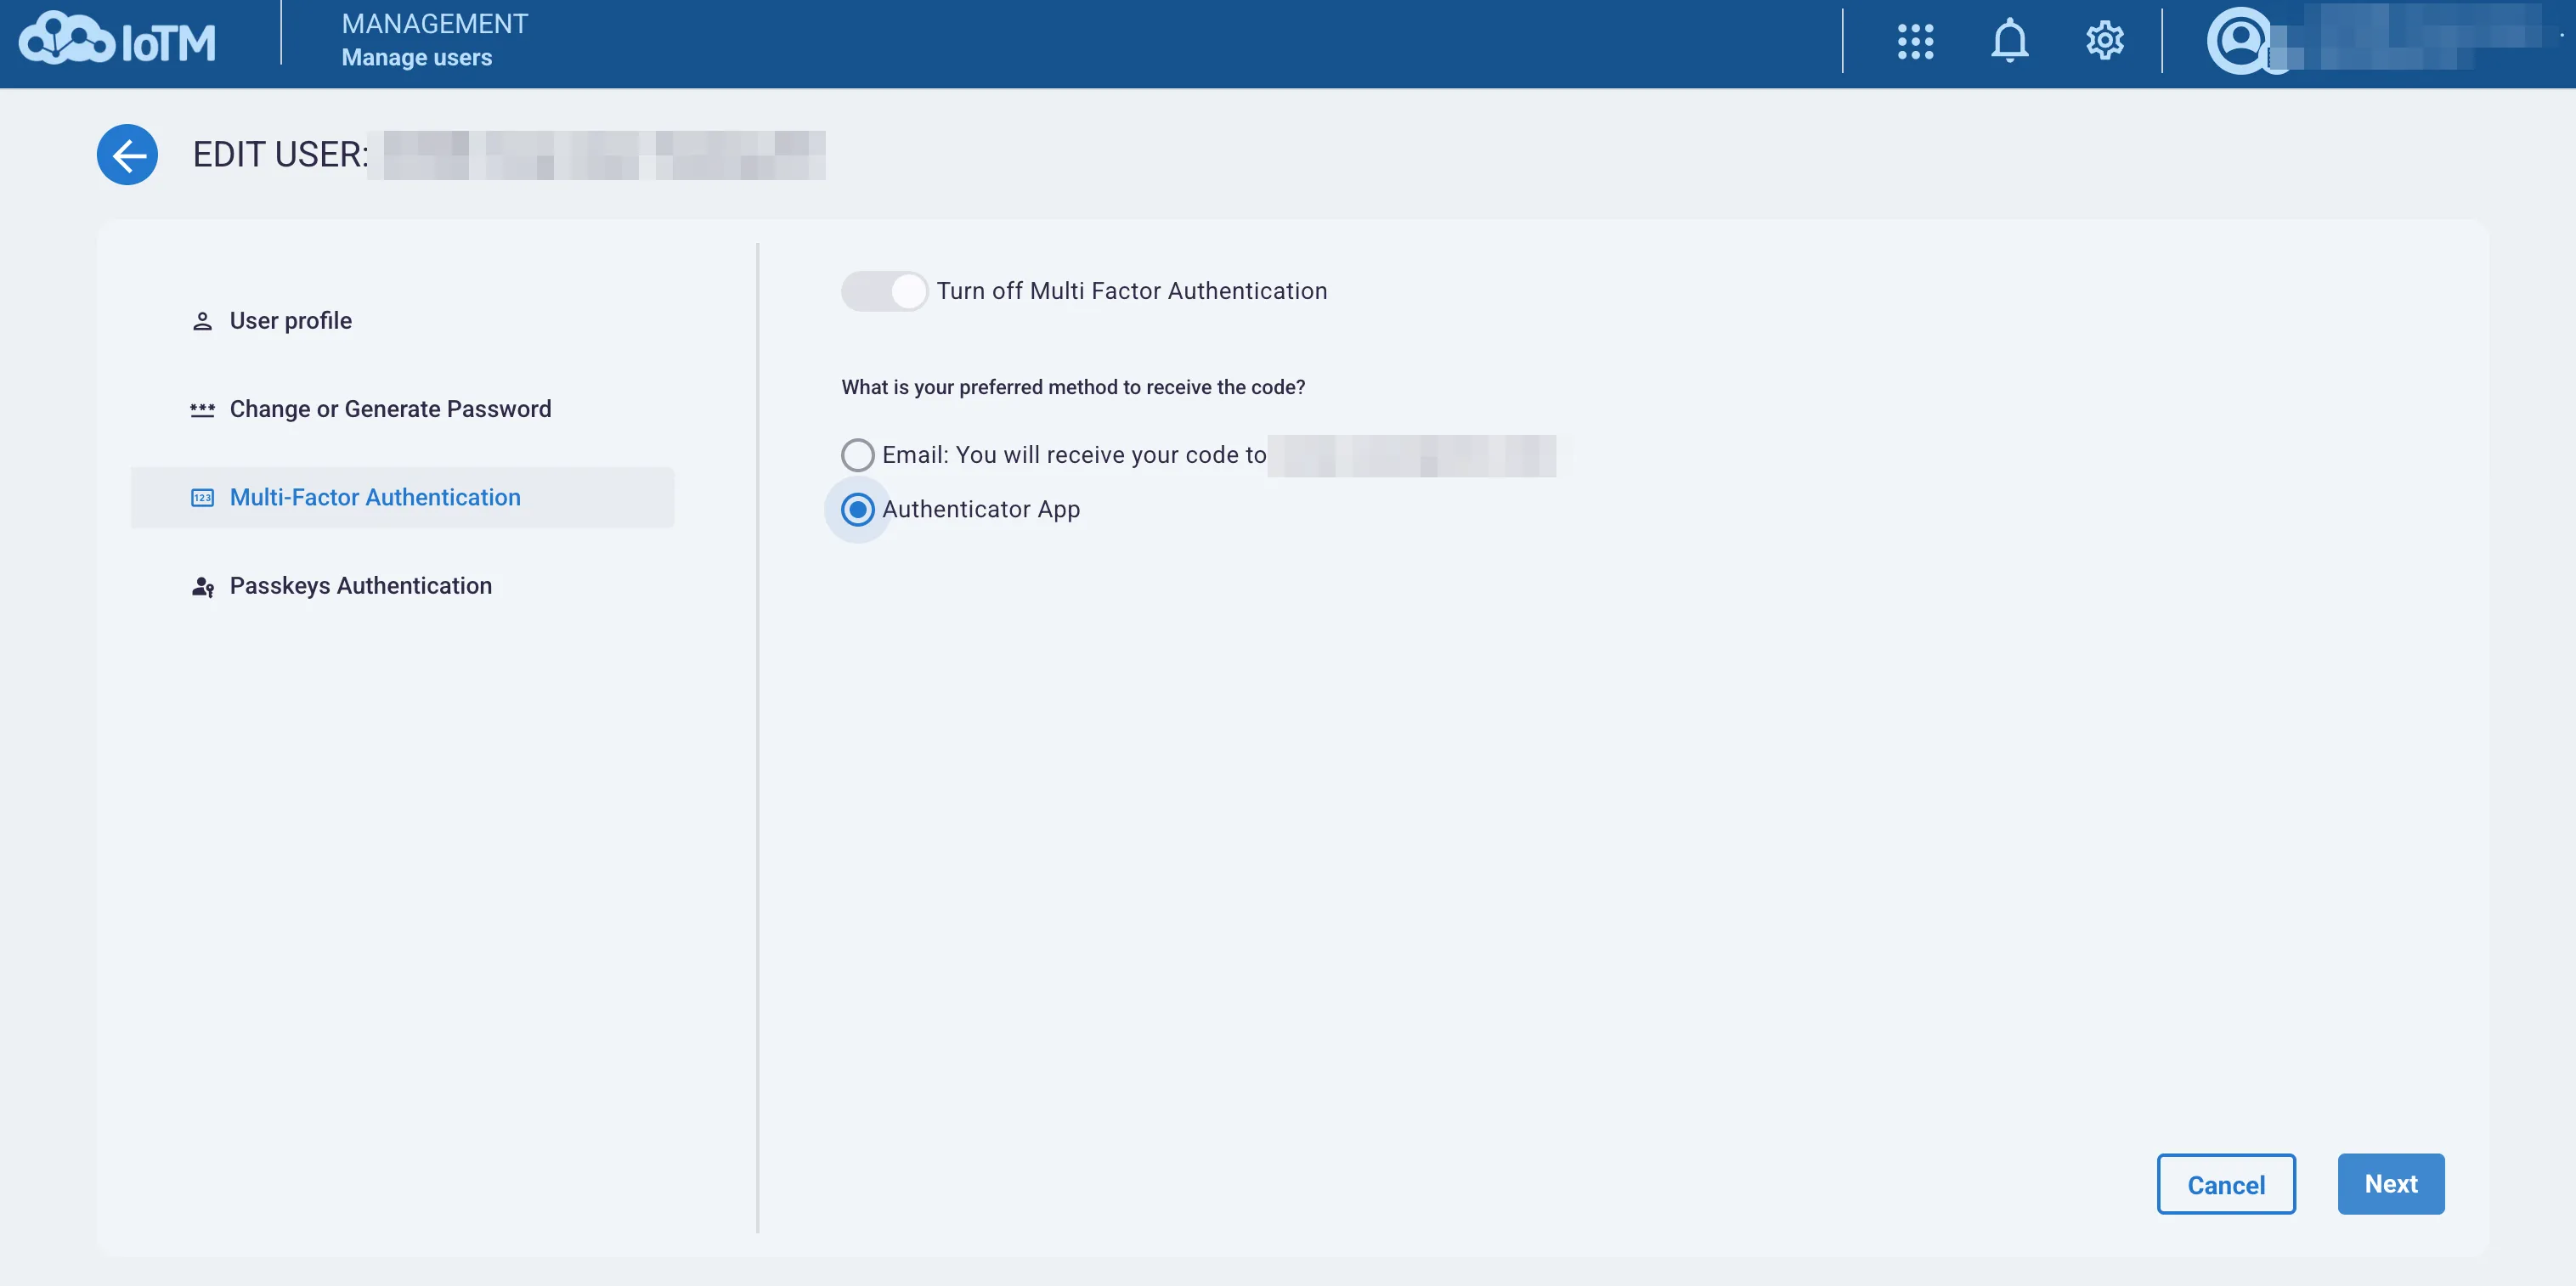
User-level MFA authenticator app option
To set up a TOTP virtual authenticator app as the preferred authentication method, select the Authenticator App option, click 'Next', and follow the instructions before clicking on 'Submit'.
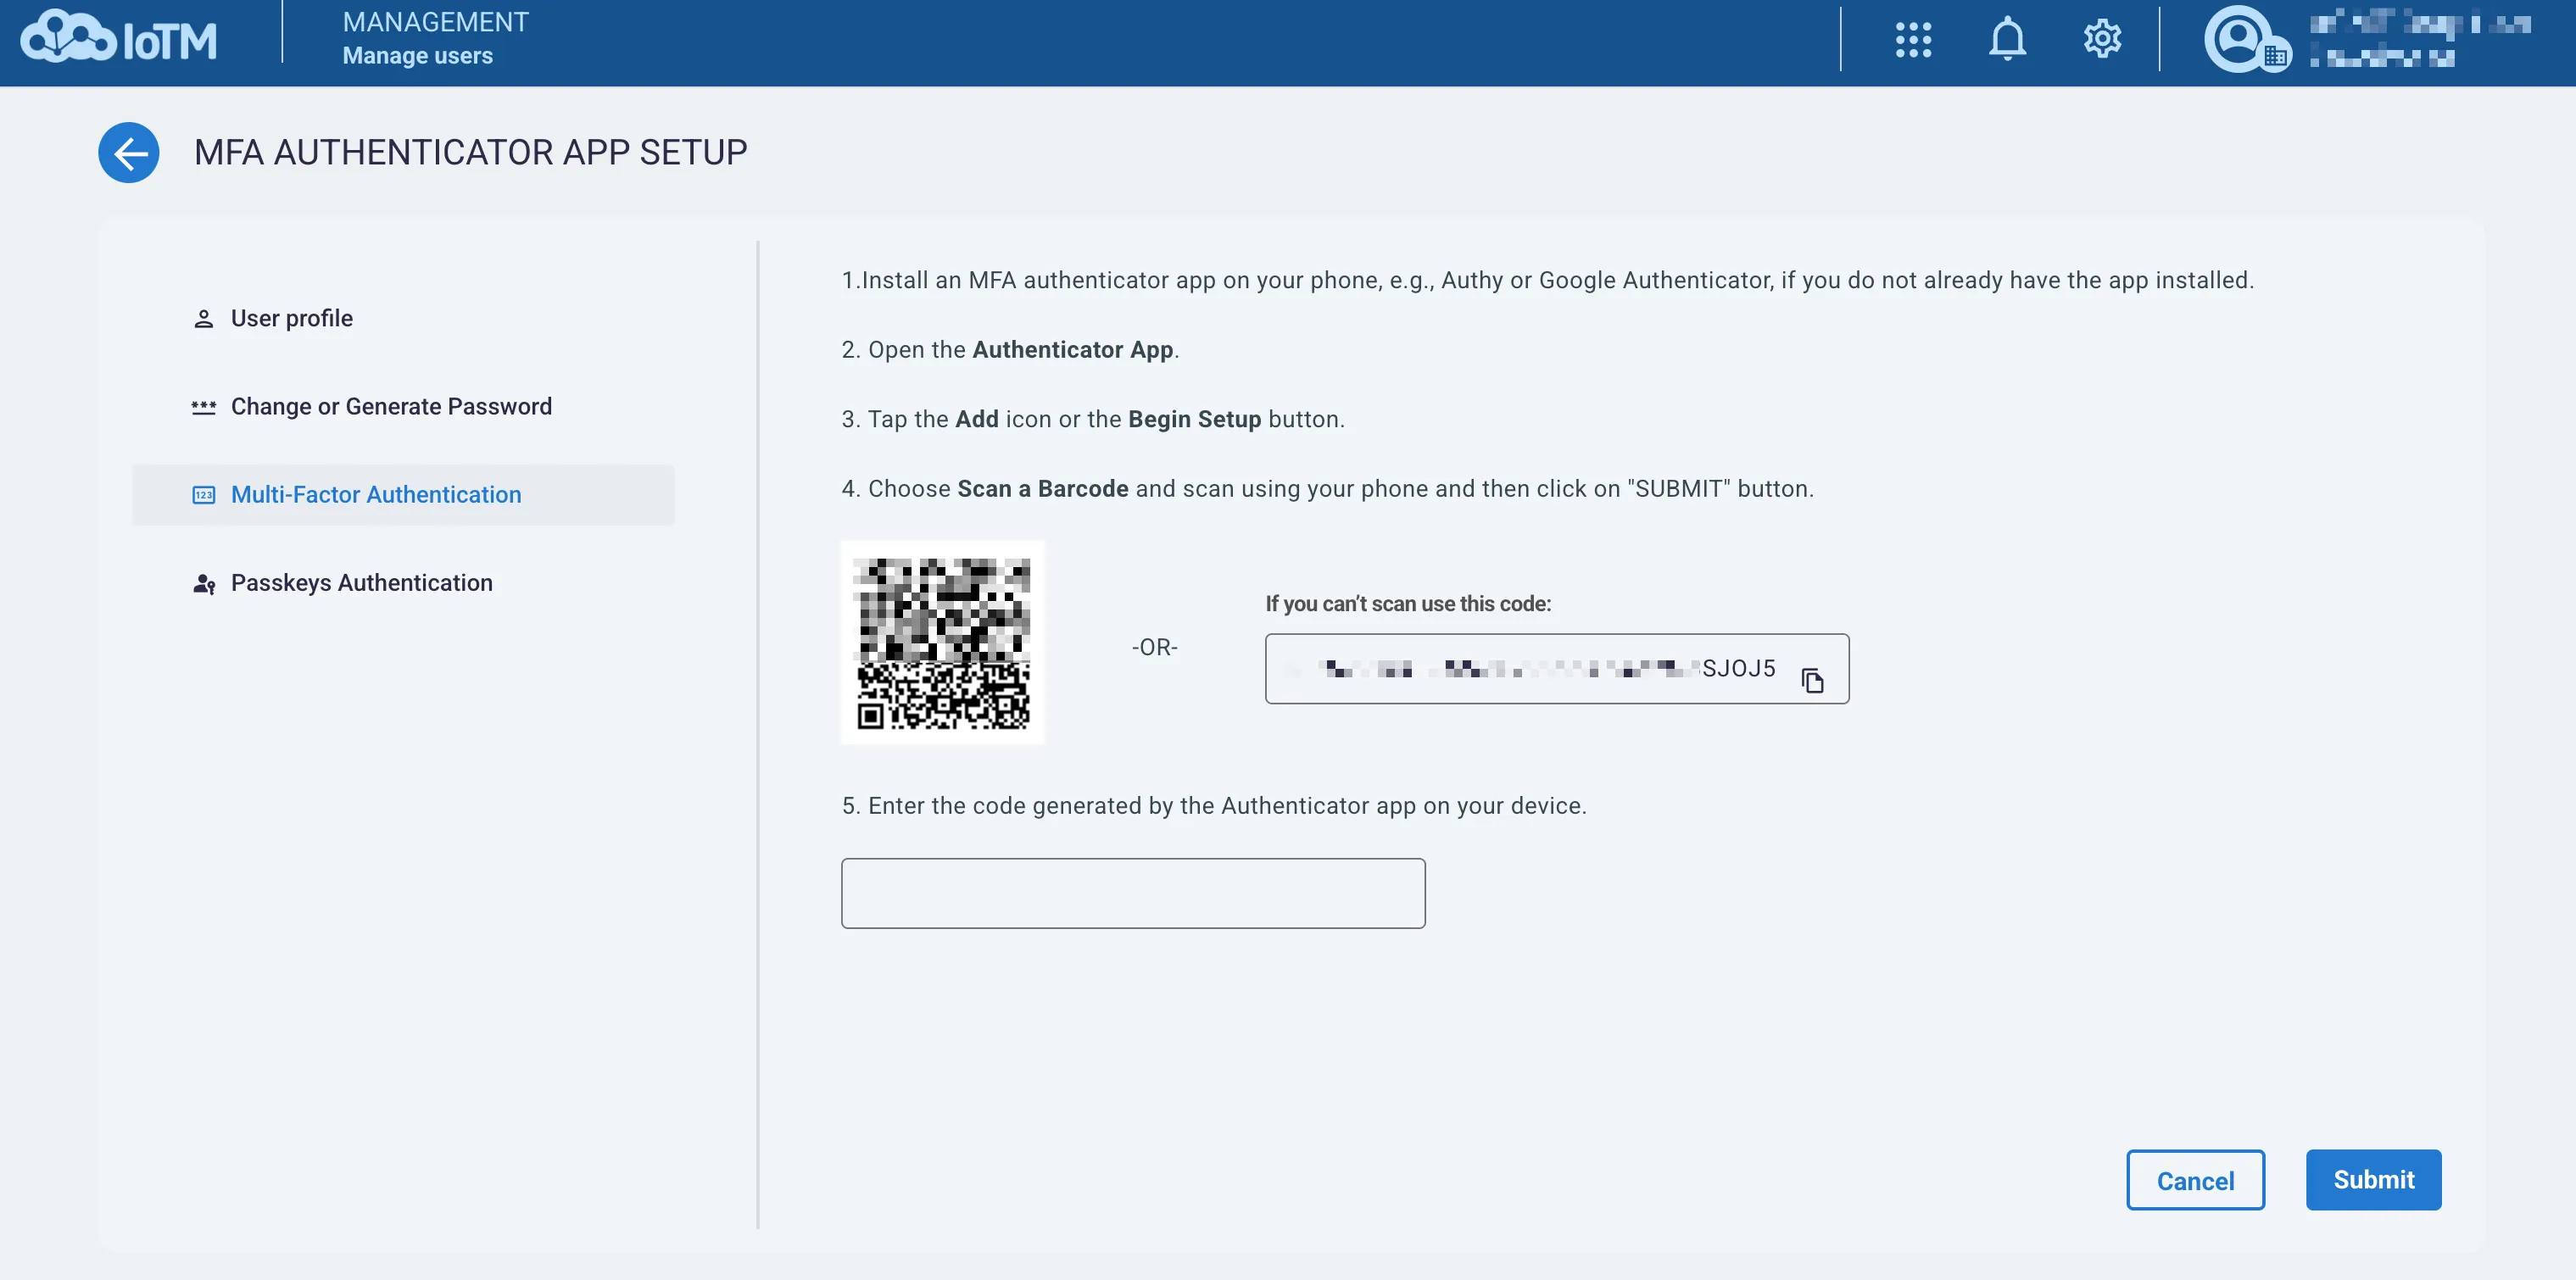
MFA authenticator app setup
The user can scan the barcode with a phone camera if they are using a mobile app as an authenticator (Twilio Authy, Google authenticator, Microsoft authenticator), or copy the text code, if using a desktop app (such as Twilio Authy desktop).
After the authenticator app produces the TOTP code, enter it in Step 5 and click on 'Submit'. If the code is verified, the preferred authentication method will change to an authenticator app, although it is always possible to fall on receiving an email authentication code if your authentication app is not at hand.
6.3.4. Unlinking or Deleting The Authenticator App Pairing (User Level)
Once a user has switched from email to an authenticator app, as the preferred 2FA method, they will have the option to unlink and register a new authenticator app or delete the authenticator app registration and revert to email.
Click on the link icon to unlink:
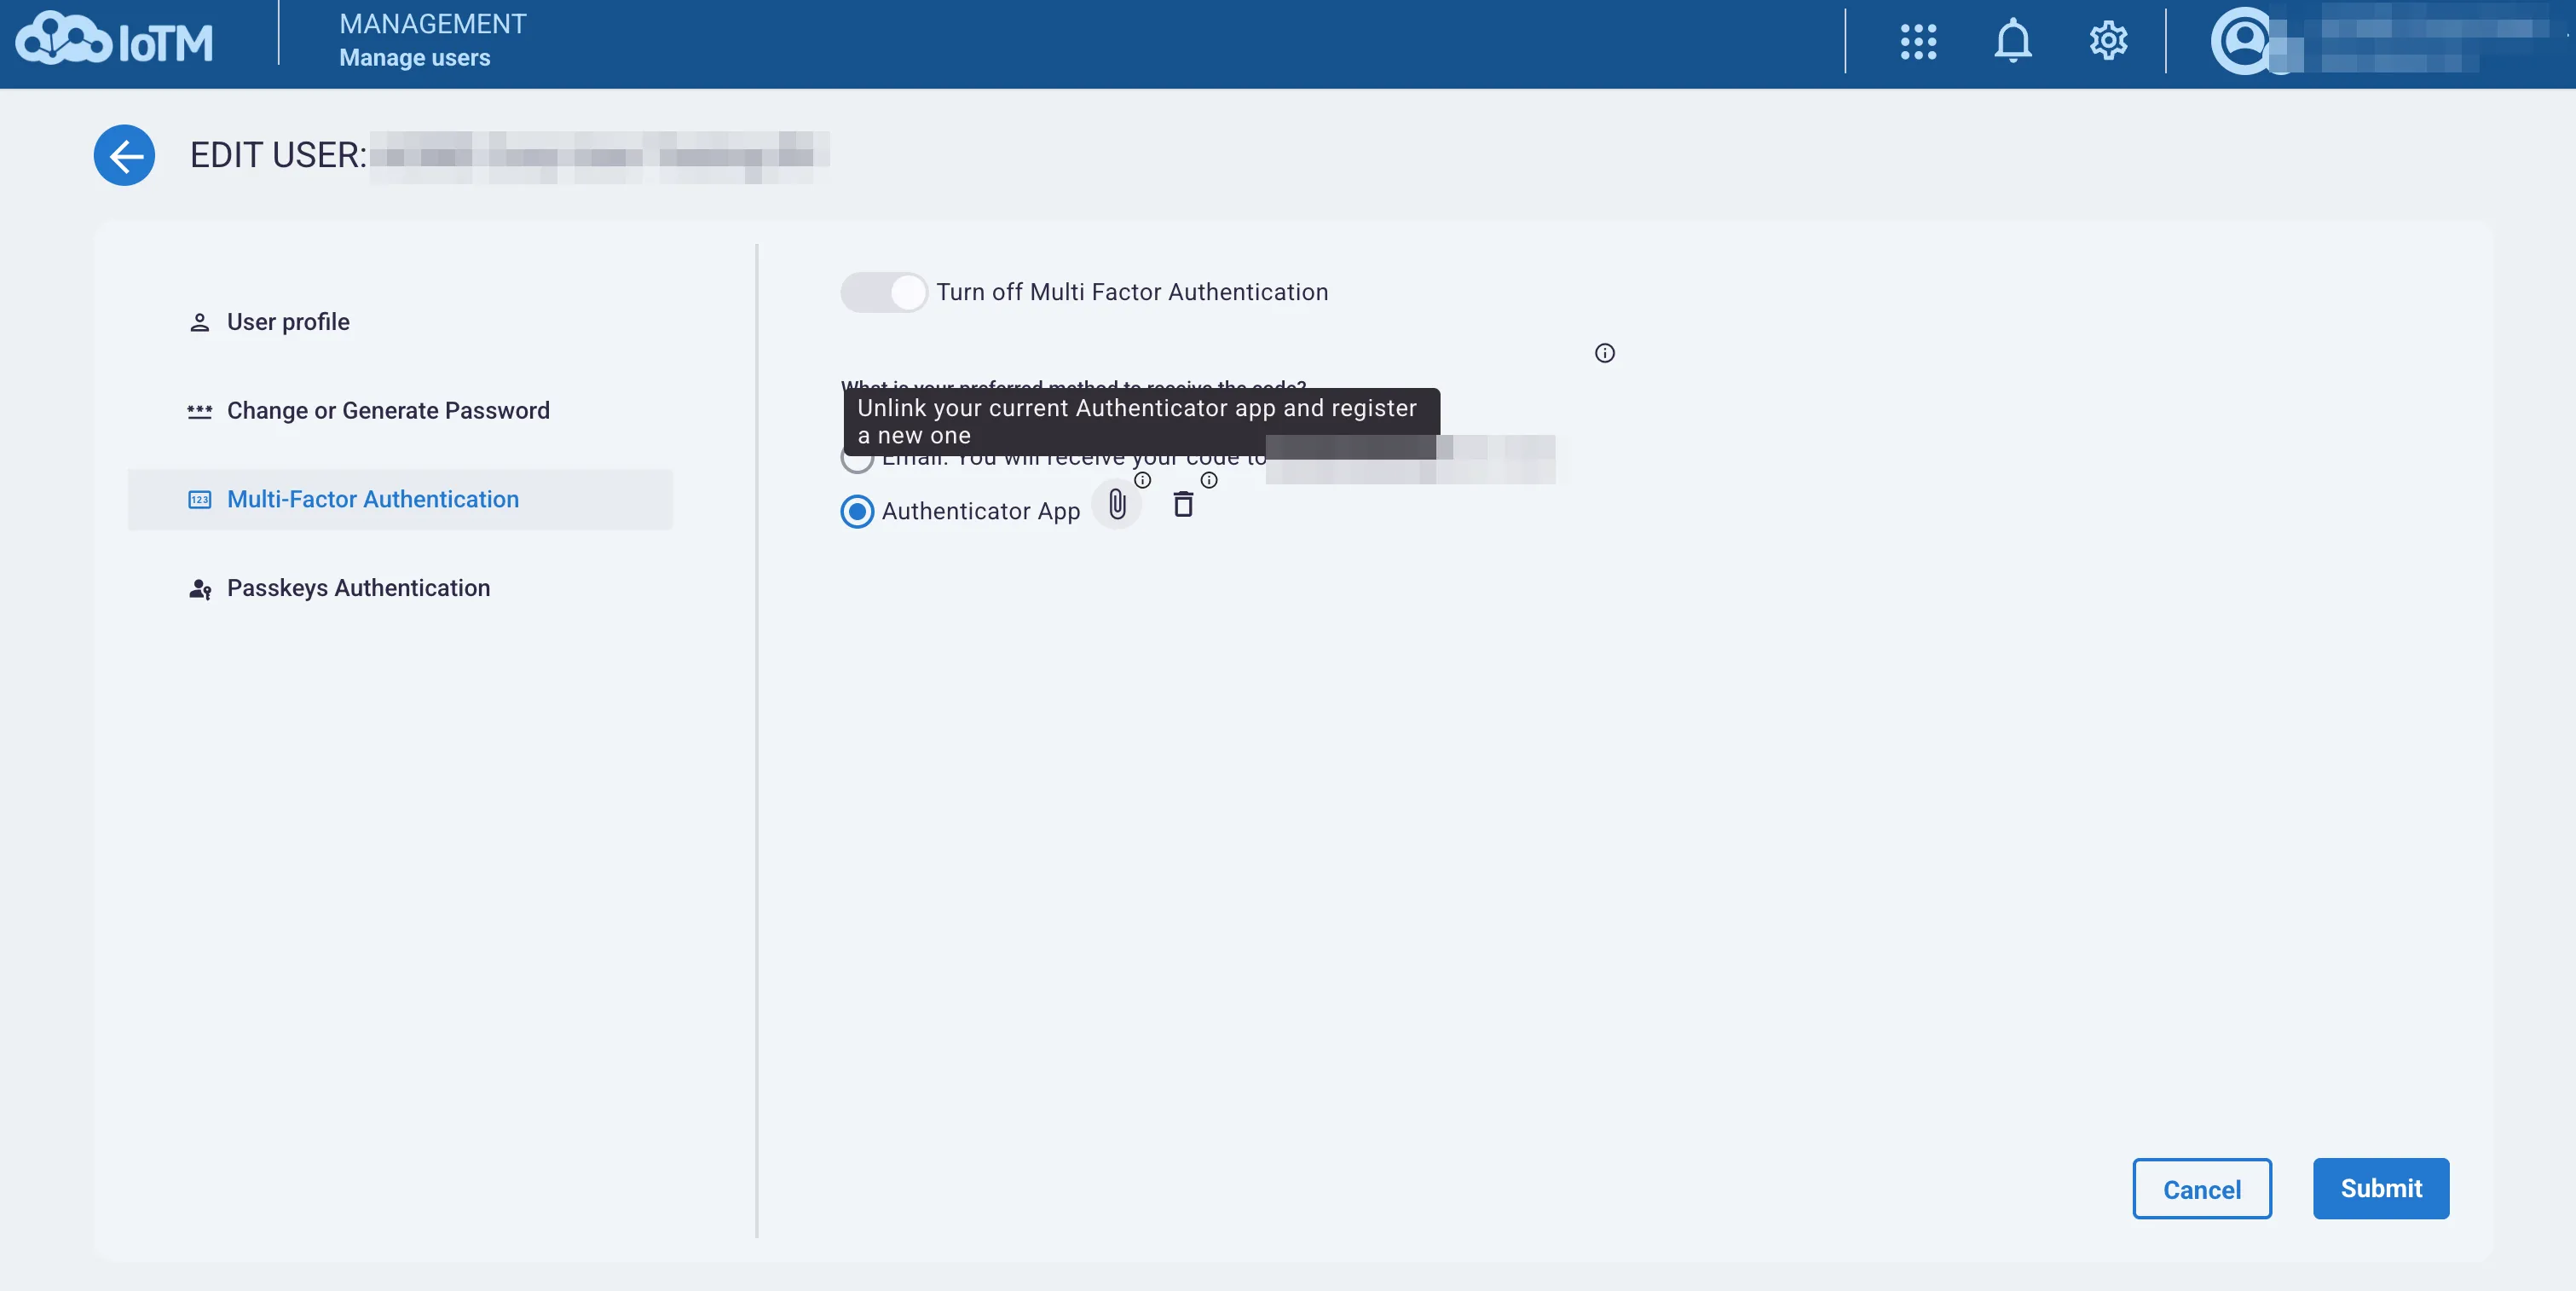
Unlink authenticator app action
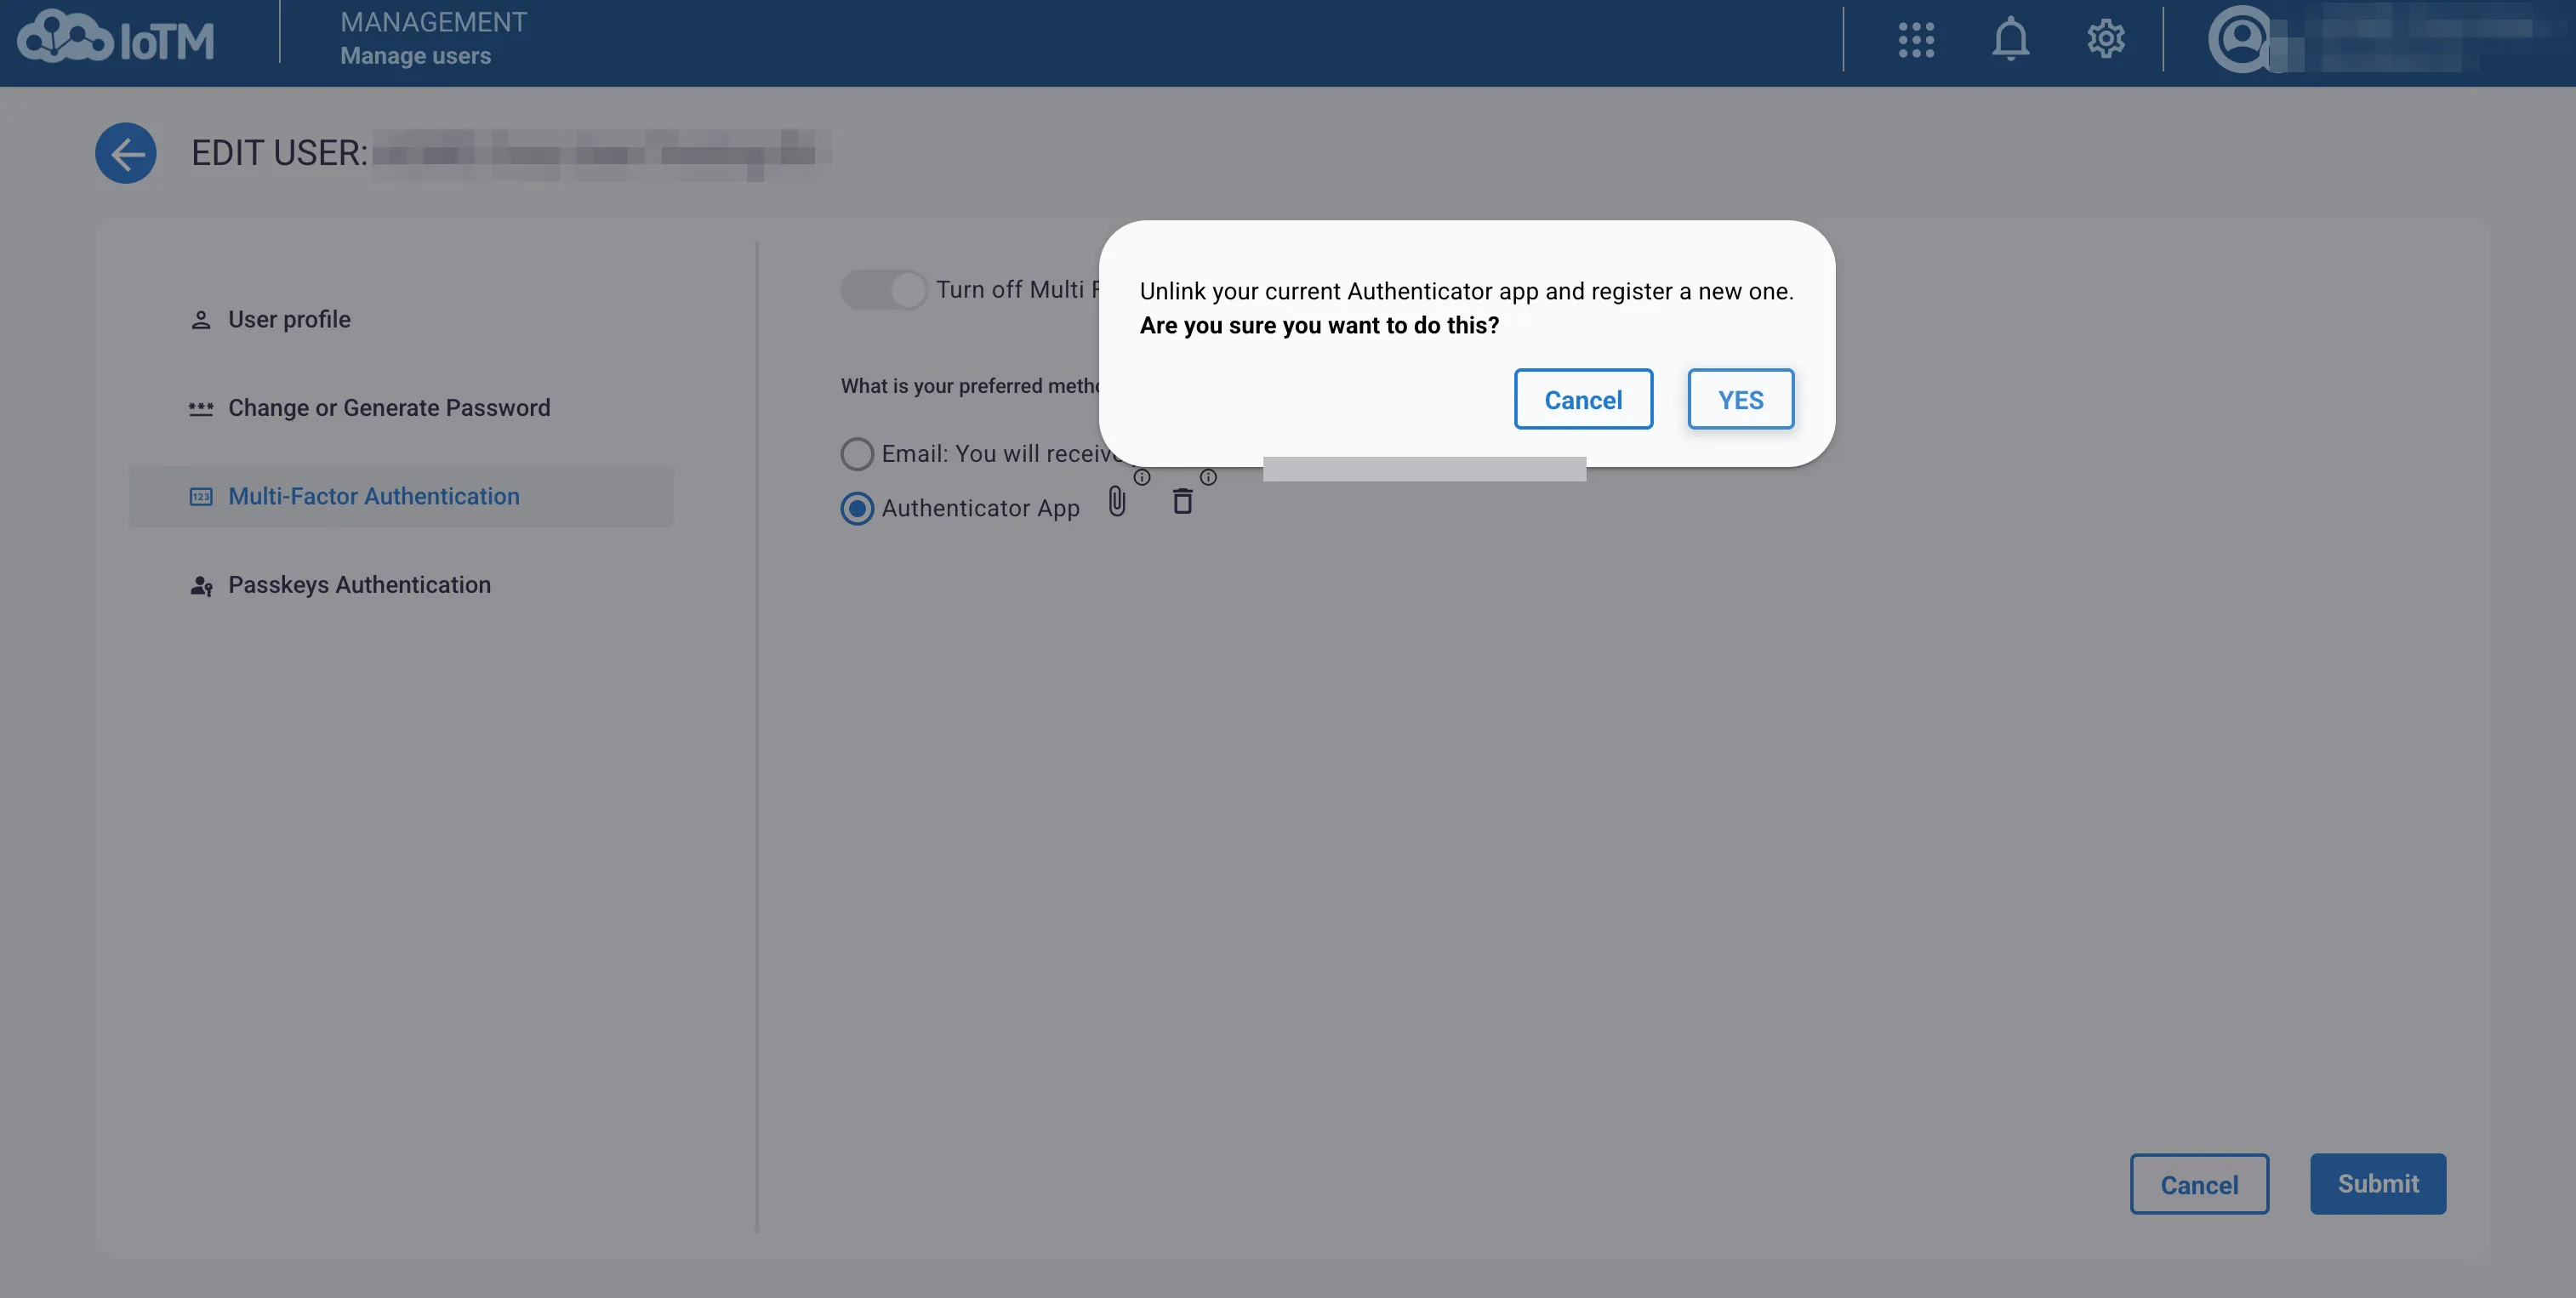
Unlink authenticator app confirmation
Click on the trash icon to delete the authenticator app and revert to email:
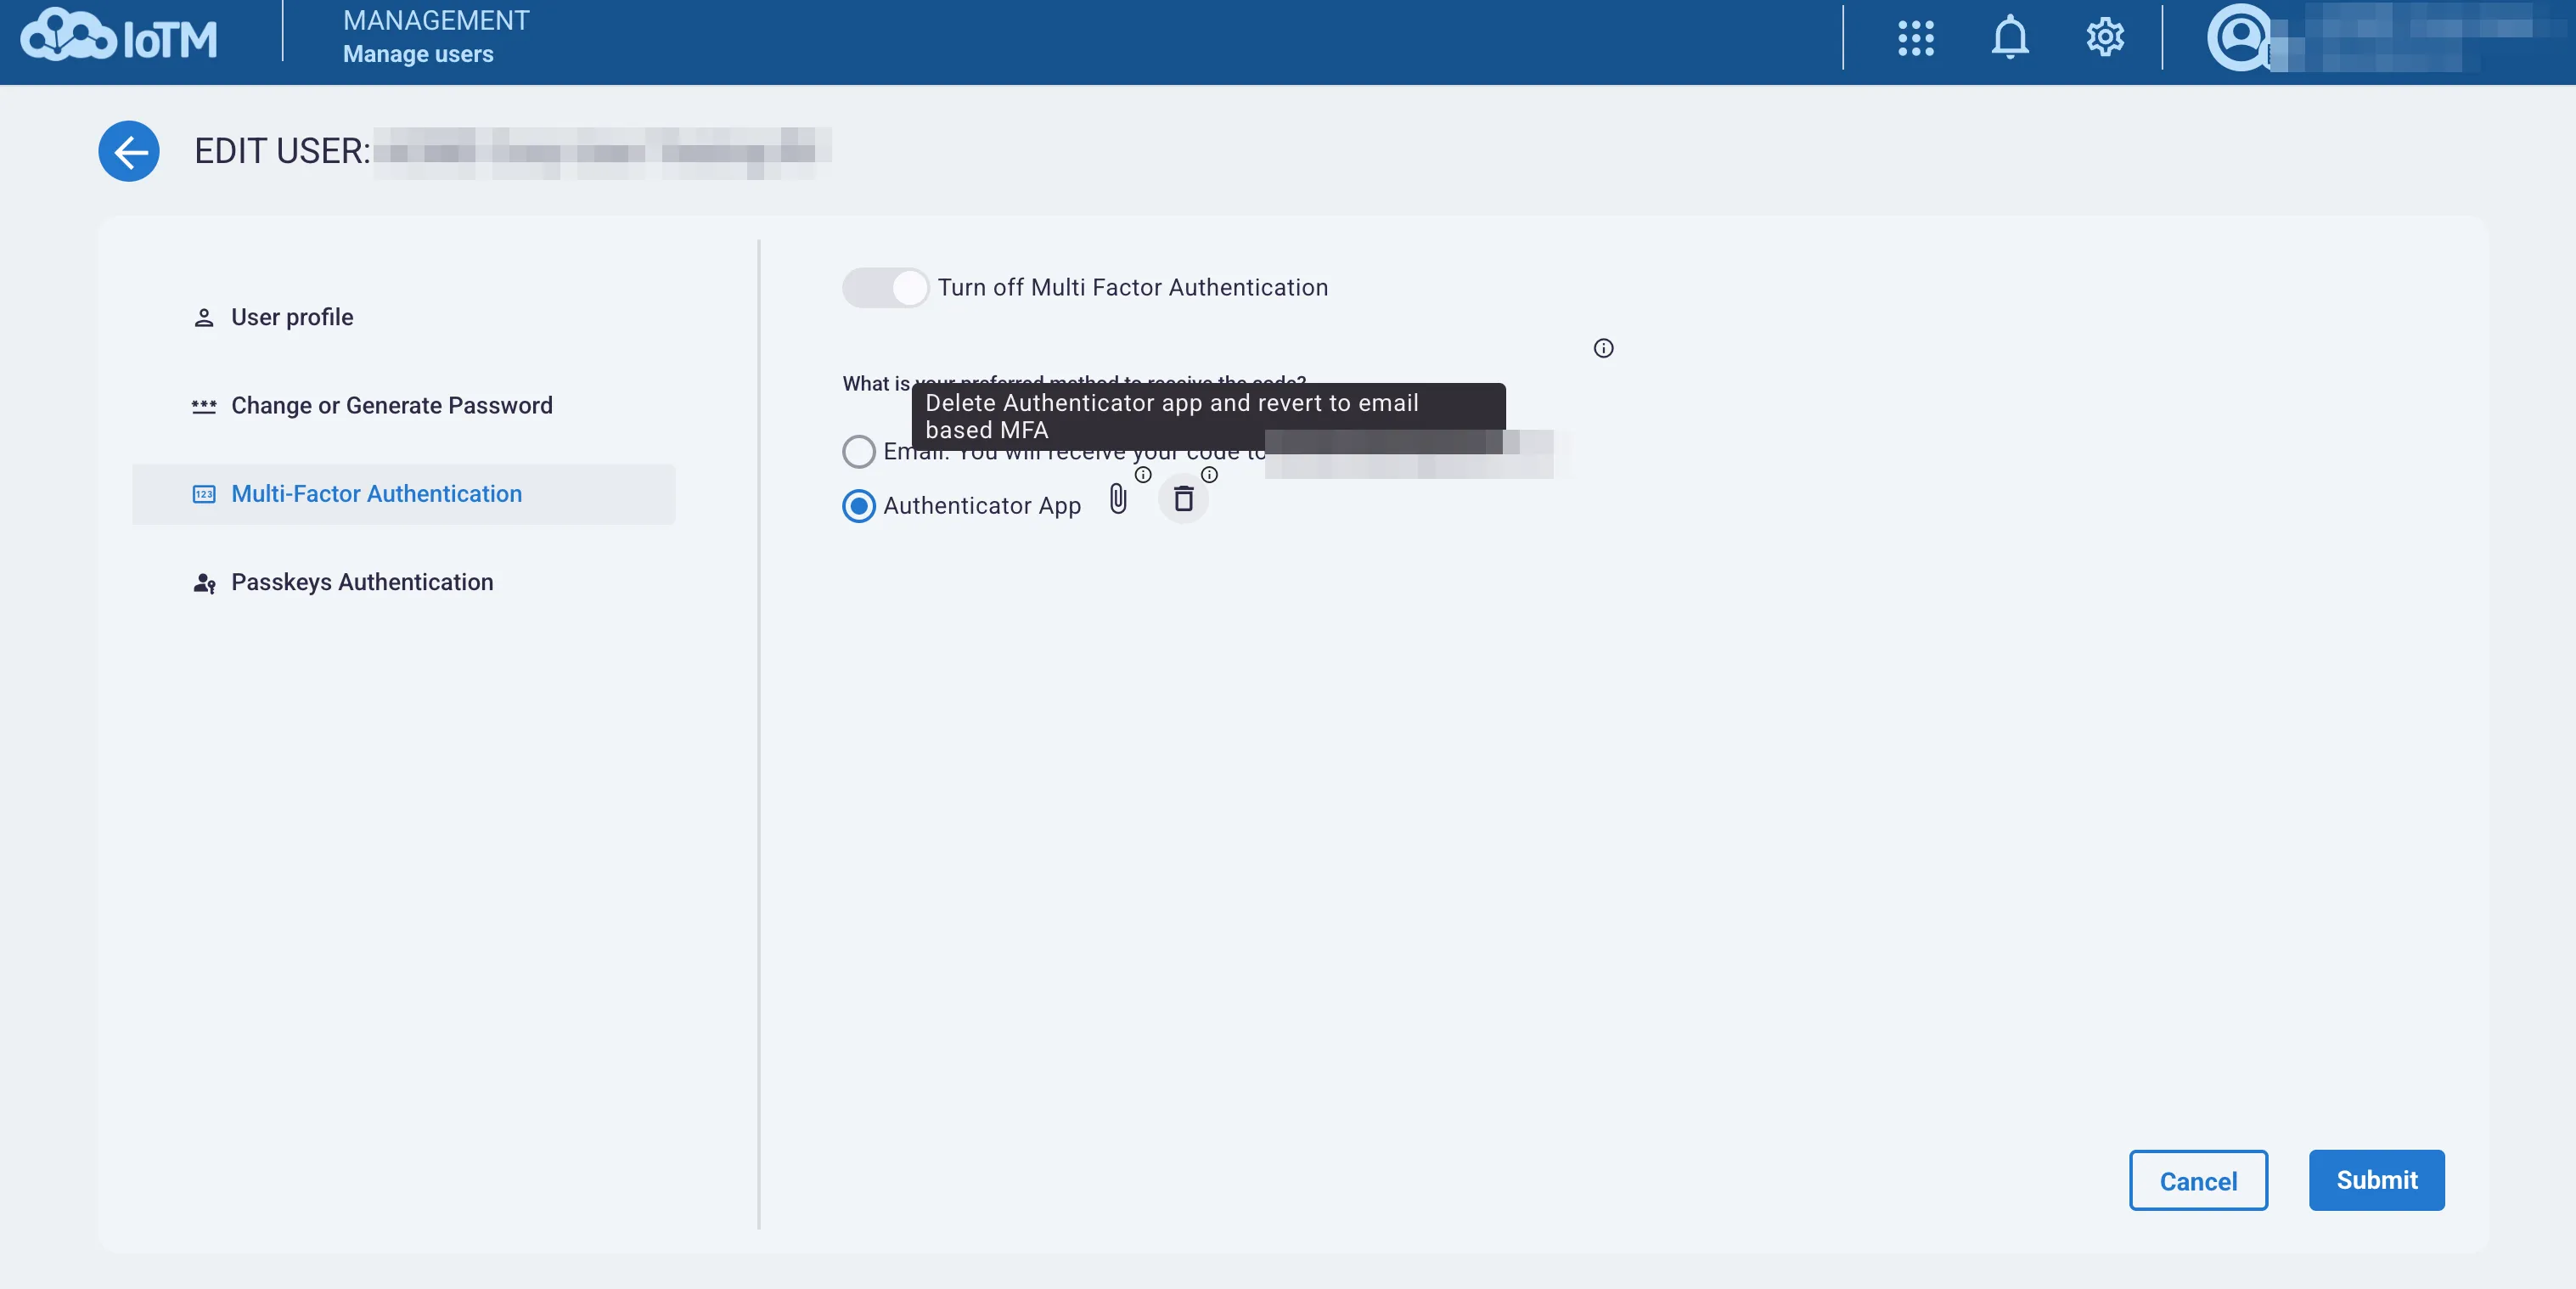
Delete authenticator app action
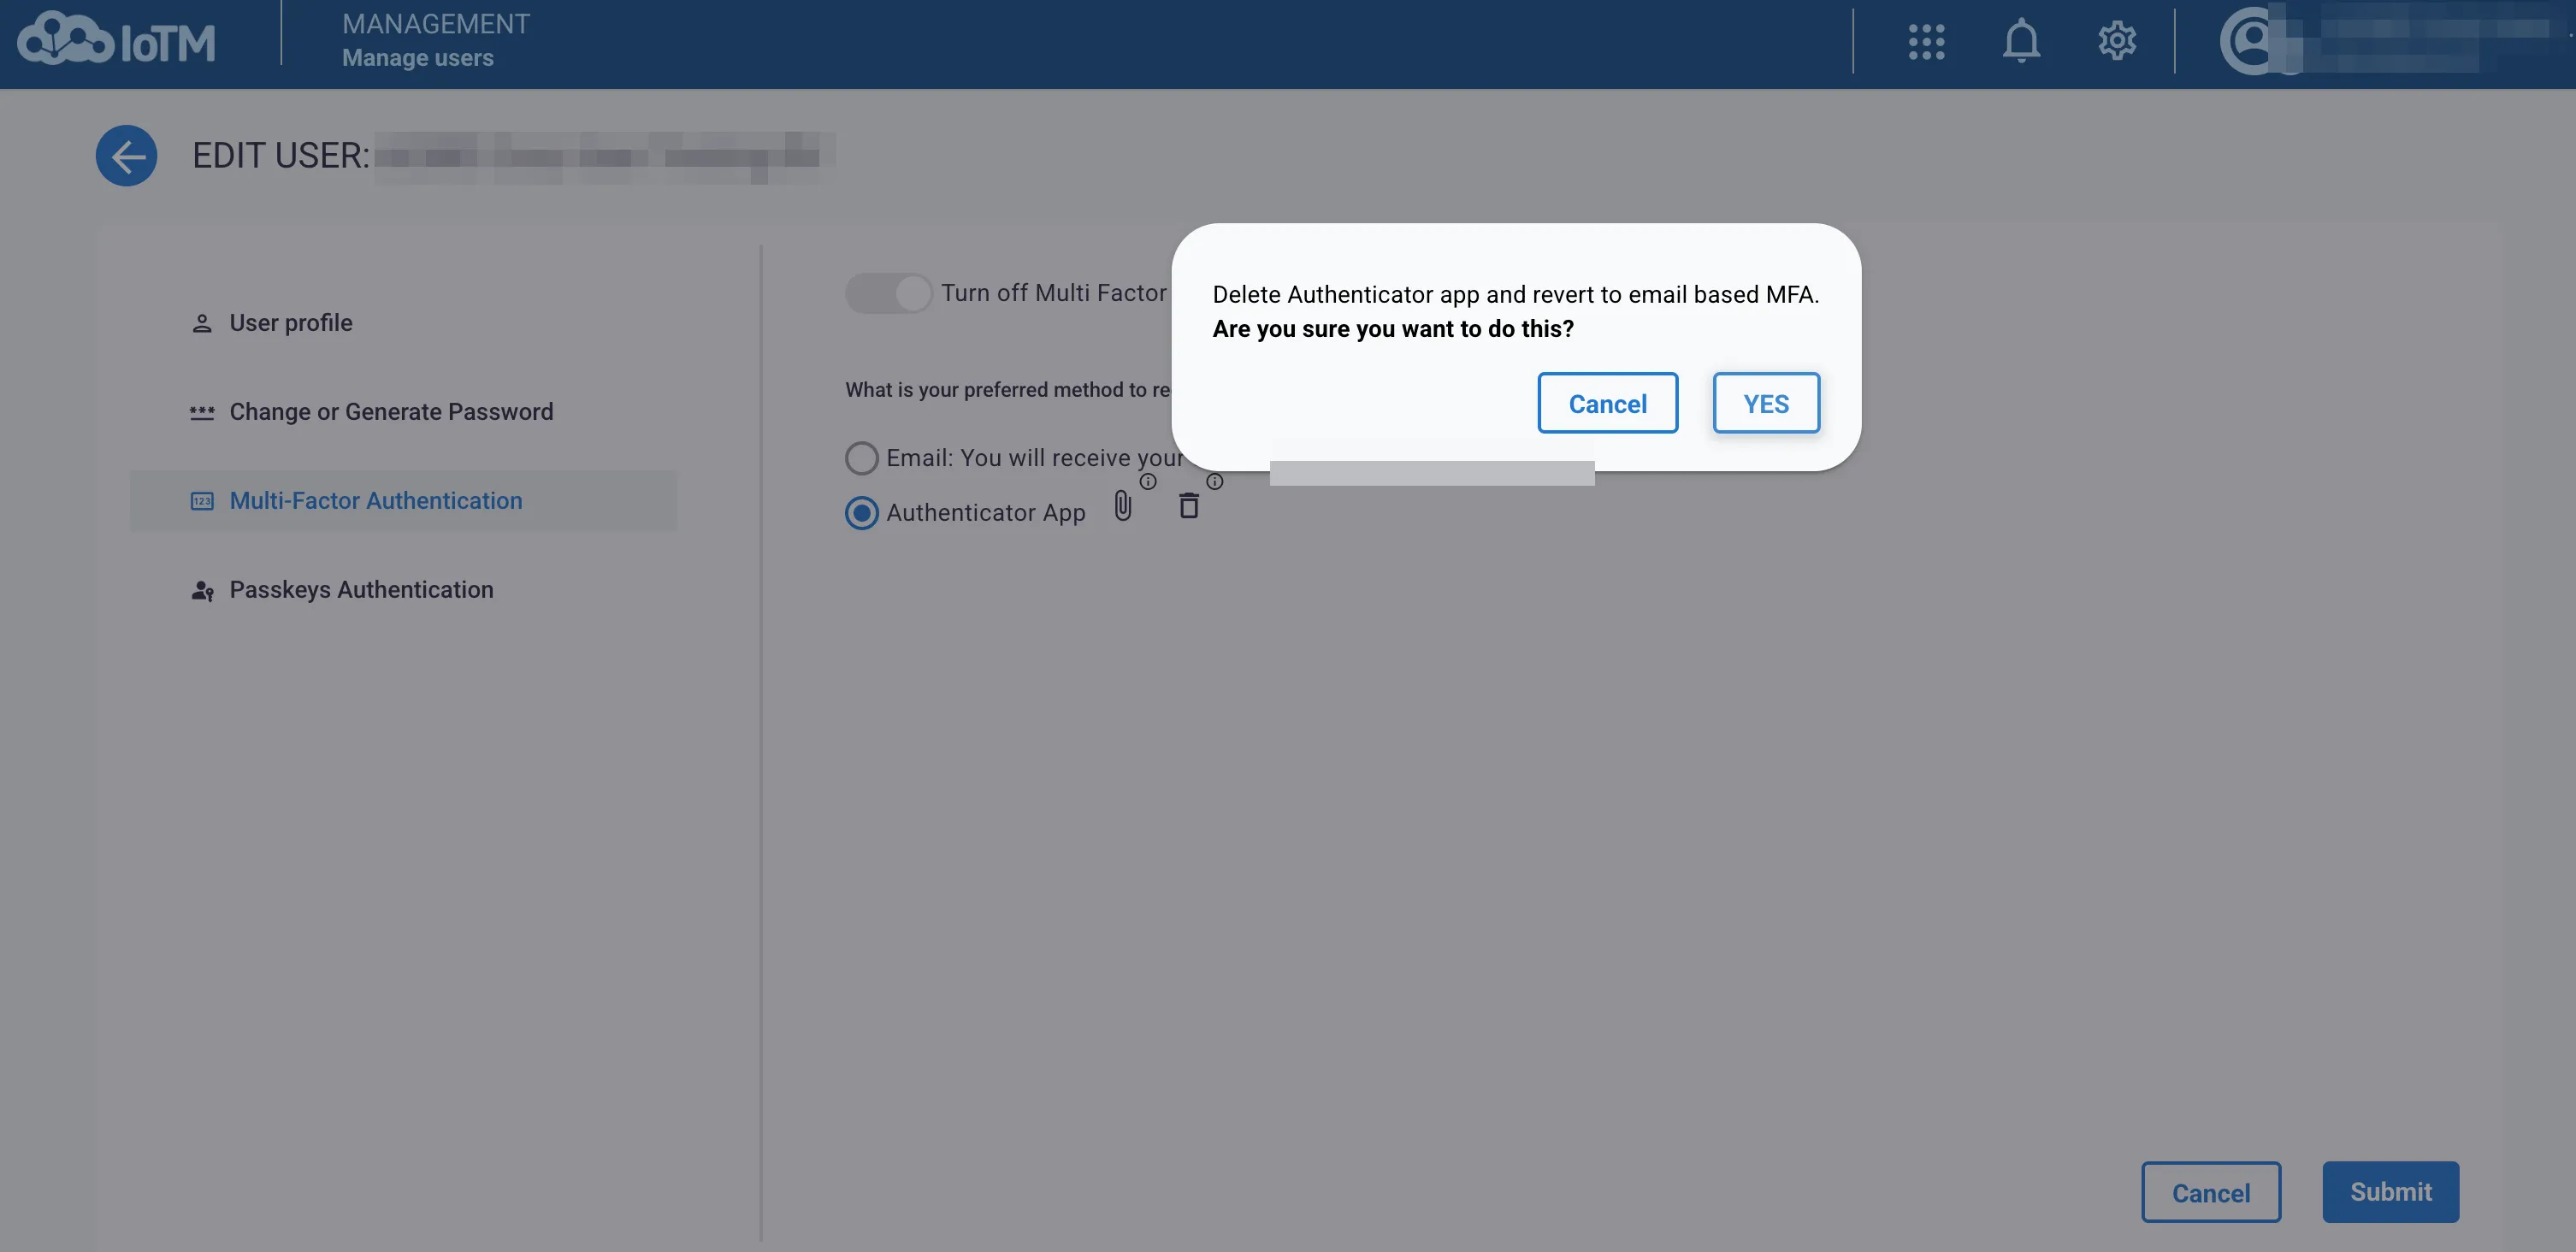
Delete authenticator app confirmation
6.3.5. Disabling User Level MFA
To disable user level MFA, switch the MFA toggle when editing the user:
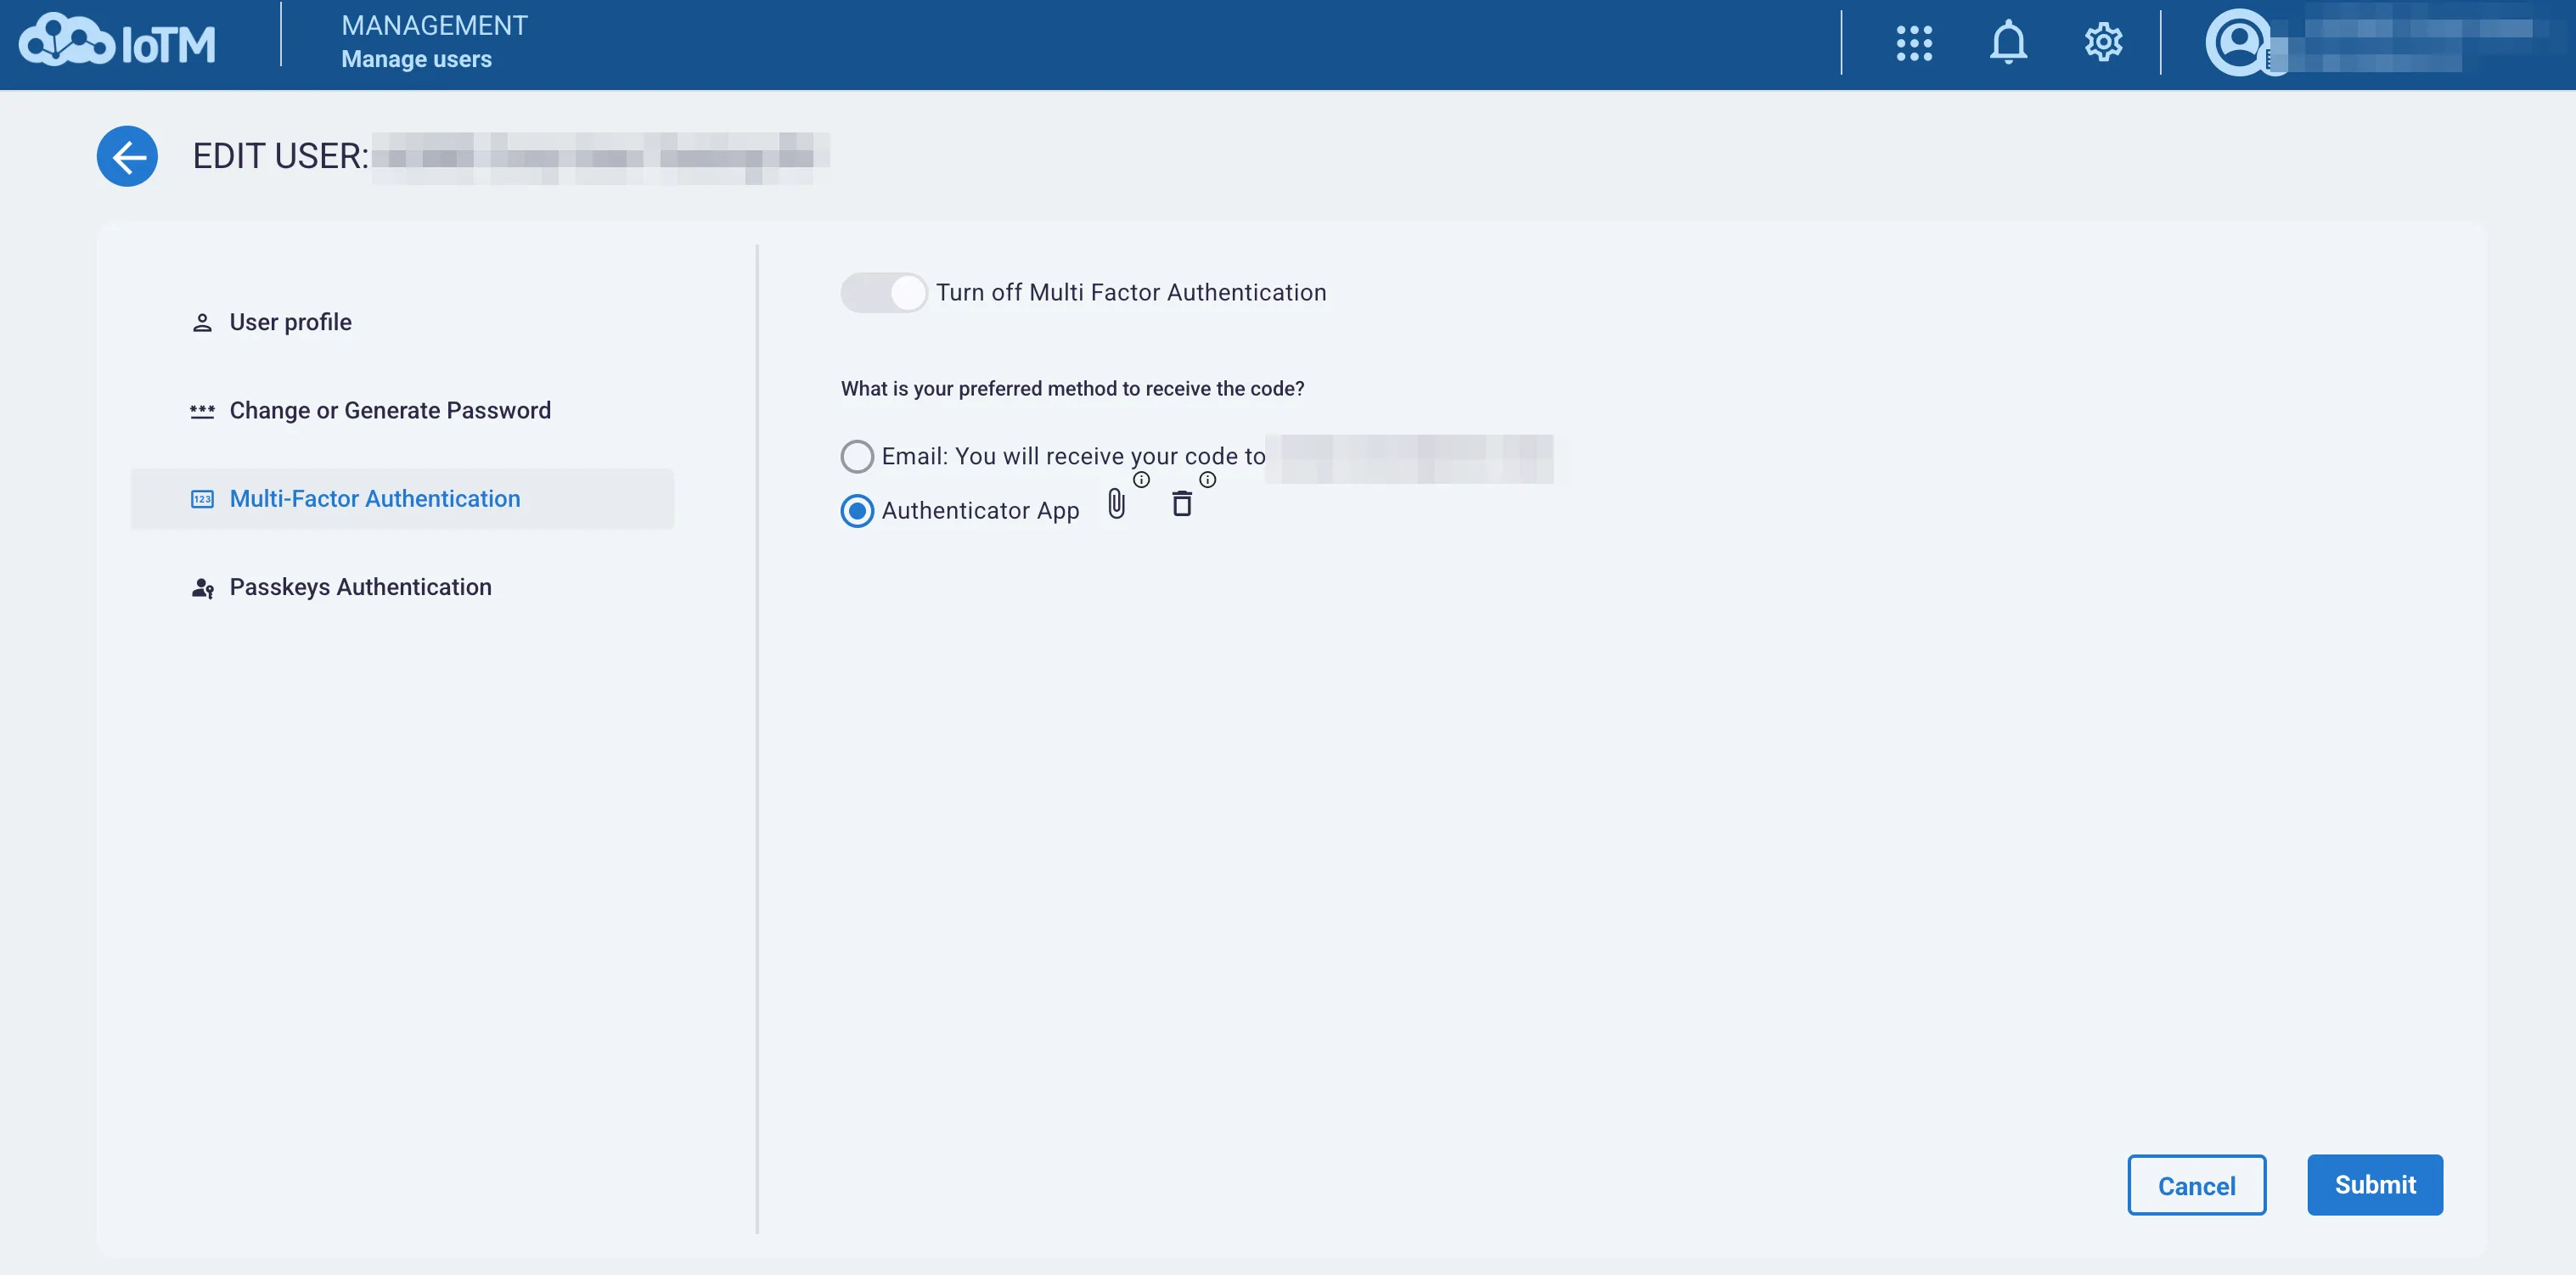
User-level MFA toggle
6.4. End Customers Tagging
End customer is a special type of tag, since a device can only be mapped to a single end customer. Both adding and deleting end customer tags can be executed in the same location on the platform in the Account Management section by clicking on the 'Import Device/Customer' call-to-action button.
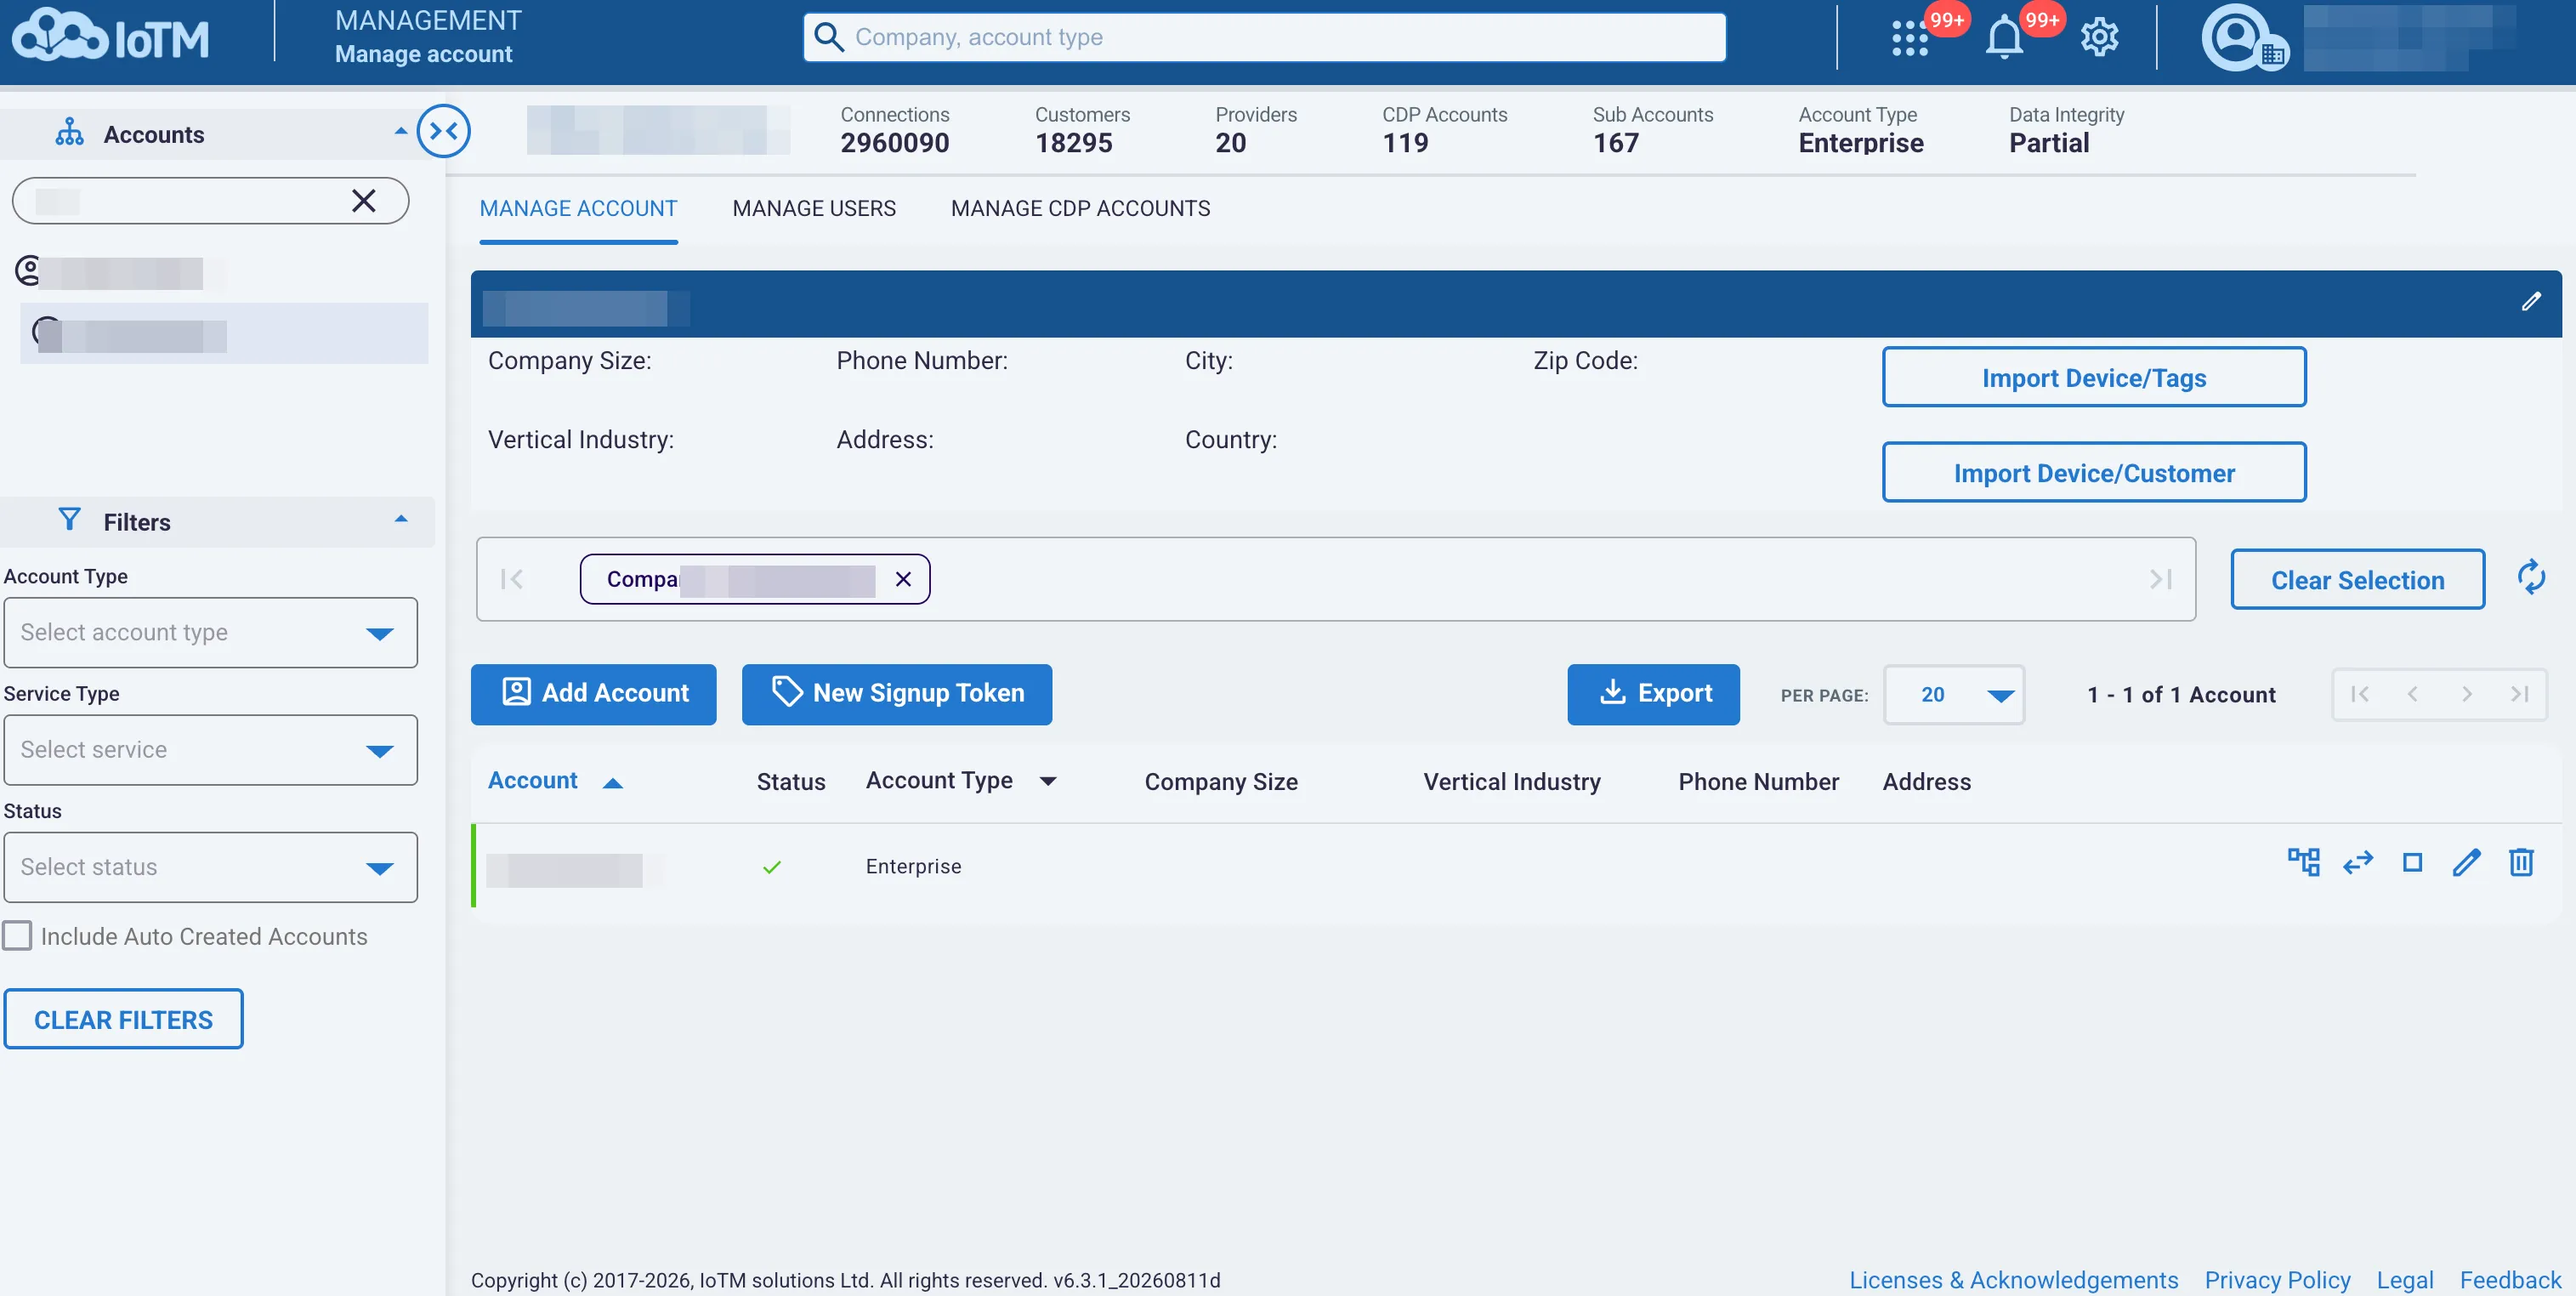
Account Management import actions
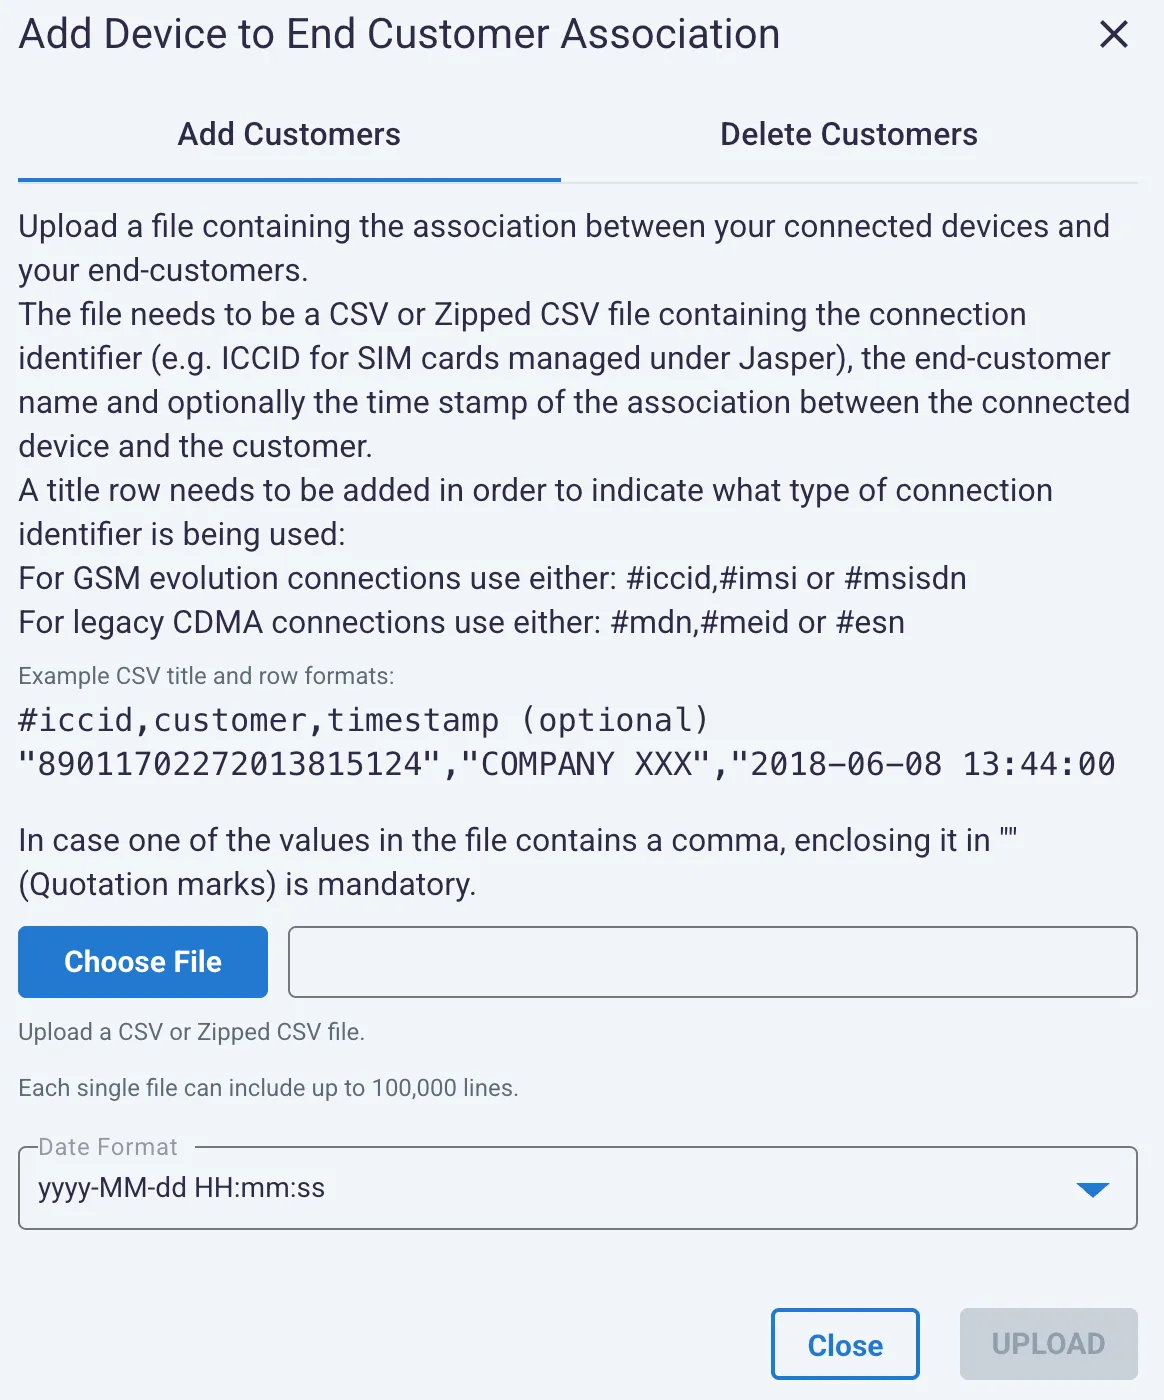
Add Device to End Customer Association dialog
Control descriptions
Control | Description |
|---|---|
Import Device / End customer mapping | Button to trigger the end customer CSV import dialog. |
Add or Delete Customers Action Selection | Tab selector to select which action to execute, either adding a device / end customer association or deleting it. |
Instructions and example row format | Instructions and an example of the correct row format in the CSV. In this case, \[Subscription ID - ICCID in case of a GSM evolution U/SIM card\], \[End Customer Name\], <Optional Data of association between the subscription and the customer> In case a value contains a comma, then the value should be wrapped with parentheses ("), so it is preferable to wrap all field values in parentheses for format safety. E.g. #ICCID, customer 89148837762557289,ACME Inc Or #IMSI 24137746553772, ACME Inc These would be alternative examples of a minimal valid format, containing the necessary fields. See Adding and Deleting customer tags sections below for more details on each action operation. |
File selector | The file selector button opens the native browser file system selection dialog. |
Date format picker | Allows you to pick from several date time formats, in case you provide the optional 3rd column in the CSV. |
Close / Upload buttons | Cancel closes the dialog with no changes. Upload executes a synchronous upload of the file to the IoTM platform for processing. |
6.4.1. Adding End Customer Tags
To add end customer tags, upload a file containing the association between your connections and your end-customers. The file should contain 2 mandatory columns, an optional 3rd column, and up to 100,000 rows per file and be no larger than 10 MB. The first (left) column should be the connection identifier and the second column should be the end customer name value. The optional 3rd column is a timestamp that defines when the device was initially associated to the respective end customer.
A title row needs to be added to indicate what type of connection identifier is being used:
- For GSM evolution connections, either : #iccid, #imsi. #msisdn can be used as well, but MSISDN is not necessarily unique within the context of a given CDP, so it is not advisable.
- For legacy CDMA connections, use either: #mdn, #meid or #esn
Note: Device identifier types cannot be mixed within the same file. Therefore, if you need to mix them, upload a separate file for each identifier type. |
|---|
The file needs to be formatted in the following way:
E.g. Without the optional 3rd timestamp column:
#iccid, customer 89011702272013815124,"ACME, Inc" 89011702272013815235,"Mars, rockets LLC"
#iccid, customer 89011702272013815124,ACME Inc 89011702272013815235,Mars rockets LLC
Note that if the customer name includes a comma (,) then they must be enclosed in quotes.
Including the optional 3rd timestamp column:
#iccid, customer, timestamp "89011702272013815124","ACME, Inc","2017-04-02 00:00:00" "89011702272013815235","Mars, rockets LLC", "2018-06-08 13:44:00"
6.4.2. Deleting End Customer Tags
To delete end customer tags, upload a file containing the list of connections to remove the end-customer association from. Since a customer tag represents an association to a single customer, the file should contain only a single mandatory column of the connection identifier. Each file may contain up to 100,000 rows and be no larger than 10 MB.
A title row needs to be added to indicate what type of connection identifier is being used:
- For GSM evolution connections, either : #iccid, #imsi. #msisdn can be used as well, but MSISDN is not necessarily unique within the context of a given CDP, so it is not advisable.
- For legacy CDMA connections, use either: #mdn, #meid or #esn
Note: Device identifier types cannot be mixed within the same file. Therefore, if you need to mix them, upload a separate file for each identifier type. |
|---|
The file needs to be formatted in the following way:
#iccid 89011702272013815124 89011702272013826126
6.5. Device 'Free' Tagging
A device can be mapped to an unlimited amount of 'free' tags (e.g. Firmware:<FW version>, Model:<Model name>, Division:<organizational division name>, etc.). Both adding and deleting end device free tags can be executed in the same location on the platform in the Account Management section by clicking on the 'Import Device/Tags' call-to-action button.
Account Management import actions
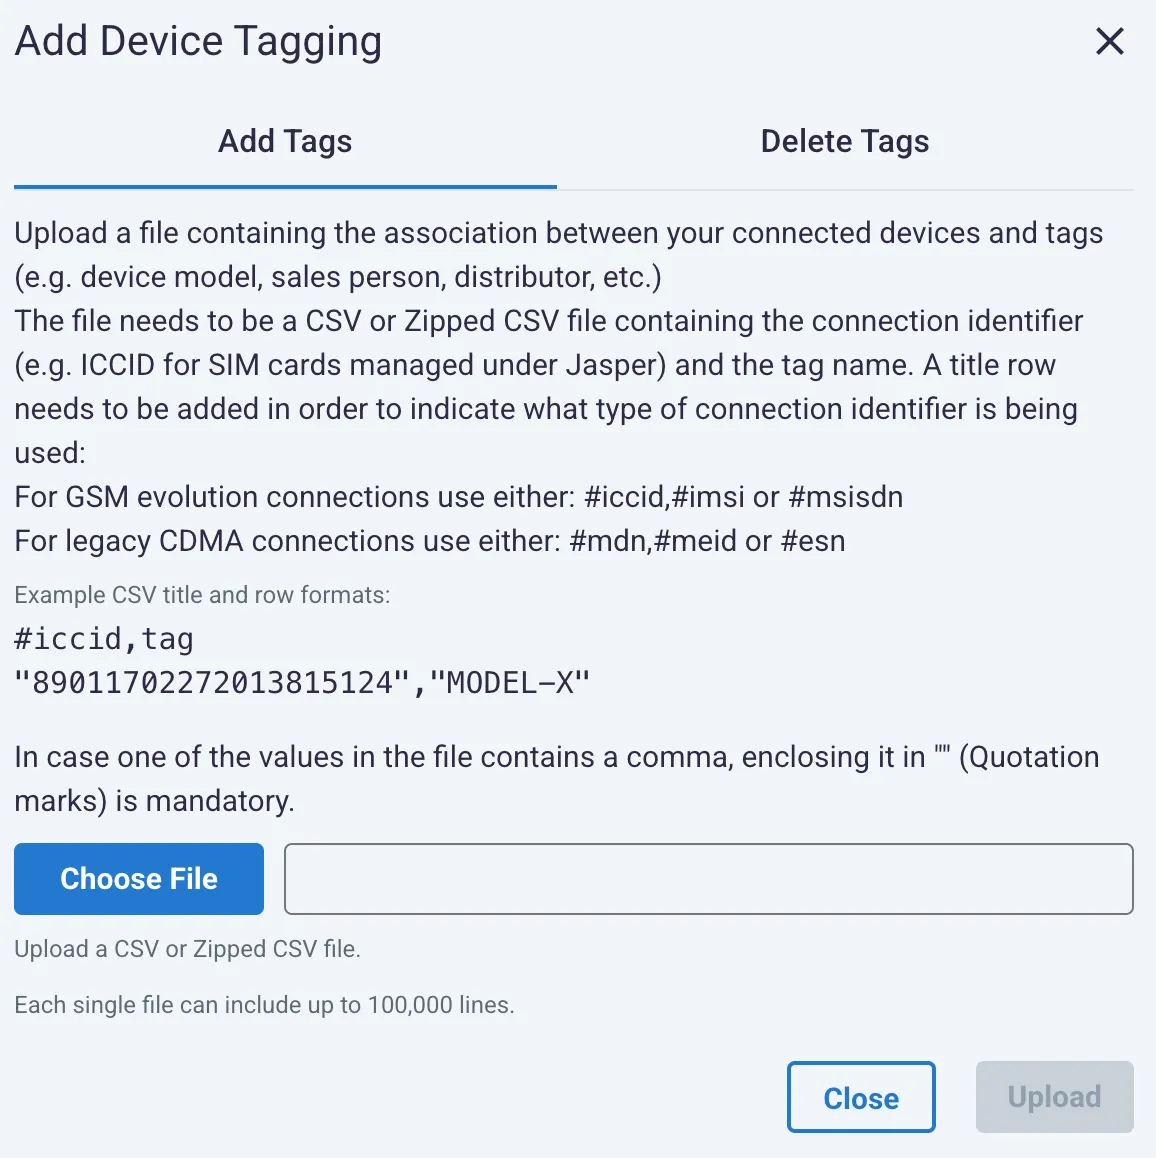
Add Device Tagging dialog
Control descriptions
Control | Description |
|---|---|
Import free device tagging. | Button to trigger the device tagging CSV import dialog. |
Add or Delete Tags action selection. | Selector to select which action to execute, either adding a device / tag association or deleting it. |
Instructions and example row format | Instructions and an example of the correct row format in the CSV. In this case, \[Subscription ID - ICCID in case of a GSM evolution U/SIM card\], \[Tag Value\] In case a value contains a comma, then the value should be wrapped with parentheses ("), so it is preferable to wrap all field values in parentheses for format safety. E.g. #ICCID, tag 89148837762557289,Model:FX-40 Or #IMSI 24137746553772,Model:FX-40 These would be alternative examples of a minimal valid format, containing the necessary fields. See Adding and Deleting Device 'Free' tags sections below for more details on each action. |
File selector | The file selector button opens the native browser operating system file system selection dialog. |
Close / Upload buttons | Cancel closes the dialog with no changes. Upload executes a synchronous upload of the file to the IoTM platform for processing. |
6.5.1. Adding Device 'Free' Tags
To add device to free tag associations, upload a file containing the association between your connections and tags (e.g., Firmware:<FW version>, Model:<Model name>, Division:<organizational division name>, Serial:<Number>, etc.).
The file should contain 2 columns and up to 100,000 rows per file and be no larger than 10 MB. The first (left) column should be the connection identifier and the second column should be the tag value. Unlike with End Customer tags, a connection can have multiple 'free' tags, and the way to convey this information in the file is to provide each connection-tag association on its own row so that the same connection identifier may appear more than once.
A title row needs to be added to indicate what type of connection identifier is being used:
- For GSM evolution connections, either : #iccid, #imsi. #msisdn can be used as well, but MSISDN is not necessarily unique within the context of a given CDP, so it is not advisable.
- For legacy CDMA connections, use either: #mdn, #meid or #esn
Note: Device identifier types cannot be mixed within the same file. Therefore, if you need to mix them, upload a separate file for each identifier type. |
|---|
The file needs to be formatted in the following way:
#iccid, tag 89011702272013815124,MODEL:X 89011702272013815124,FW:v1.02 89011702272013816236,MODEL:X 89011702272013816236,FW:v1.03
Important Operational Note: if your tag uses a <prefix>:<value> structure, this is called prefix-based tagging, and it is the recommended type of tagging. The reason prefix-based tagging is preferable to non-prefix-based tags is that if you upload a prefixed based tag with a new value, the old tag with this prefix will be overridden and updated. For instance, if you tagged #iccid, tag 89011702272013816236,FW:v1.03 And later, you upload a new tag file with #iccid, tag 89011702272013816236,FW:v1.04 Then the FW:v1.03 value will be replaced with the FW:v1.04 value without the Need to delete the FW:v1.03 first, and you will not have a duplicate FW tag on the ICCID. |
|---|
6.5.2. Deleting Device 'Free' Tags
To delete device to free tag associations, upload a file containing the association you wish to delete between the connection and tags. The file should contain 2 columns and up to 100,000 rows per file. The first (left) column should be the connection identifier and the second column should be the tag value. Note that a connection can have multiple 'free' tags, therefore the same connection identifier may appear more than once in the file - for however many tags you wish to delete.
A title row needs to be added to indicate what type of connection identifier is being used:
- For GSM evolution connections, either : #iccid, #imsi. #msisdn can be used as well, but MSISDN is not necessarily unique within the context of a given CDP, so it is not advisable.
- For legacy CDMA connections, use either: #mdn, #meid or #esn
Note: Device identifier types cannot be mixed within the same file. Therefore, if you need to mix them, upload a separate file for each identifier type. |
|---|
The file needs to be formatted in the following way:
#iccid, tag 89011702272013815124,MODEL:X 89011702272013815124,FW:v1.02 89011702272013816236,MODEL:X 89011702272013816236,FW:v1.03
Important Operational Note: If you want to delete all the tags from a connection, then simply upload only the identifier with no specific tag to delete. e.g. #iccid 89011702272013815124 |
|---|