Products
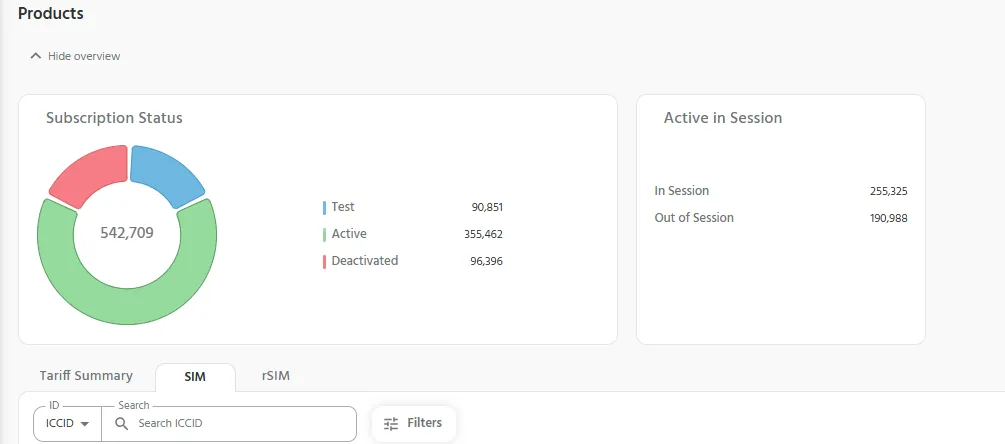
The Products page provides an overview of the tariffs and connected products within your account. Use Tariff Summary to review usage against tariff allowances, or open the SIM and rSIM tabs to search, filter and review individual products.
Product information can be reviewed at account, tariff and individual-product level. Available tabs and information may vary according to the product types within your account.
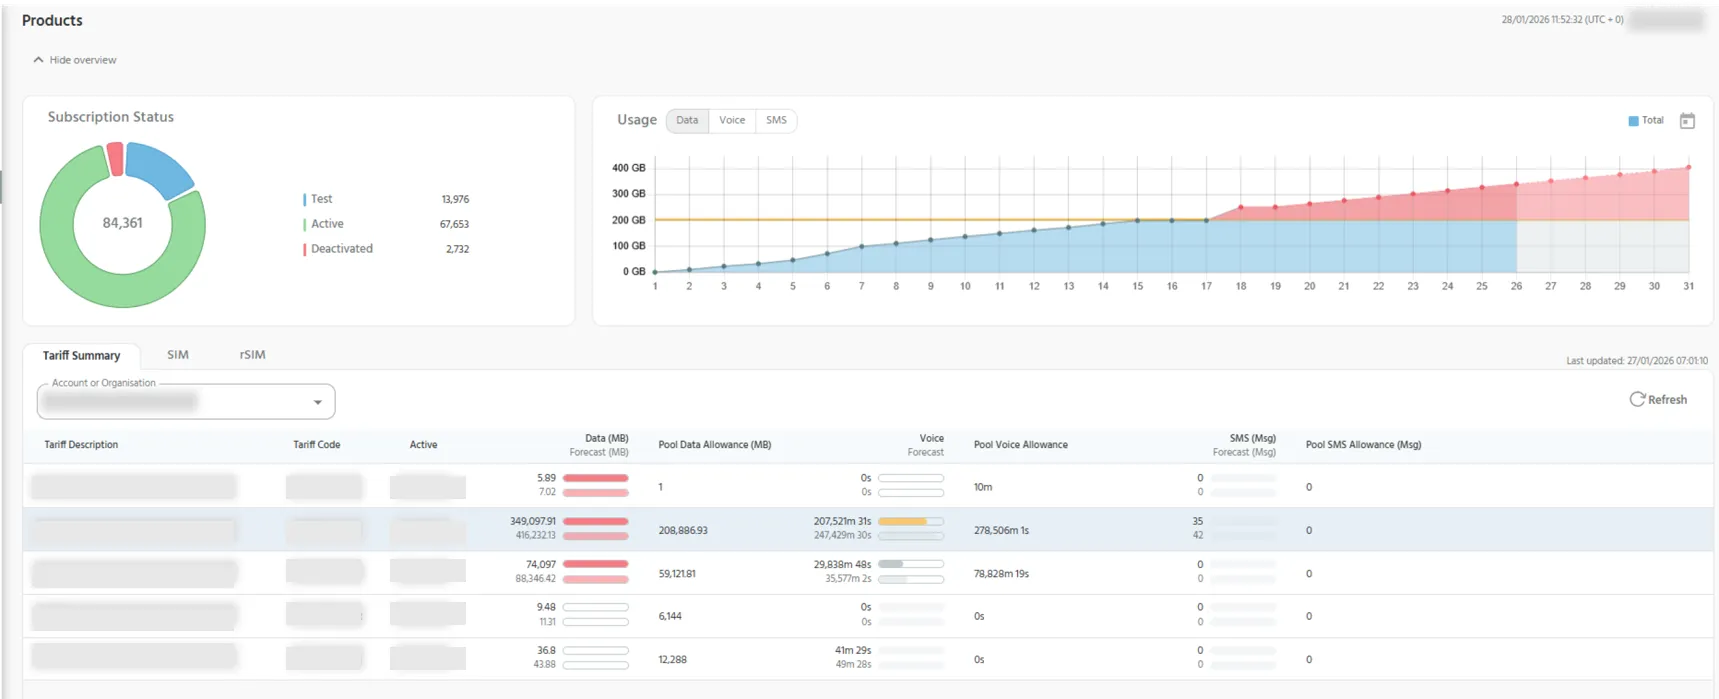
Tariff Summary
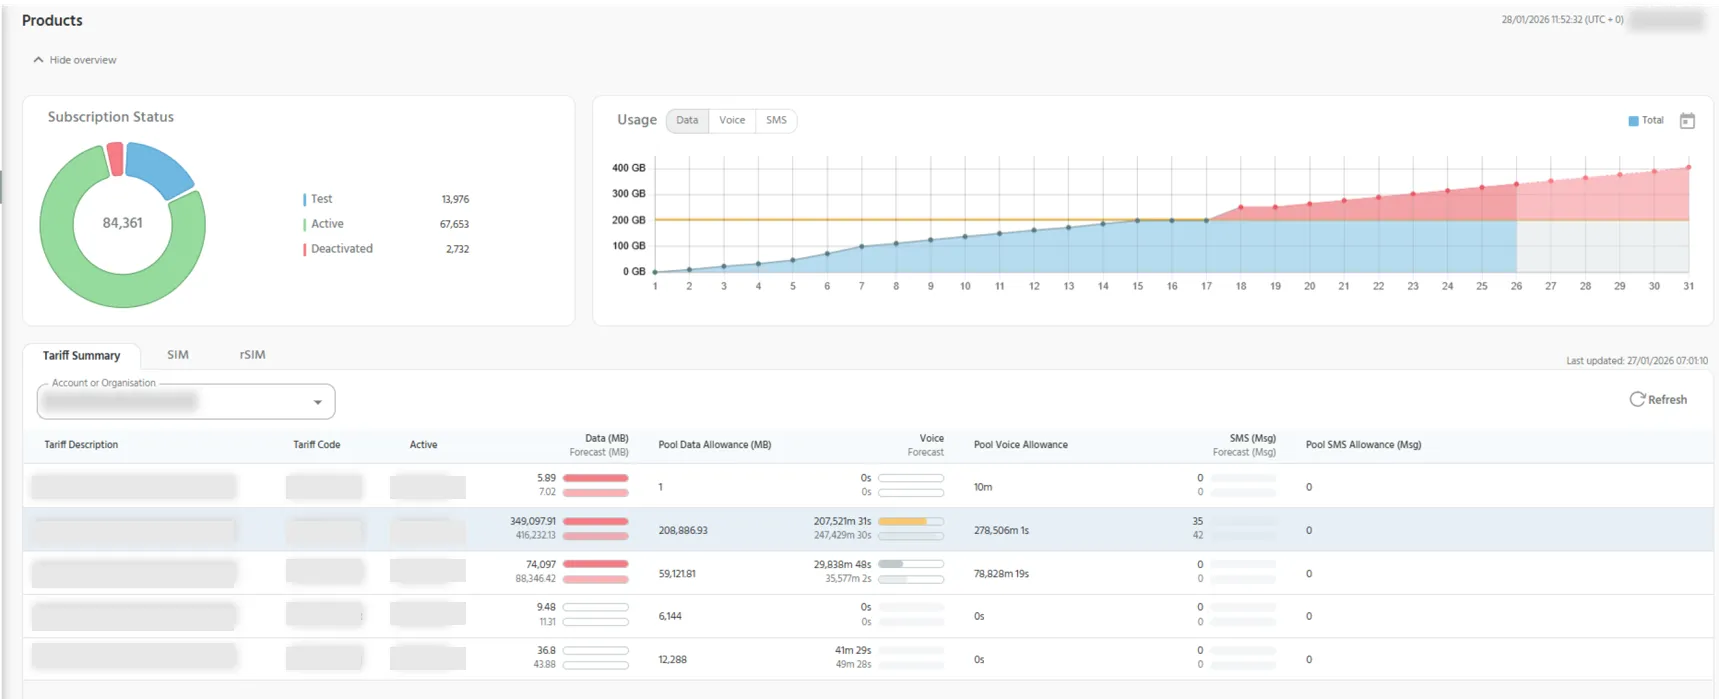
The Tariff Summary tab provides an overview of usage against the allowances available across your tariffs. Use it to identify tariffs approaching or exceeding their allowances and to review forecast usage for the current period.
Usage Against Allowances
Usage is displayed against the available data, voice and SMS allowances for each tariff.
Progress bars use colour to highlight the level of consumption:
- Grey: up to 80% of the allowance has been used.
- Amber: between 80% and 99% has been used.
- Red: 100% or more of the allowance has been used.
Review an Individual Tariff
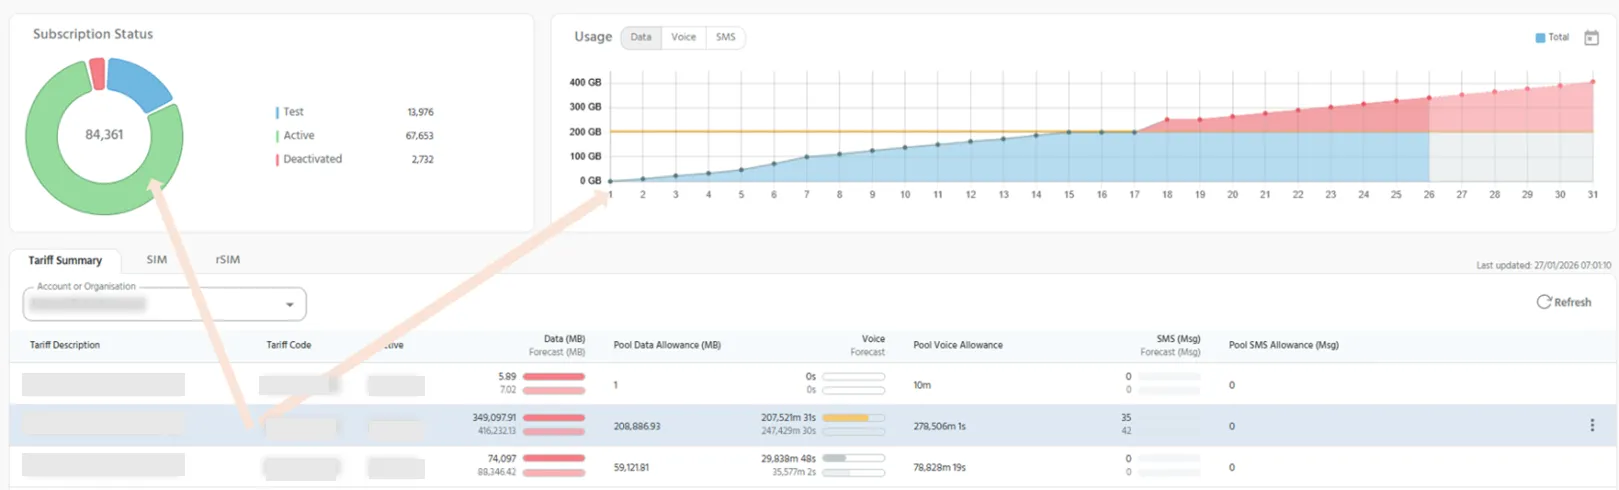
Select a tariff row to view the subscription status and usage summary for that tariff. The summary displays the associated subscription information and usage values for the selected tariff.
Forecast Usage
Forecast information is available for data, voice and SMS usage. Use the forecast to understand how current consumption may develop during the applicable usage period.
Review Tariff Details
The summary table includes information such as:
- Tariff description;
- The number of active SIMs associated with each tariff code;
- Data, voice and SMS usage;
- Links to the corresponding SIM or rSIM product view.
Usage Alerts
The Usage Alerts feature helps users proactively monitor tariff allowance consumption and identify potential overages before they occur.
Usage Alerting is configured from the Tariff Summary page and allows users to receive notifications when selected tariff pools reach defined usage thresholds.
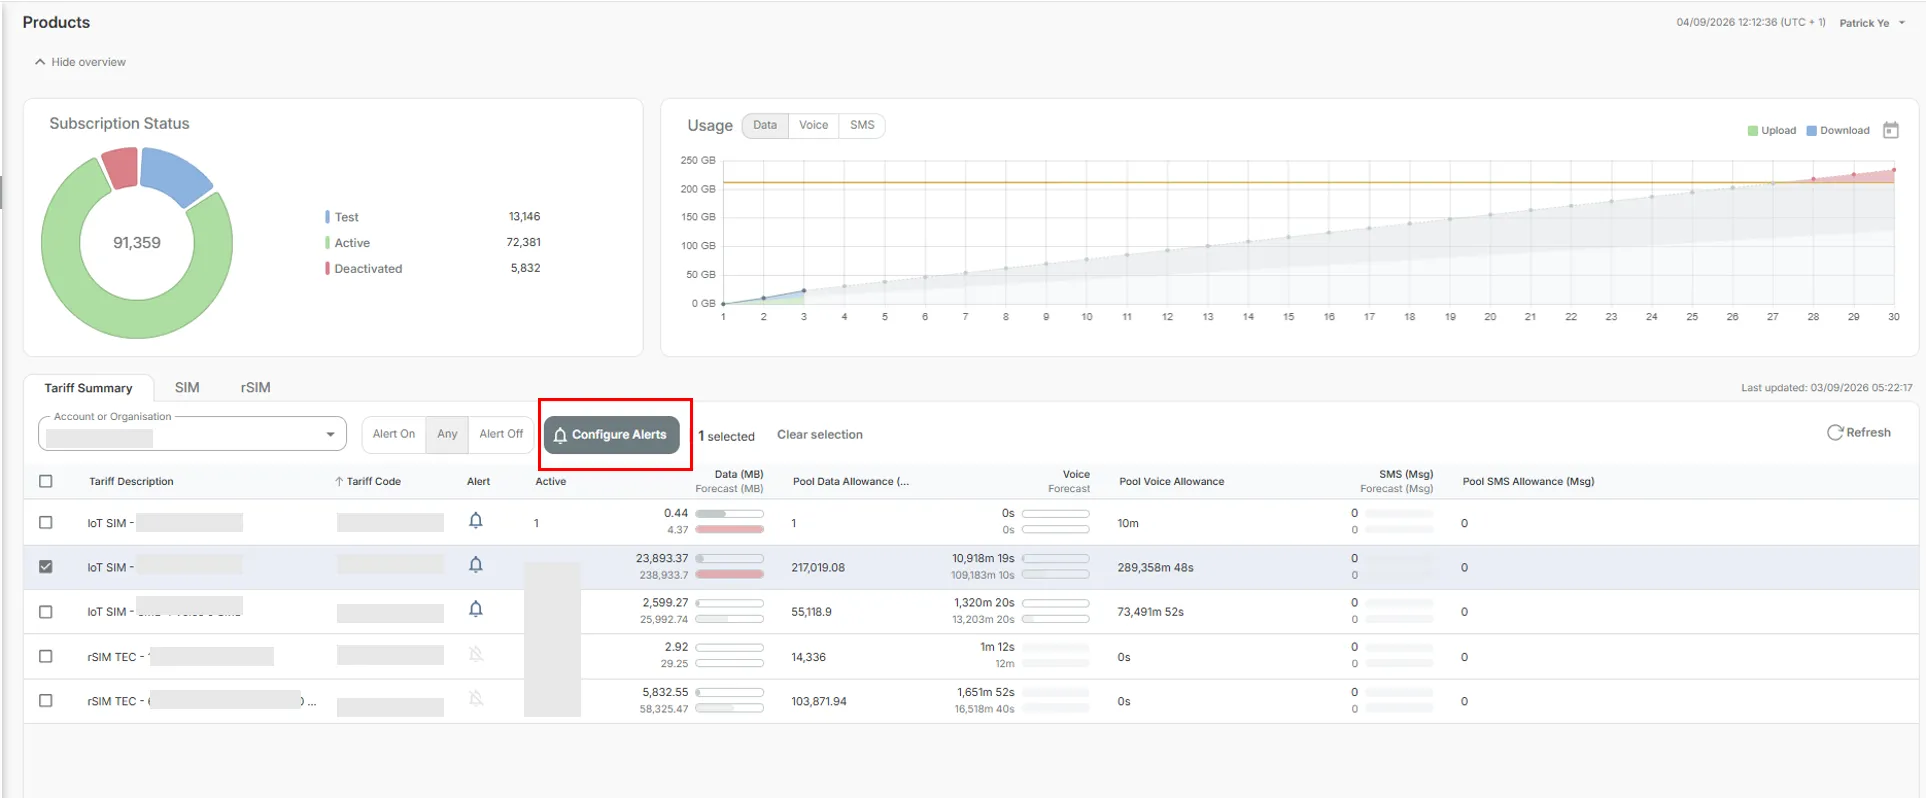
Configure Usage Alerting
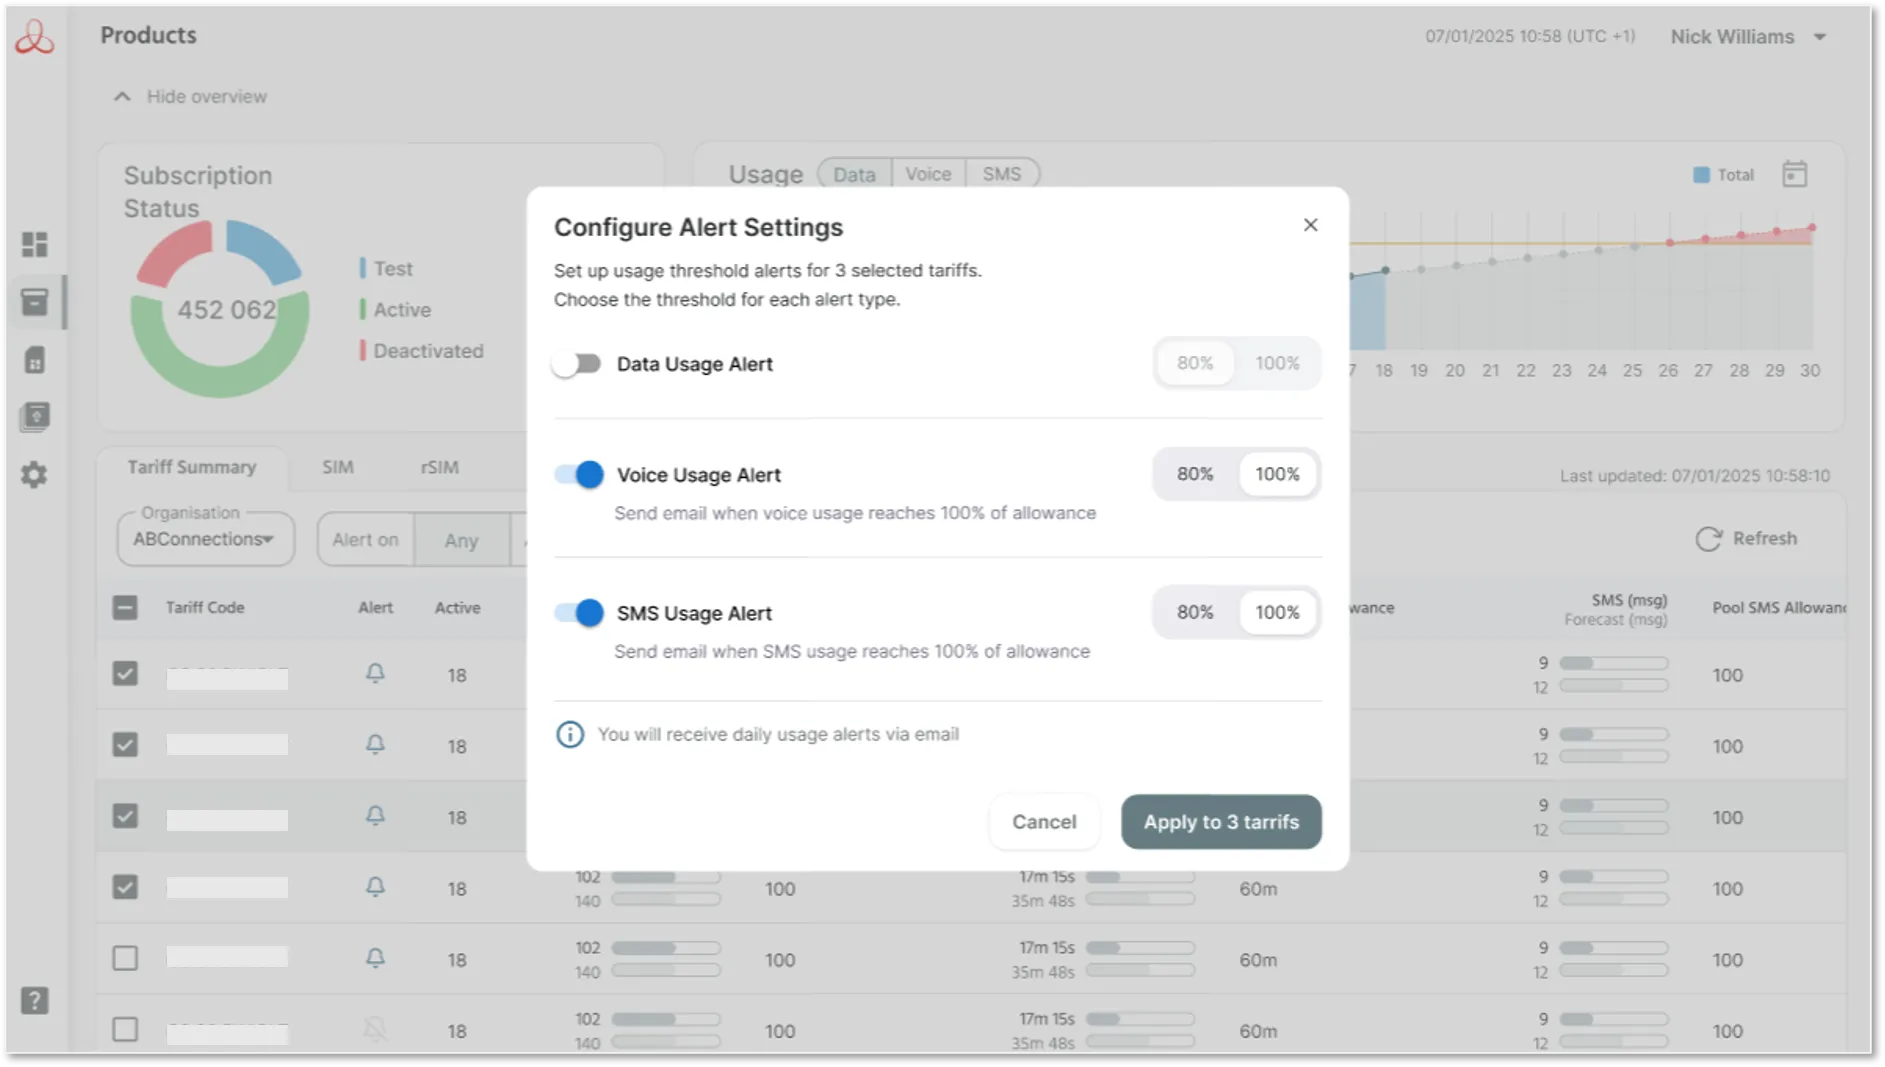
Users can enable alerting for one or more tariff pools within the selected account. The current release supports notifications at the following usage thresholds:
- 80% usage
- 100% usage
Alerting can be configured for selected tariff pools directly from the Tariff Summary view.
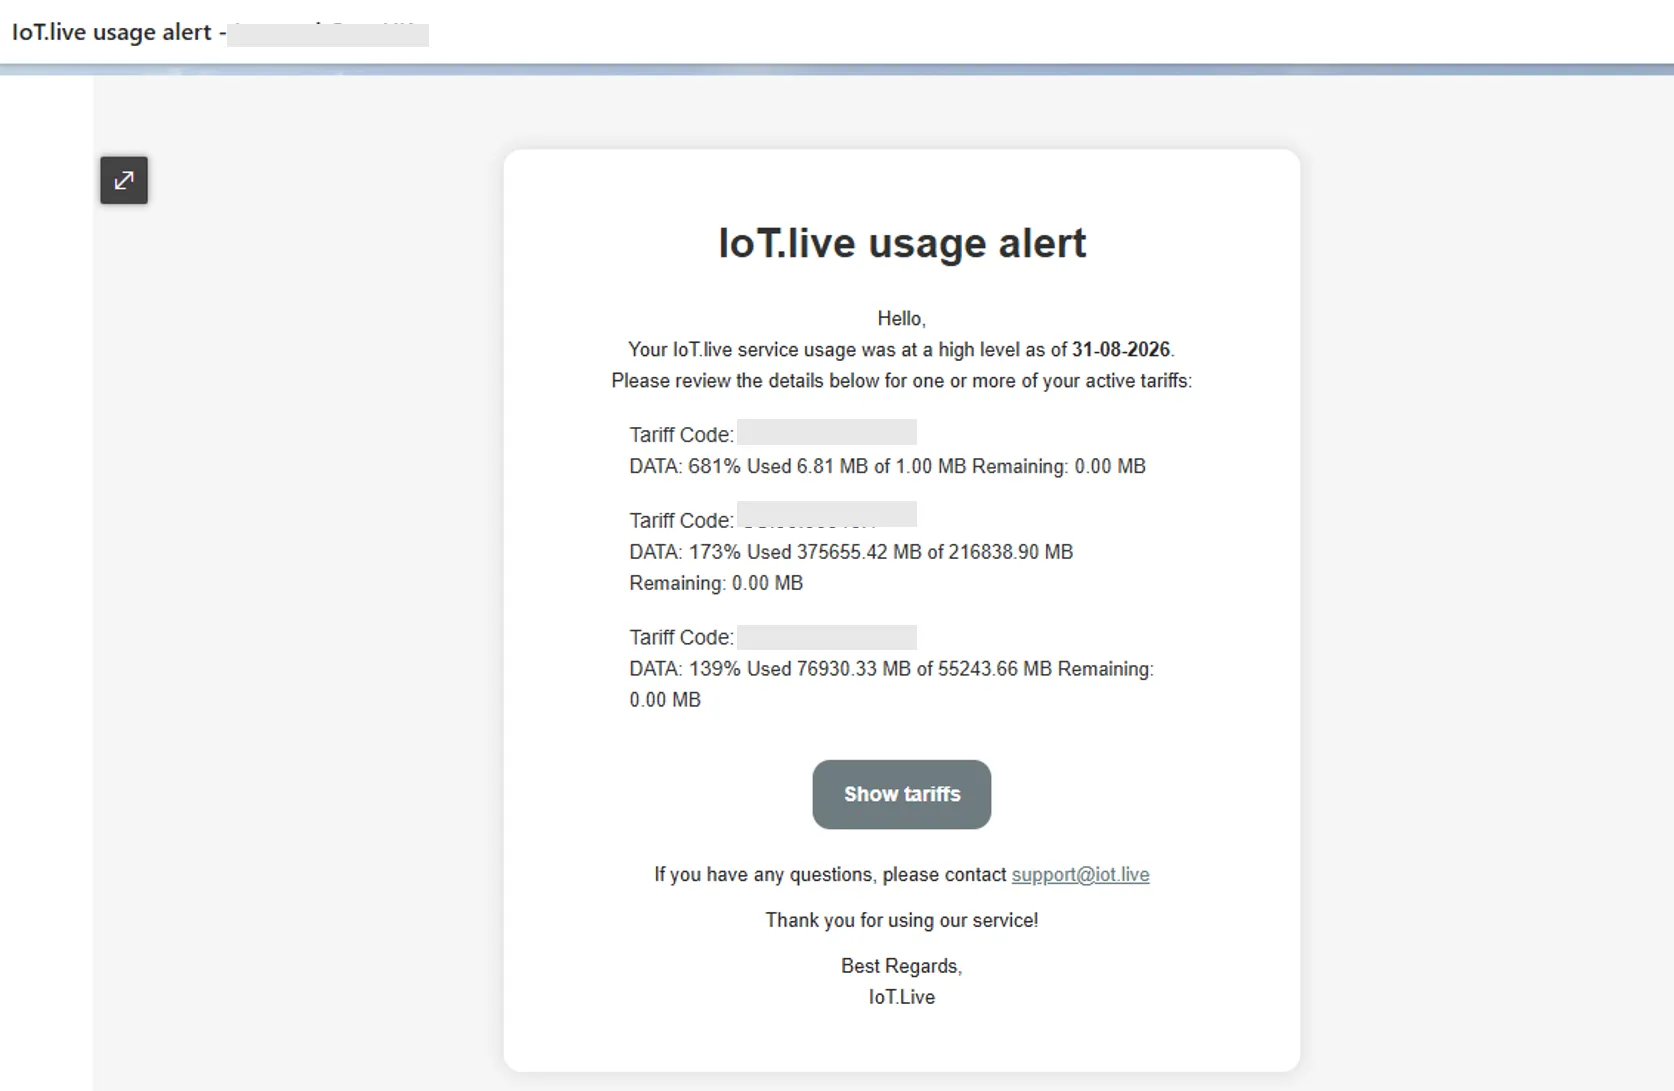
Receive alert notifications
When a configured threshold is reached, IoT.live generates a daily alert notification.
Notifications are sent only when alert conditions are met and are delivered to the email address associated with the CMP user account.
The notification includes information about the affected tariff pools and the current allowance utilisation.
Manage alerts
Users can:
- enable alerting for one or more tariff pools;
- add additional tariff pools to an existing alert configuration;
- remove tariff pools from alerting;
- clear or reset alert selections.
Export and Refresh
Use Export to download the available tariff information. Use Refresh to update the information shown on the page.
SIM Products
Search and Filter SIM Products
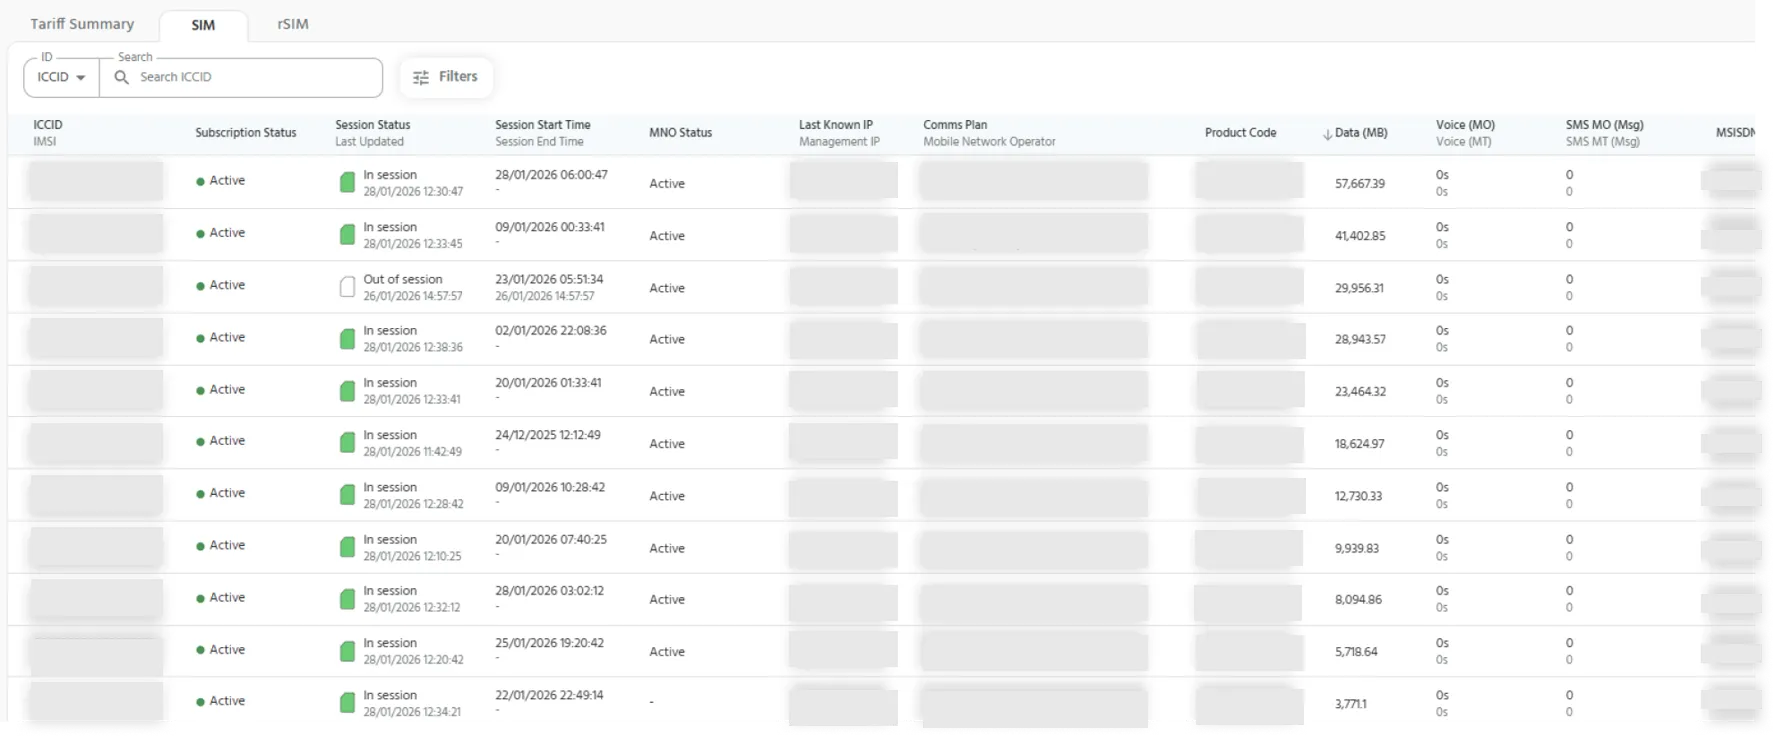
Use Search to find a product using an available identifier.
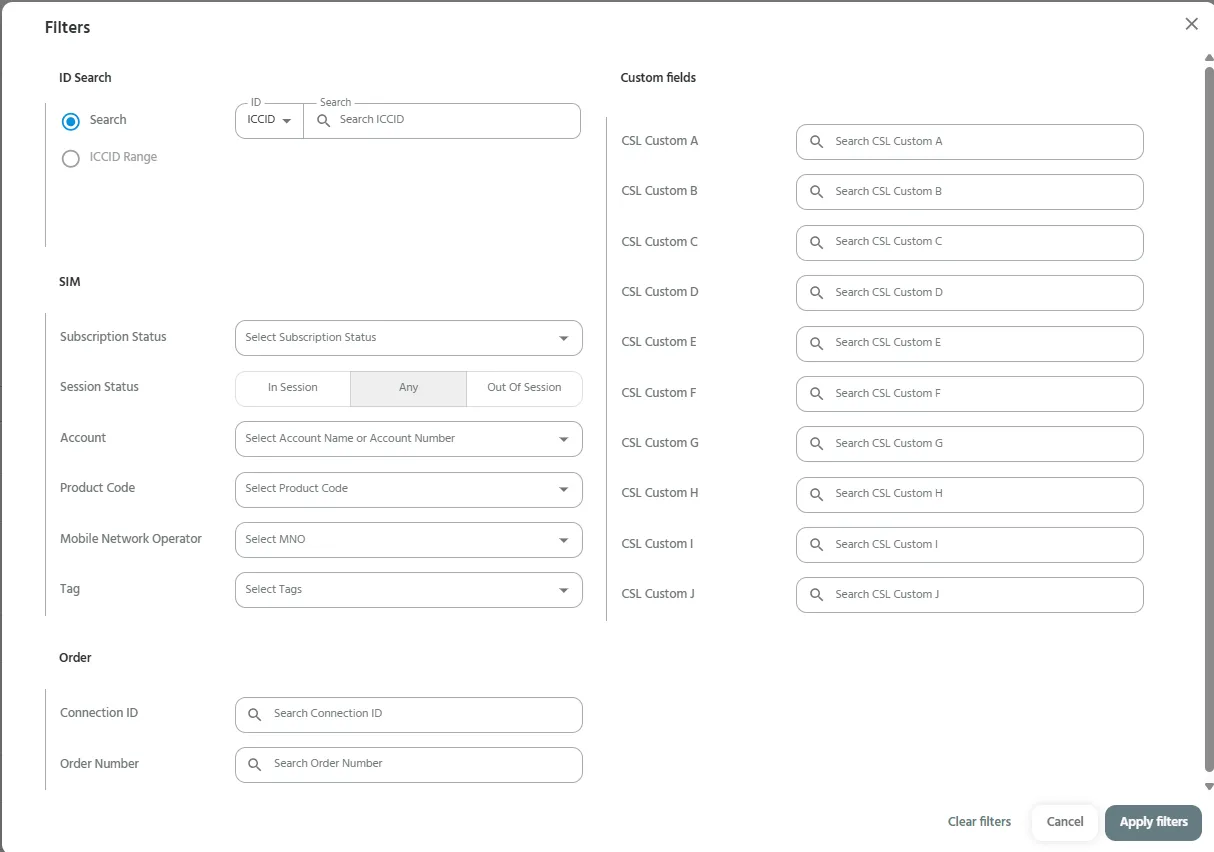
Select Filters to narrow the product list using fields such as:
- Subscription Status;
- Session Status;
- Network;
- Product Code;
- Mobile Network Operator;
- Tag;
- Connection ID;
- Order Number;
- Available custom fields.
View SIM Details
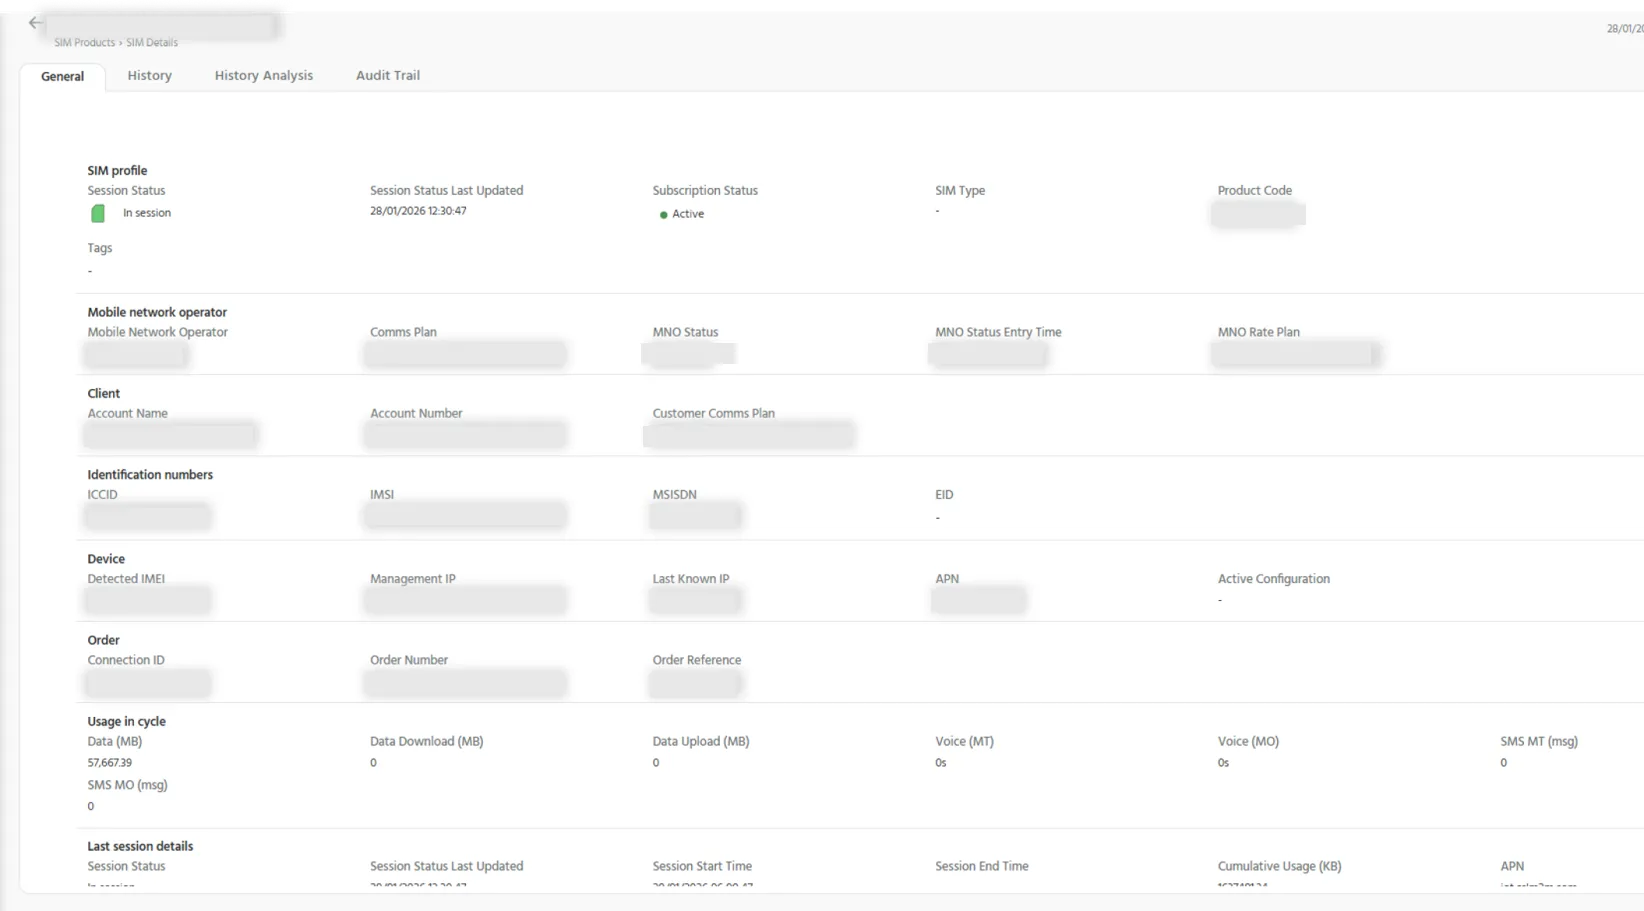
Select a row within the Product table to open the corresponding product details page. The page provides information about the selected SIM and access to the available product-level tabs.
The visible tabs in your screenshots include:
- General, for the SIM’s main product, account, network and service information;
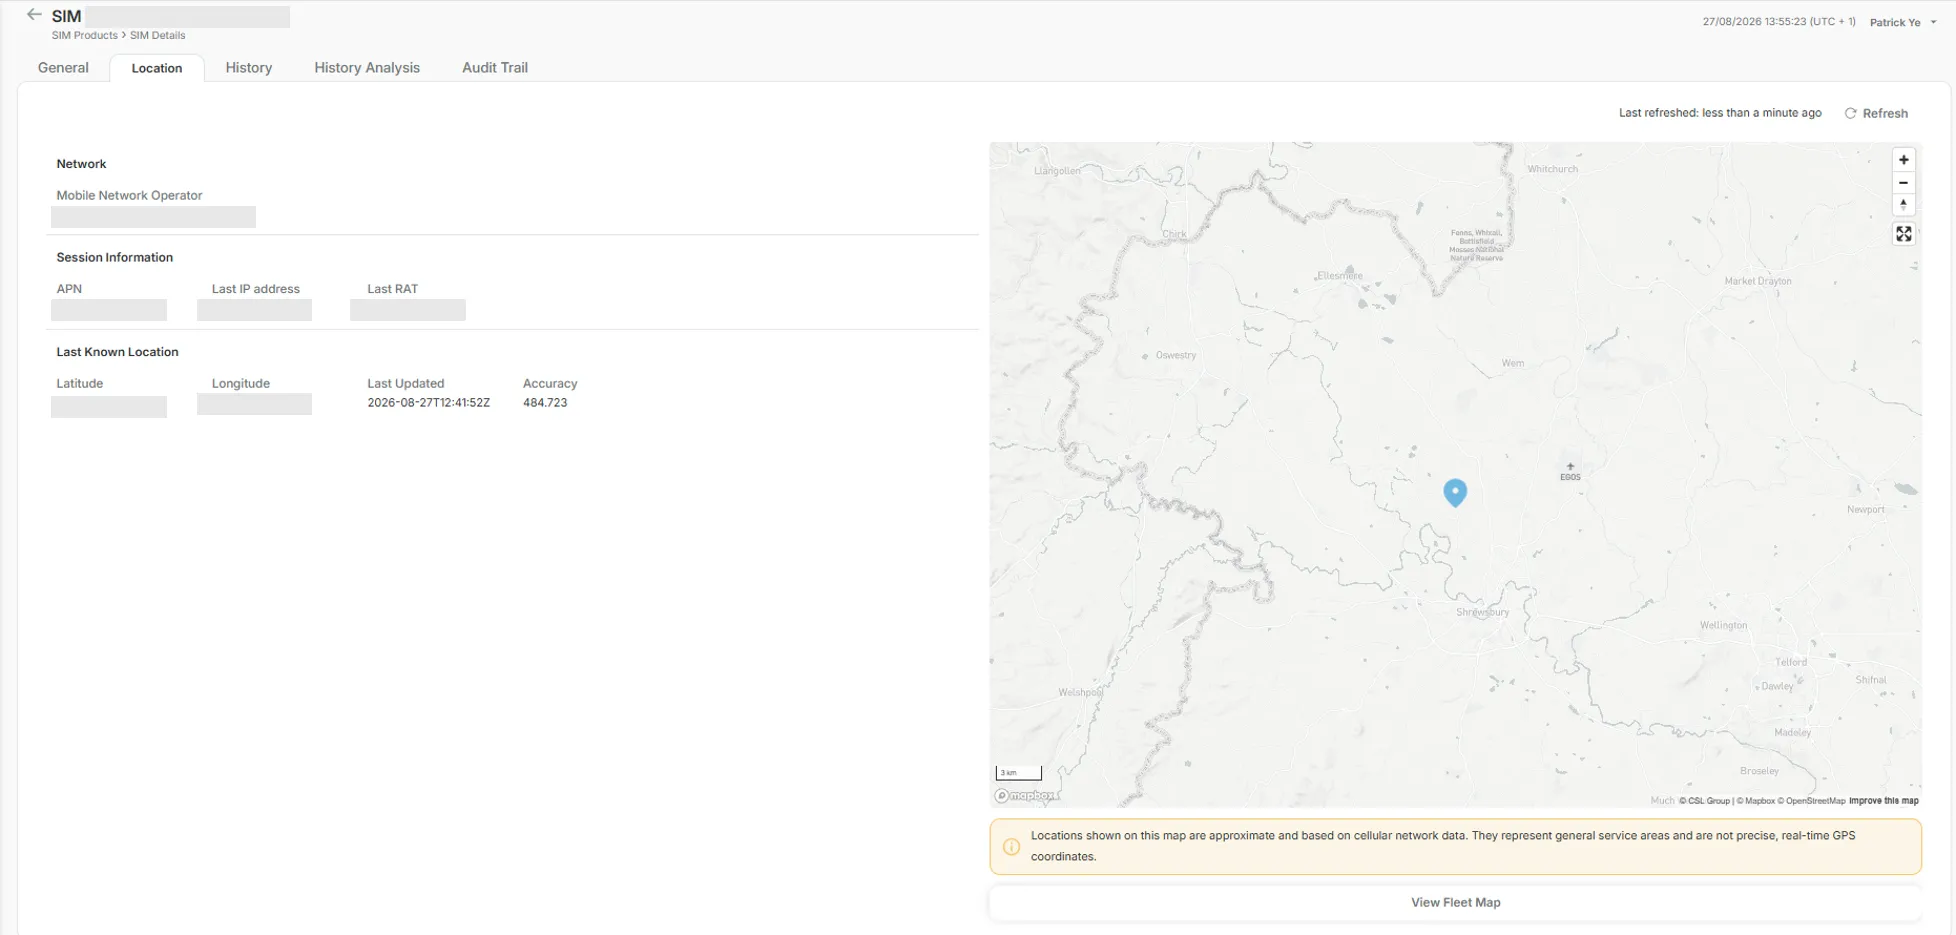
- Locations, where available, for the product’s last known location;
- History, review individual session records and network information;
- History Analysis, visually analyse session activity over a selected period;
- Audit Trail, for recorded changes to the product.
General Tab
The General tab also allows authorised users to add or edit tag information for the selected SIM.
Location Tab
The Location Tab shows the product's last known location if available.
History Tab
The History tab provides a detailed record of data sessions associated with the selected SIM or rSIM product. Use this view to review when a session started and ended, how long it lasted, the amount of data used and the network information recorded during that session.
Each session row can include:
- profile;
- session start and end time;
- duration;
- cumulative usage;
- IP address and APN;
- MNO and roaming codes;
- location information;
- detected IMEI;
- session ID;
- radio access type;
- RAS client;
- framed protocol;
- NAS IP address;
- service type;
- username.
The exact fields shown depend on the information available for the session.
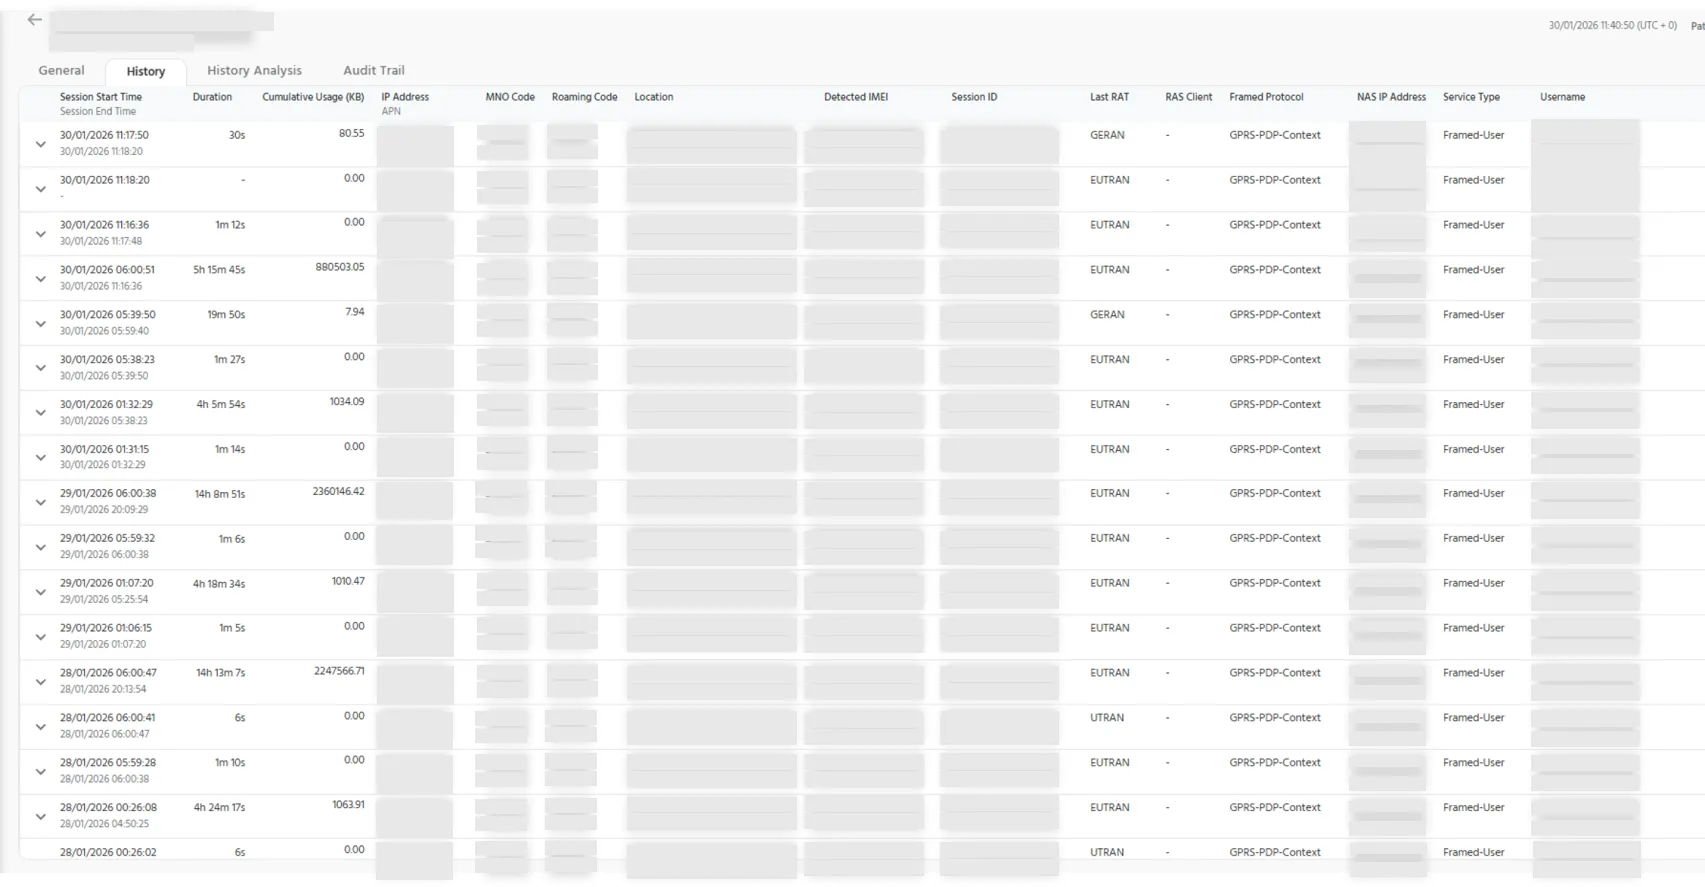
Review session interim records: Select the expand control beside a session to review the interim records captured during that session.
Interim records can show:
- whether the interim represents the start or stop of the session;
- when the session status was last updated;
- usage recorded at that point;
- MNO code;
- location information;
- radio access type.
Use the interim records to identify changes that occurred within a single session, such as changes in location or radio access type.
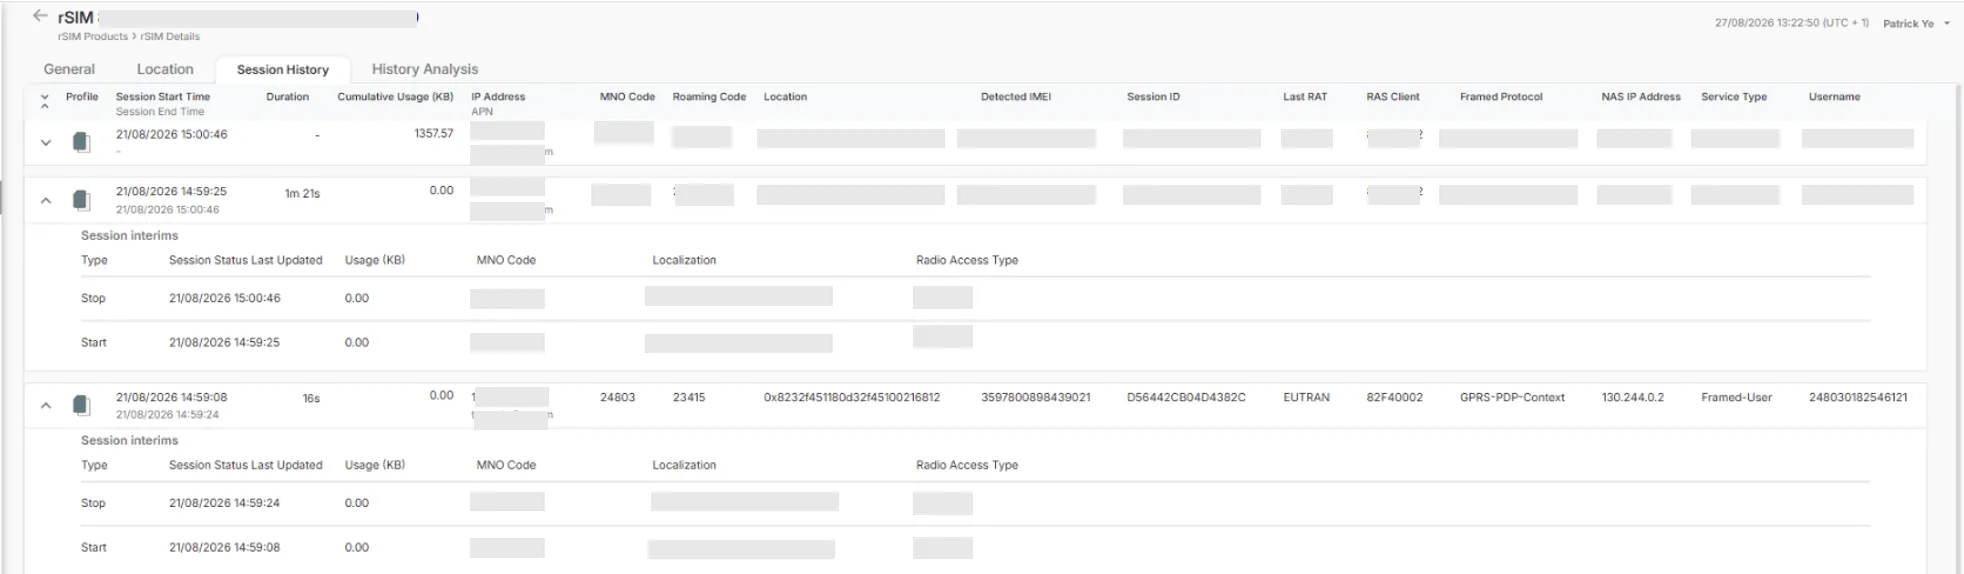
What to look for: Session History can support connectivity investigation by helping users review:
- repeated short sessions occurring close together;
- sessions with no recorded data transfer;
- sessions that have not been finalised;
- the country or network used by a session;
- changes in location, carrier, radio access type or APN during a session.
These are identified in the supporting research as useful indicators when investigating connectivity behaviour. However, their presence does not by itself confirm a fault, because some devices connect only briefly while others maintain sessions for extended periods.
Session behaviour varies by product and use case. Review the session pattern together with the available network, usage and device information before drawing a conclusion.
History Analysis Tab
The History Analysis tab provides a visual timeline of session and connectivity activity for the selected product. Use it to identify patterns, compare sessions and examine activity within a chosen time period.
The view includes:
- a date range selector;
- a time-range control with adjustable handles;
- preset zoom options;
- session and polling timelines;
- average session throughput;
- details for the selected session;
- available interim, location and radio access information.
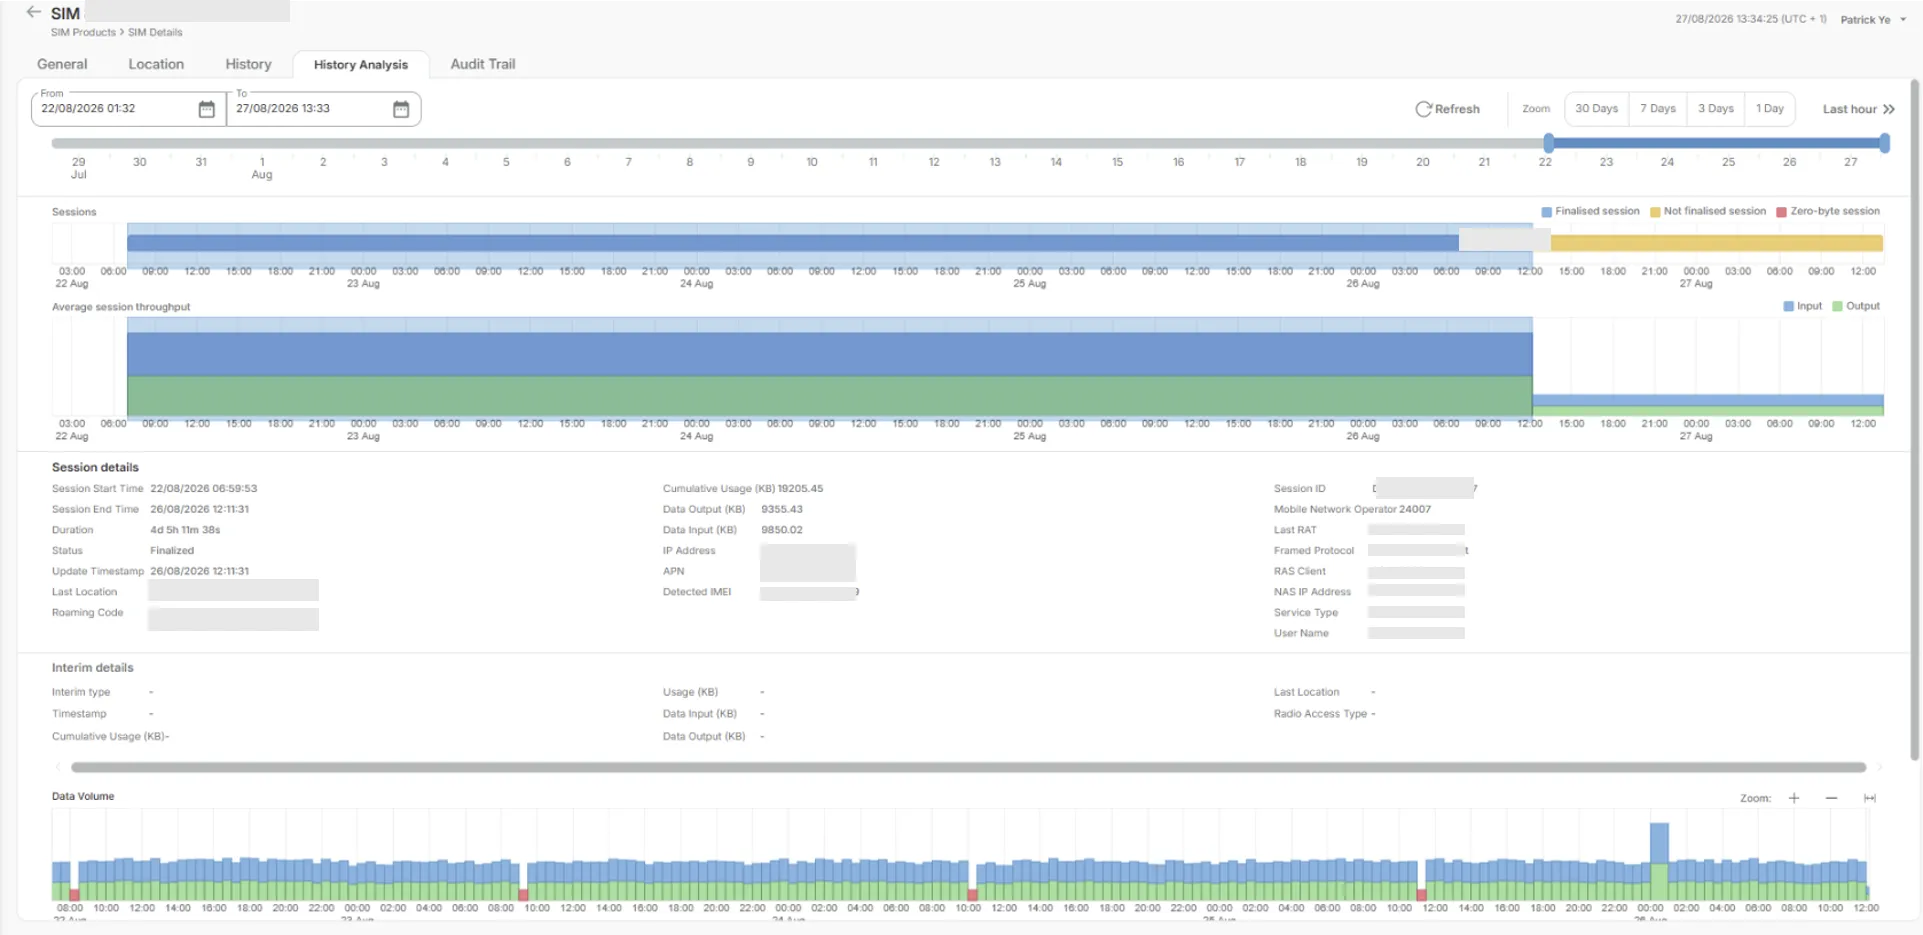
Select a time period: Use the From and To fields to define the period you want to review.
The timeline control can then be used to refine the visible period:
- drag either handle to change the start or end of the selected period;
- drag the selected range to move it without changing its length;
- select 30 Days, 7 Days, 3 Days or 1 Day to change the timeline scale;
- use Last hour where available to move to the most recent activity;
- select Refresh to display the latest available information.
The Sessions timeline shows when data sessions occurred and how long they lasted.
The design distinguishes:
- Finalised session;
- Not finalised session;
- Zero-byte session.
The Average session throughput chart displays input and output throughput for sessions across the selected period.
- Input is shown in blue in the current interface.
- Output is shown in green in the current interface.
Hover over a point or session in the chart to display the available session details, including its timing, location and data input and output values.
Review an individual session: Select a session on the timeline to display its details below the charts. Depending on the available data, the selected-session area can include:
- session start and end time;
- duration and finalisation status;
- update timestamp;
- cumulative usage;
- data input and output;
- IP address and APN;
- detected IMEI;
- MNO and roaming codes;
- location;
- radio access type;
- session ID;
- rSIM profile and ICCID;
- additional network and service information.
History Analysis can help identify:
- groups of unusually short sessions;
- gaps between sessions;
- sessions that remain unfinalised;
- sessions with no recorded data transfer;
- changes between primary and backup rSIM profiles;
- changes in radio access type or location;
- input and output throughput patterns.
Audit Trail Tab
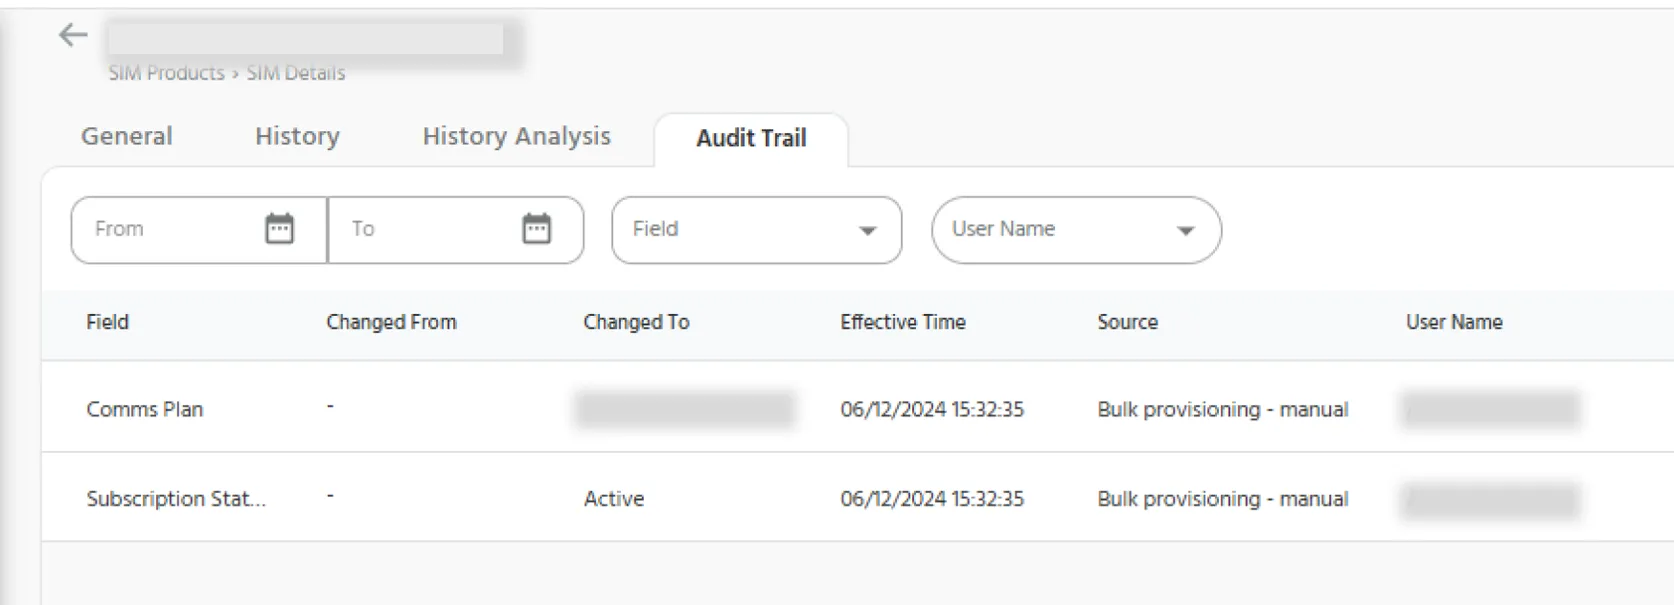
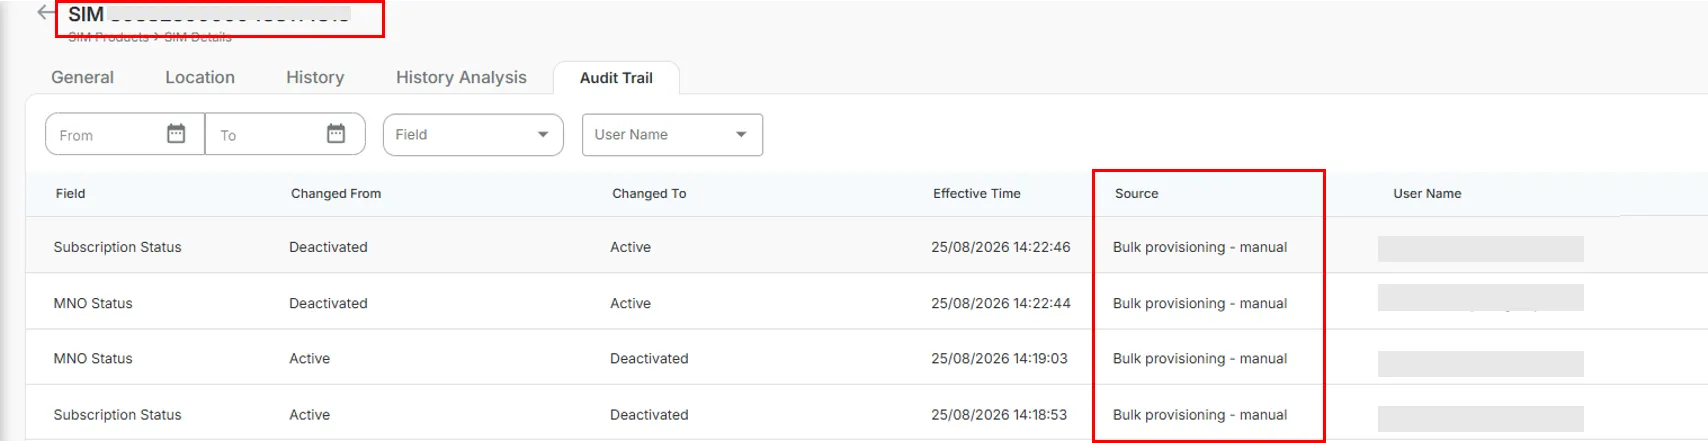
The Audit Trail tab provides a historical record of changes made to the selected product. Use it to review the field changed, the previous and new values, the effective time, the change source and the user associated with the change.
rSIM Products
The rSIM tab shows the rSIM products available within the selected account. Use the search, filter and sorting controls to find and review individual rSIM products.
The account-level summary includes:
- Subscription Status;
- rSIM Status;
- rSIM Performance.
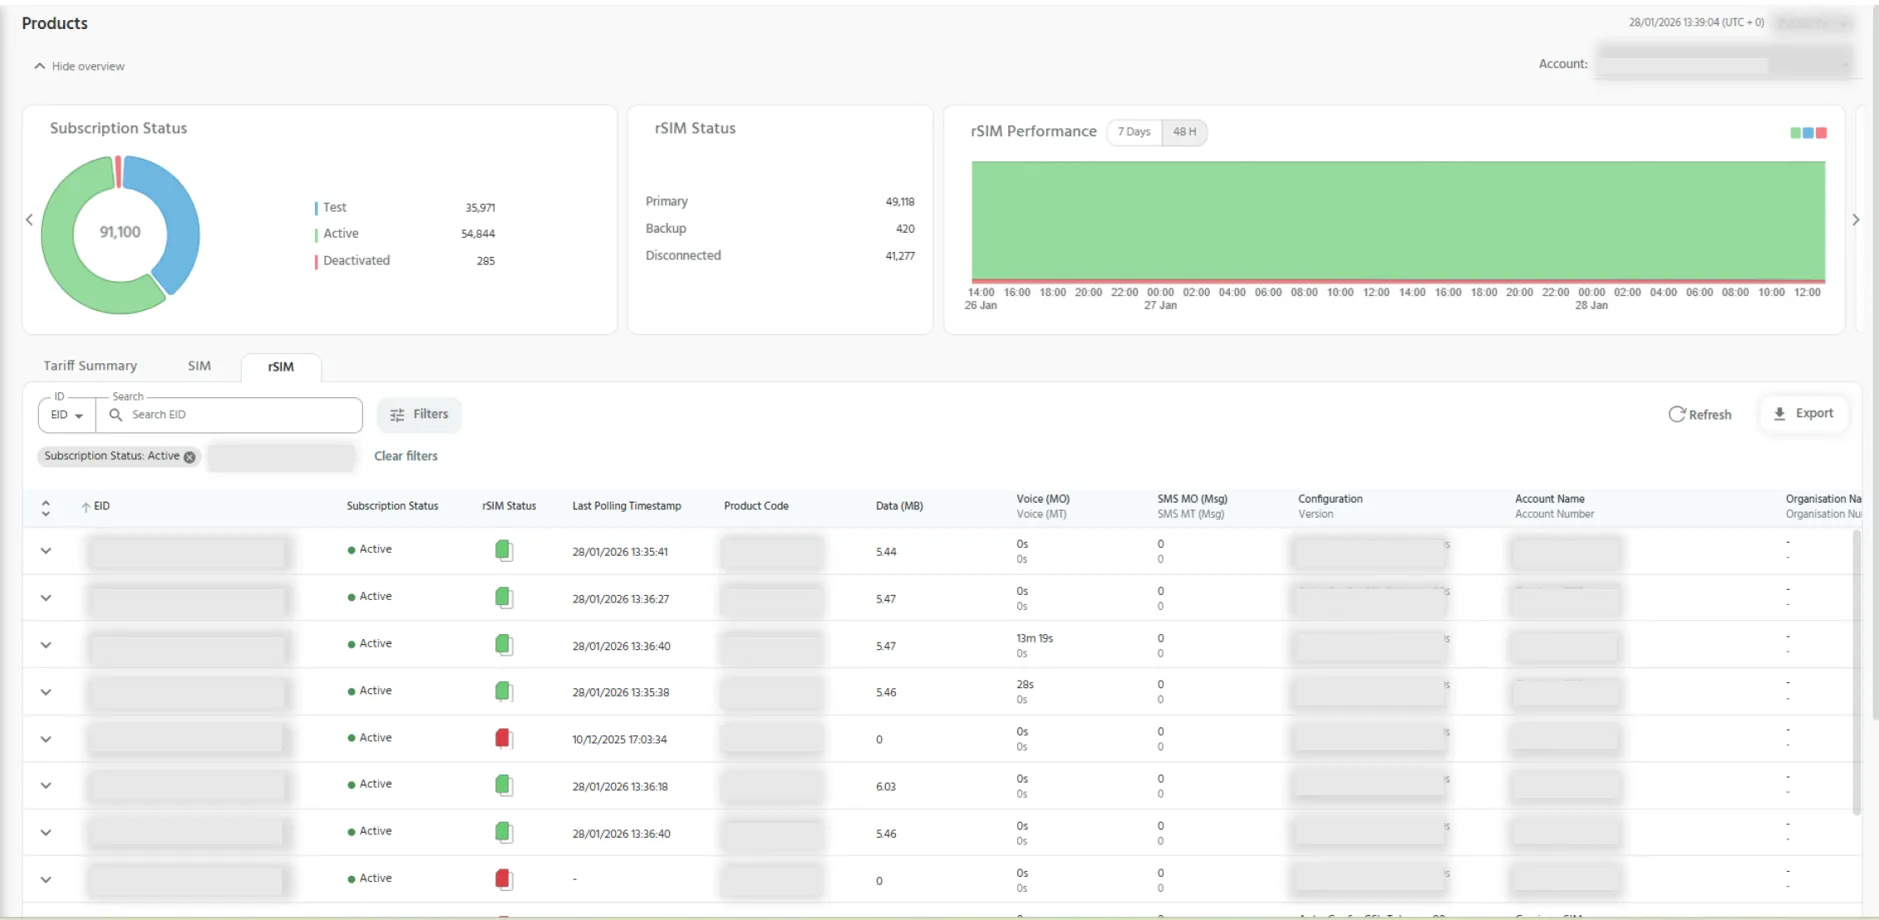
rSIM Performance
The rSIM Performance chart provides a time-based view of rSIM profile activity. Select the available period to review performance over the last 48 hours or 7 days.
The chart:
- divides the selected period into time intervals;
- shows the proportion of rSIMs in the displayed profile states;
- includes only rSIMs that have polled during the displayed period;
- displays additional information when you hover over a time interval.
Understand the rSIM States
- Primary: the primary rSIM profile was the last profile to poll within the displayed snapshot period.
- Backup: the backup profile was the last profile to poll within the displayed snapshot period.
- Disconnected: neither profile polled within the displayed snapshot period.
Review rSIM Session Activity
Unlike standard SIM products, rSIM products include visibility of both the Primary and Backup profile states. Session History and History Analysis can therefore be used not only to review connectivity activity, but also to understand how the resilient profile configuration is behaving over time.
Use Session History to review individual sessions and their associated network information. Use History Analysis to compare polling, session and throughput activity across the Primary and Backup profiles.
The rSIM experience extends the standard SIM analysis tools by providing visibility of Primary and Backup profile activity, polling status and session behaviour.
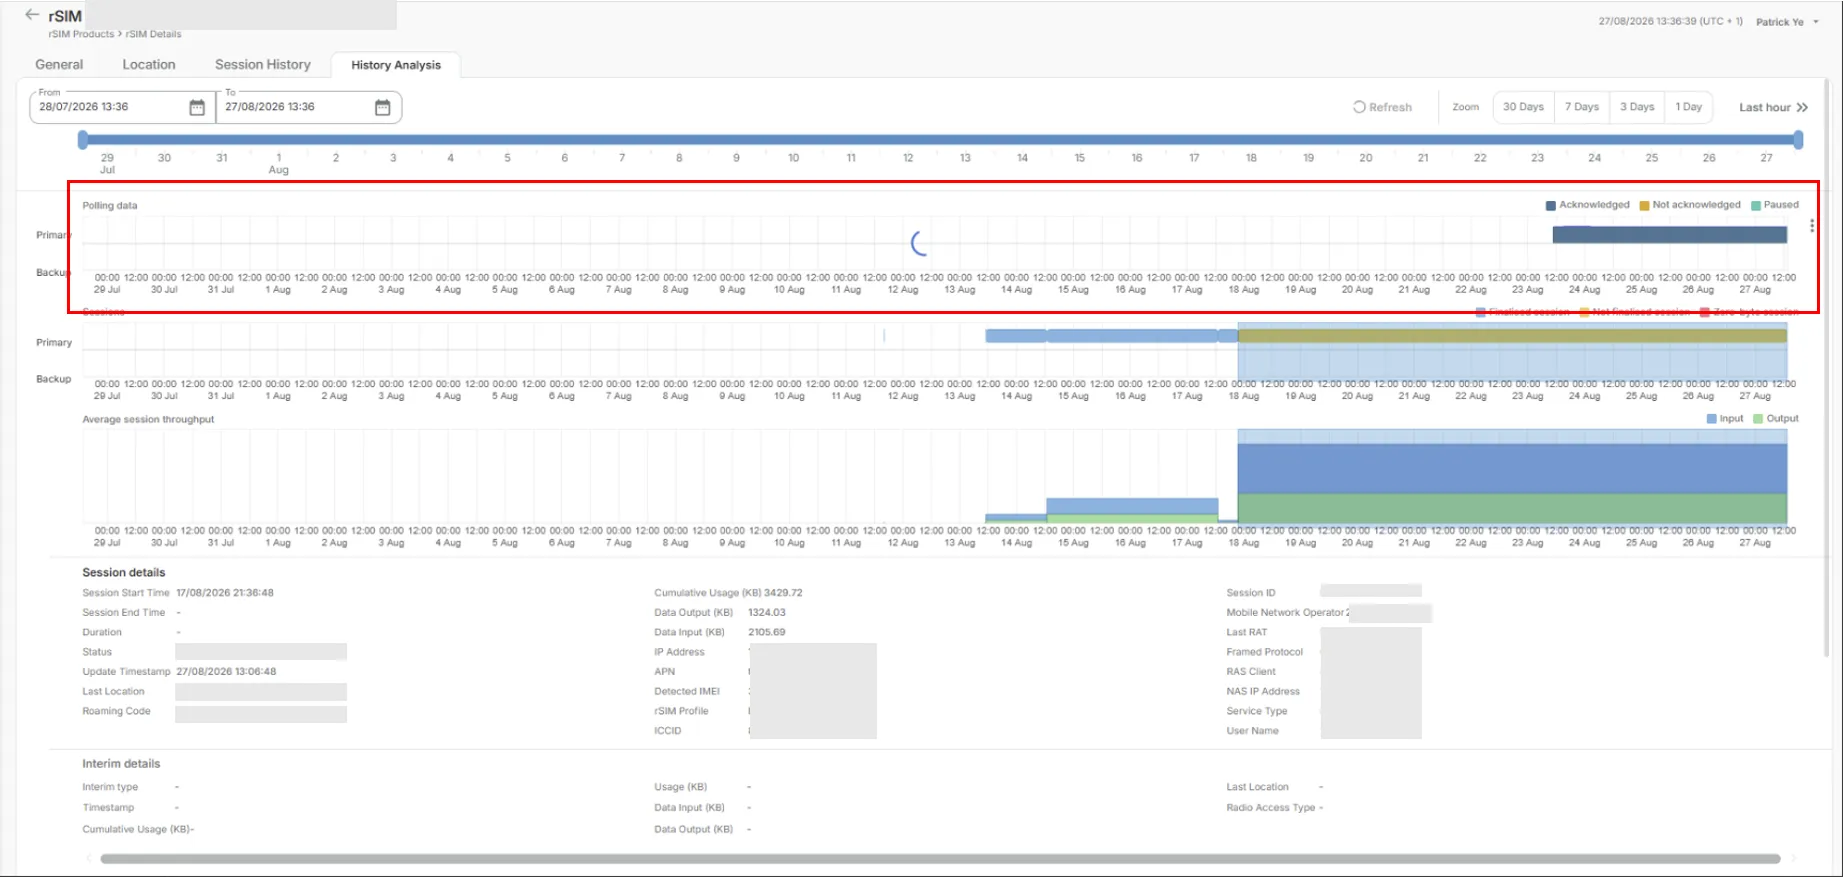
Understand Polling Activity
The Polling Data section shows polling activity separately for the Primary and Backup profiles.
The chart can help users determine:
- whether the expected profile is actively polling;
- when polling activity changed;
- whether a profile entered a paused or unacknowledged state;
- whether the Primary and Backup profiles are behaving as expected.
The polling timeline is one of the key troubleshooting aids available for resilient SIM products.
Polling activity helps identify whether the expected profile is actively communicating with the platform and whether profile failover behaviour is operating as expected.
Compare Primary and Backup Profiles
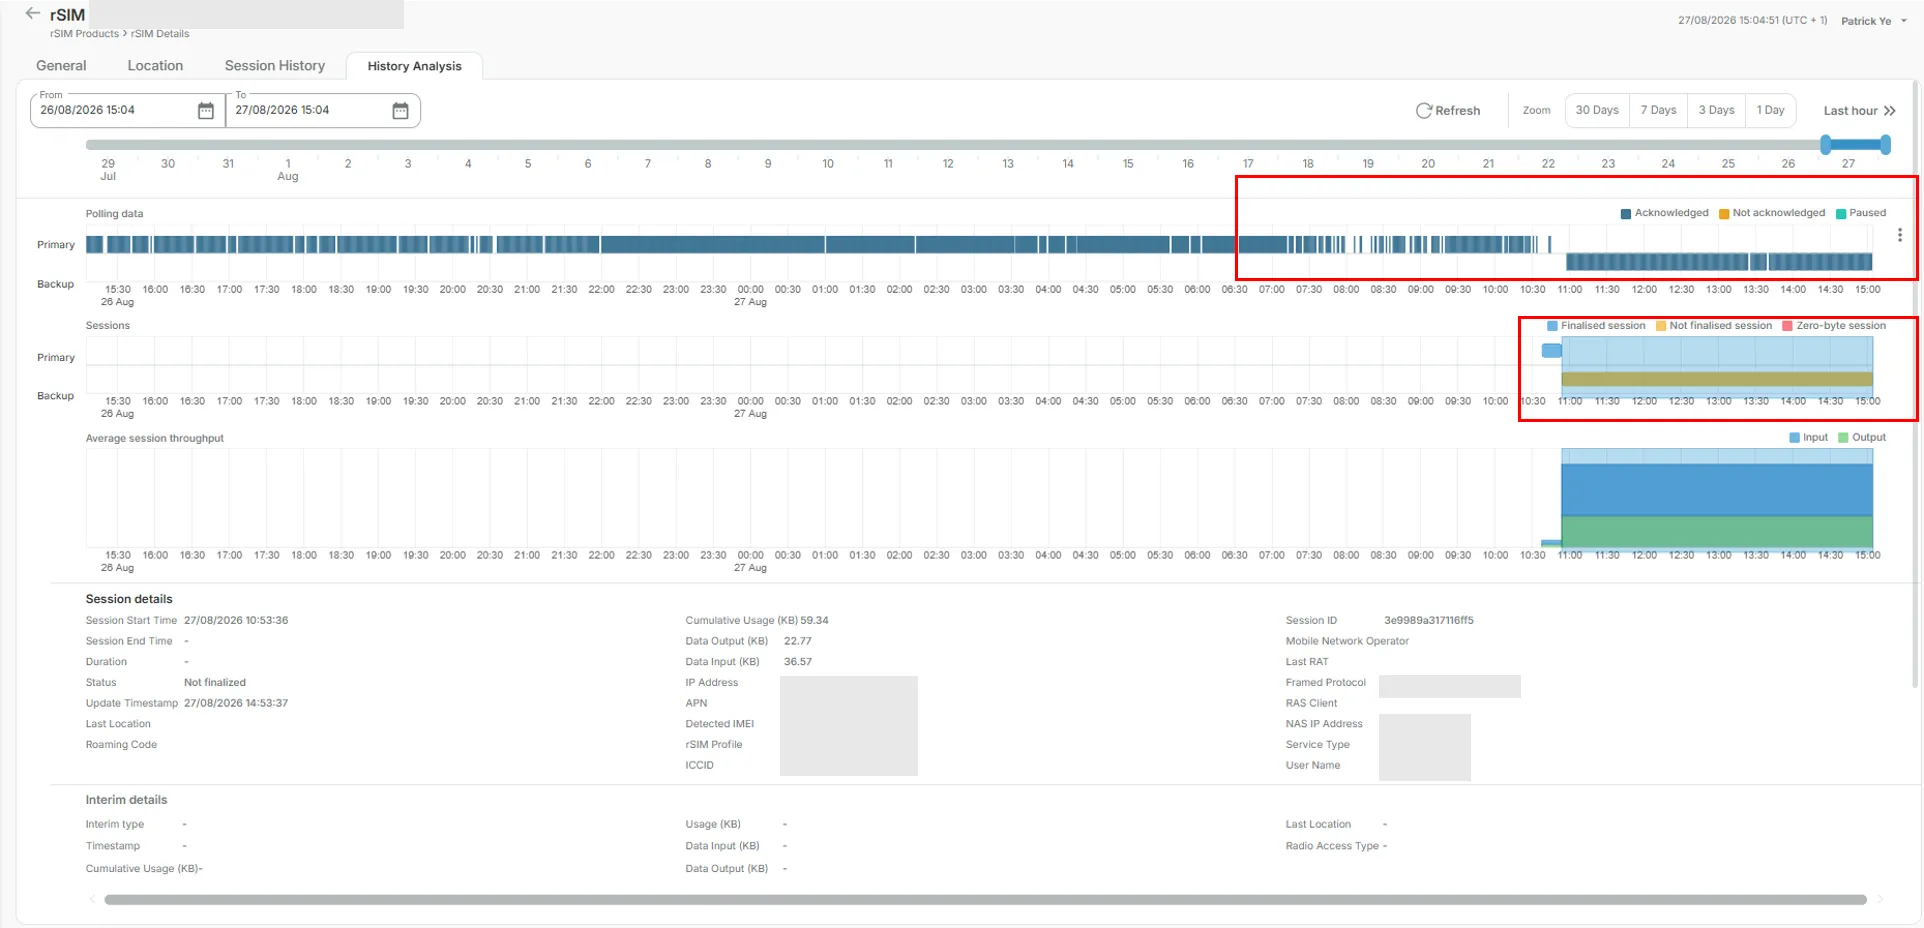
History Analysis allows users to compare across the Primary and Backup profiles via:
- polling activity;
- active sessions;
- average throughput;
- session duration;
- session finalisation status;
This can help identify whether connectivity issues are associated with a specific profile rather than the rSIM as a whole.
Review Session Throughput
The Average Session Throughput graph provides a visual representation of input and output traffic over the selected period.
Use this chart to:
- identify unusually low or high data volumes;
- review periods of inactivity;
- compare throughput across different sessions;
- support investigation of unexpected connectivity behaviour.
Investigate Connectivity Behaviour
For rSIM products, History Analysis can support investigation of:
- unexpected profile switching;
- missing polling activity;
- repeated short sessions;
- unfinalised sessions;
- zero-byte sessions;
- changes in radio access type;
- location changes.
These indicators should be reviewed together with the product configuration and operational context before concluding that a fault exists.
For full instructions on the controls and charts, see Review Session History and Analyse session history earlier on this page.
SIM Lifecycle Management
SIM Lifecycle Management in IoT.live allows authorised users to manage supported lifecycle actions directly from the Products page. You can perform an action on an individual product or select multiple products, submit lifecycle requests and monitor processing outcomes in Products Management.
Important: The actions available depend on the product’s current status, your user role and your account permissions. Customer users can manage only products within their own account.
Understand the Lifecycle
Status | Description |
|---|---|
Inventory | Product has been provisioned but is not yet available to customers. Visible to CSL internal users only. |
Test Ready | Product is available for testing and can be activated by authorised users. |
Active | Product is available for normal operational use. |
Deactivated | Product has been suspended and is unavailable for normal use. |
Terminated | Product has been permanently terminated and cannot be reactivated. |
IoT.live presents a simplified lifecycle model. Statuses from multiple connectivity platforms are normalised into a consistent set of lifecycle states to provide a common user experience across the platform.
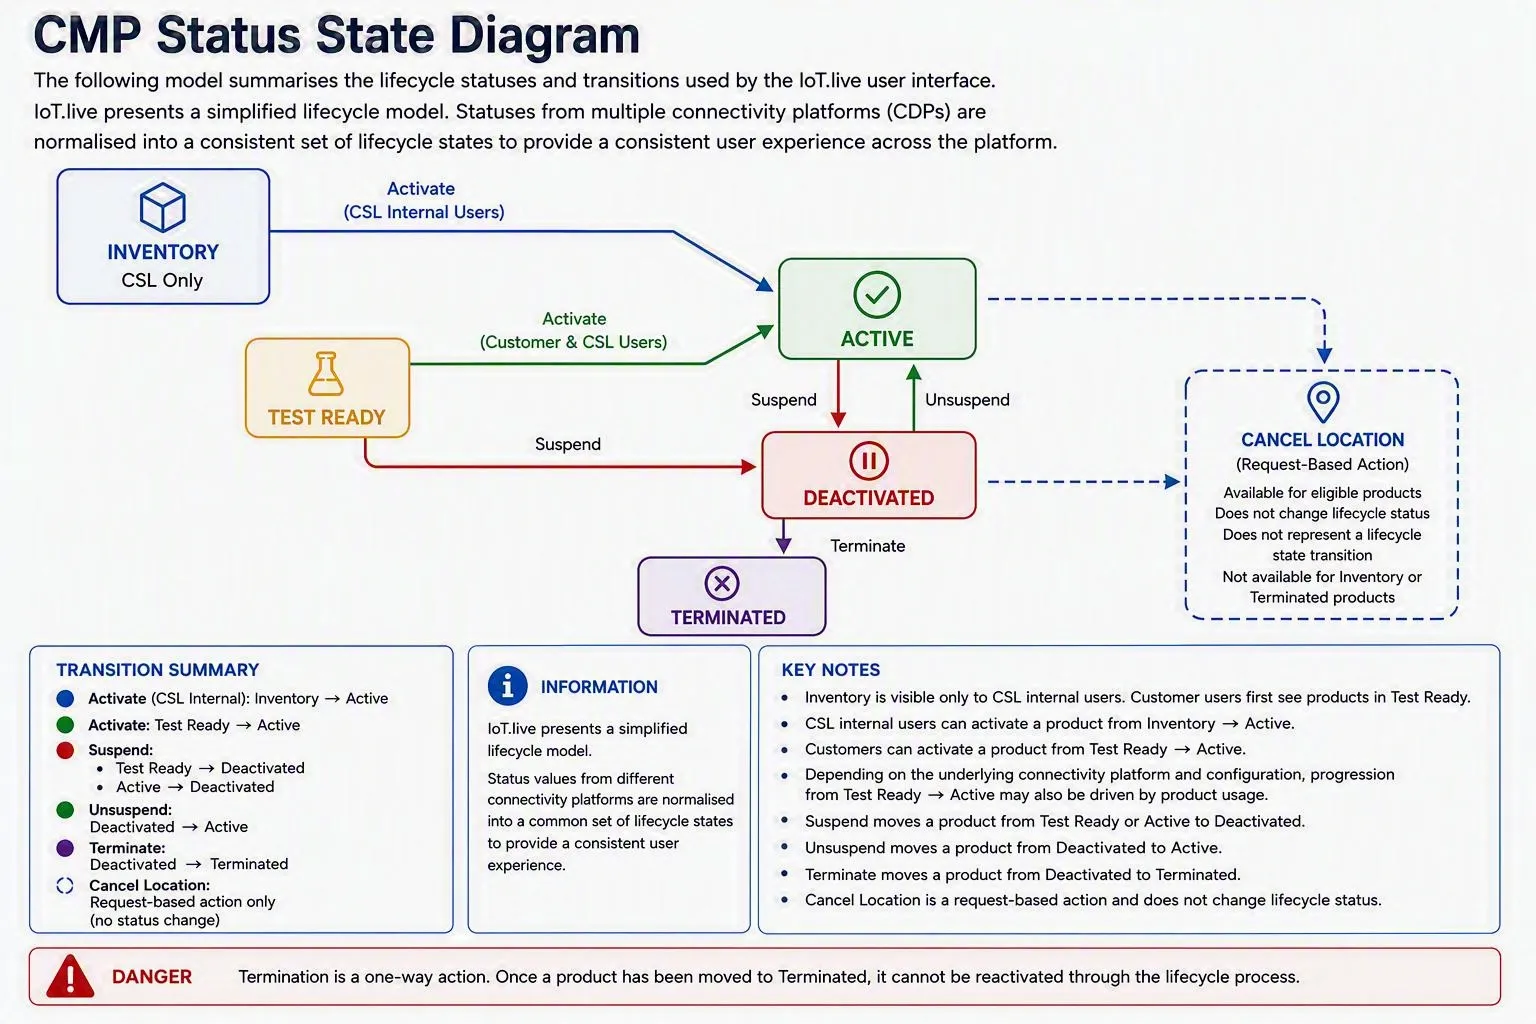
Current status | Action | New status |
|---|---|---|
Inventory | Activate | Active |
Test Ready | Activate | Active |
Test Ready | Suspend | Deactivated |
Active | Suspend | Deactivated |
Deactivated | Unsuspend | Active |
Deactivated | Terminate | Terminated |
Lifecycle transitions vary according to product status and user role. Refer to the activation guidance below for the supported activation paths.
Termination is a one-way action. A terminated product cannot return to an earlier lifecycle status through the lifecycle flow described on this page.
"Actions" for Lifecycle Changes
- Open Products in IoT.live.
- Find the product you want to manage.
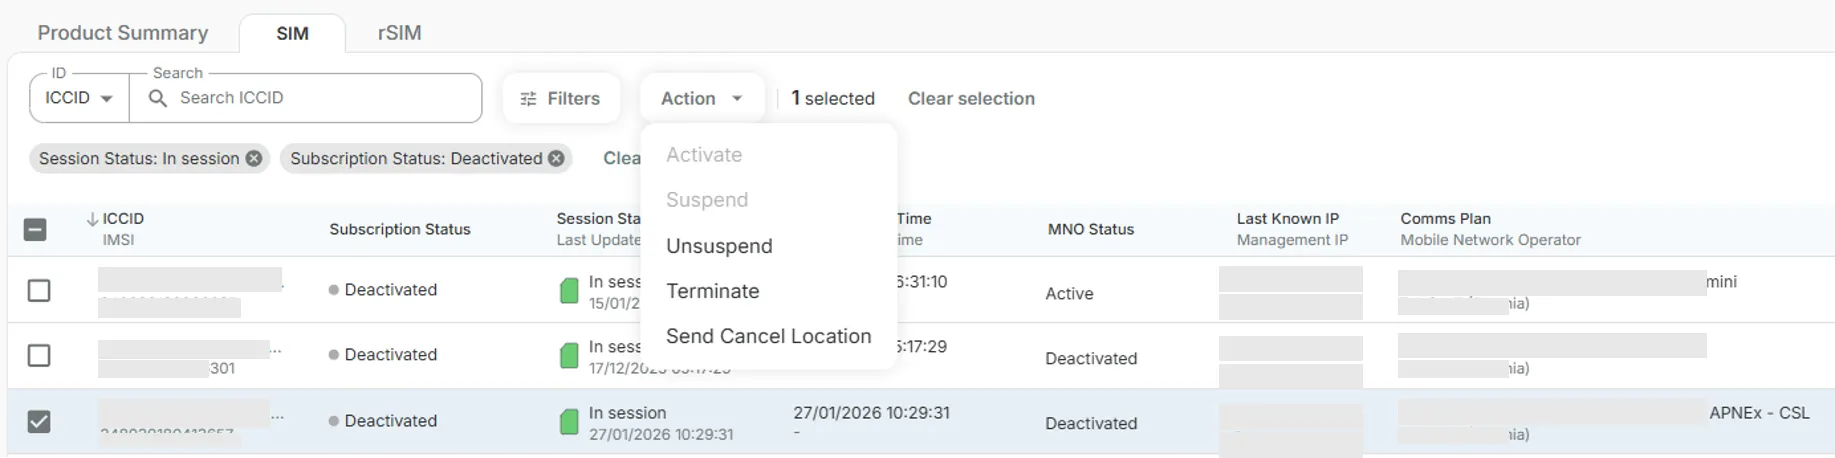
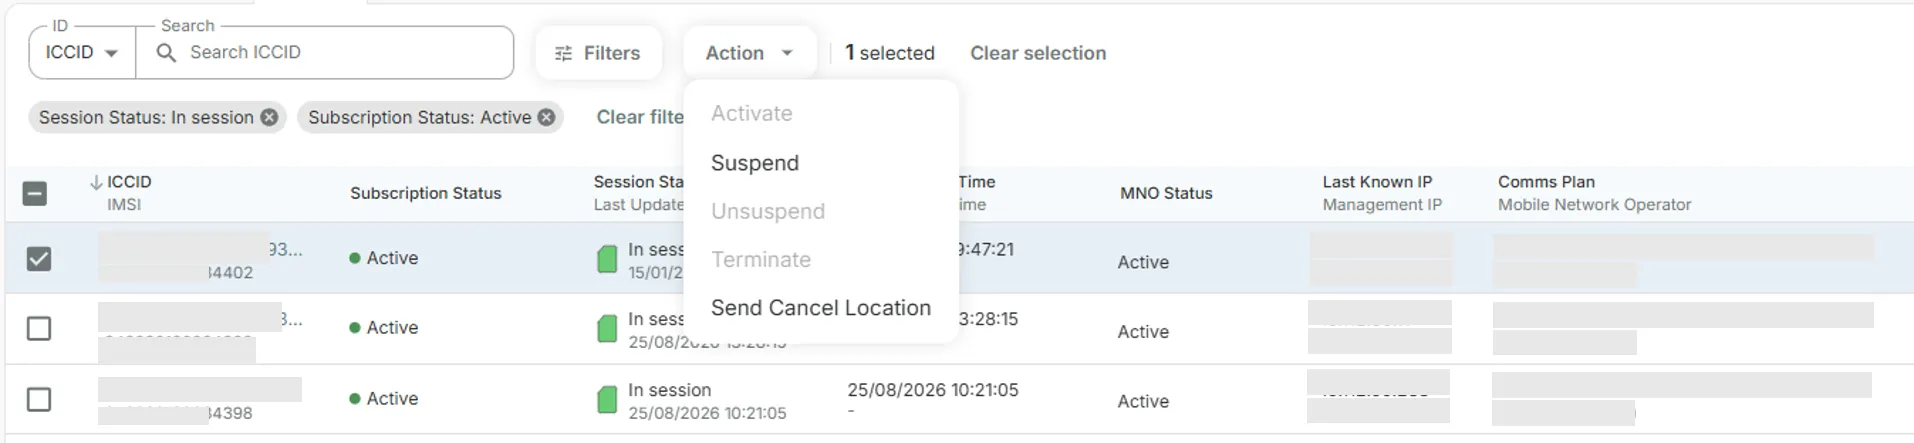
- Open the Action menu.
- Select an available lifecycle action.
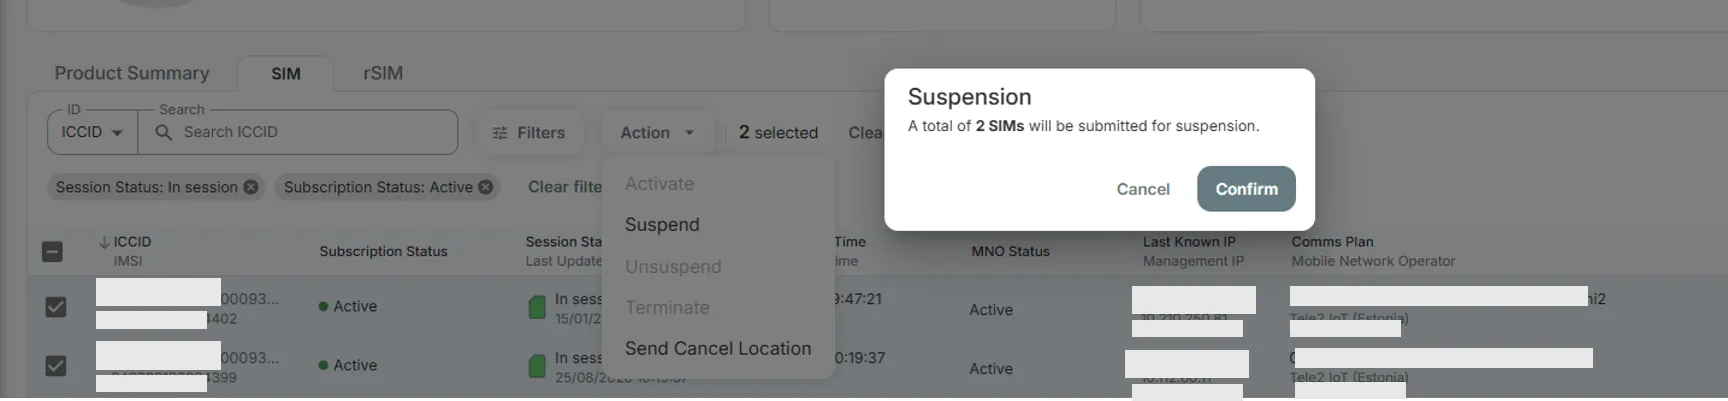
- Review the confirmation message.
- Confirm the request.
The Action menu displays only the lifecycle actions permitted by the product’s current status and your user role. Confirmation is required before submission.
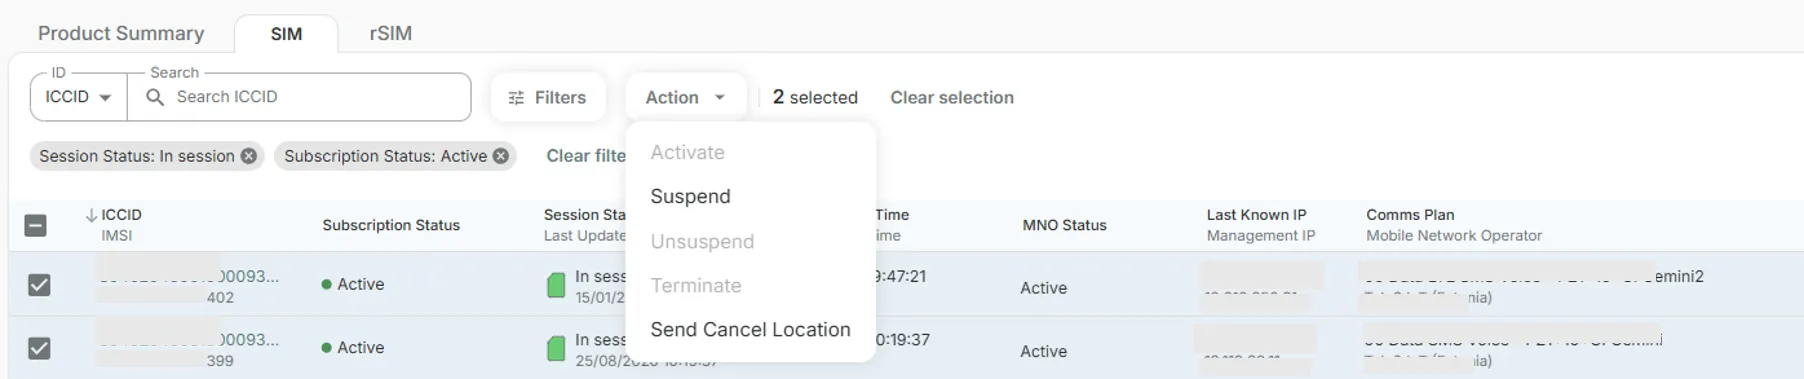
Activate a Product
Activation behaviour differs depending on the current product status and user role.
For CSL internal users
- Activate from Inventory → Active
- Activate from Test Ready → Active
For customer users
- Activate from Test Ready → Active
Inventory is visible only to CSL internal users. Customer users first see products when they are in the Test Ready state.
Progression from Test Ready to Active may also occur automatically when product usage is detected. This behaviour varies according to platform configuration and business rules.
Suspend or Unsuspend a Product
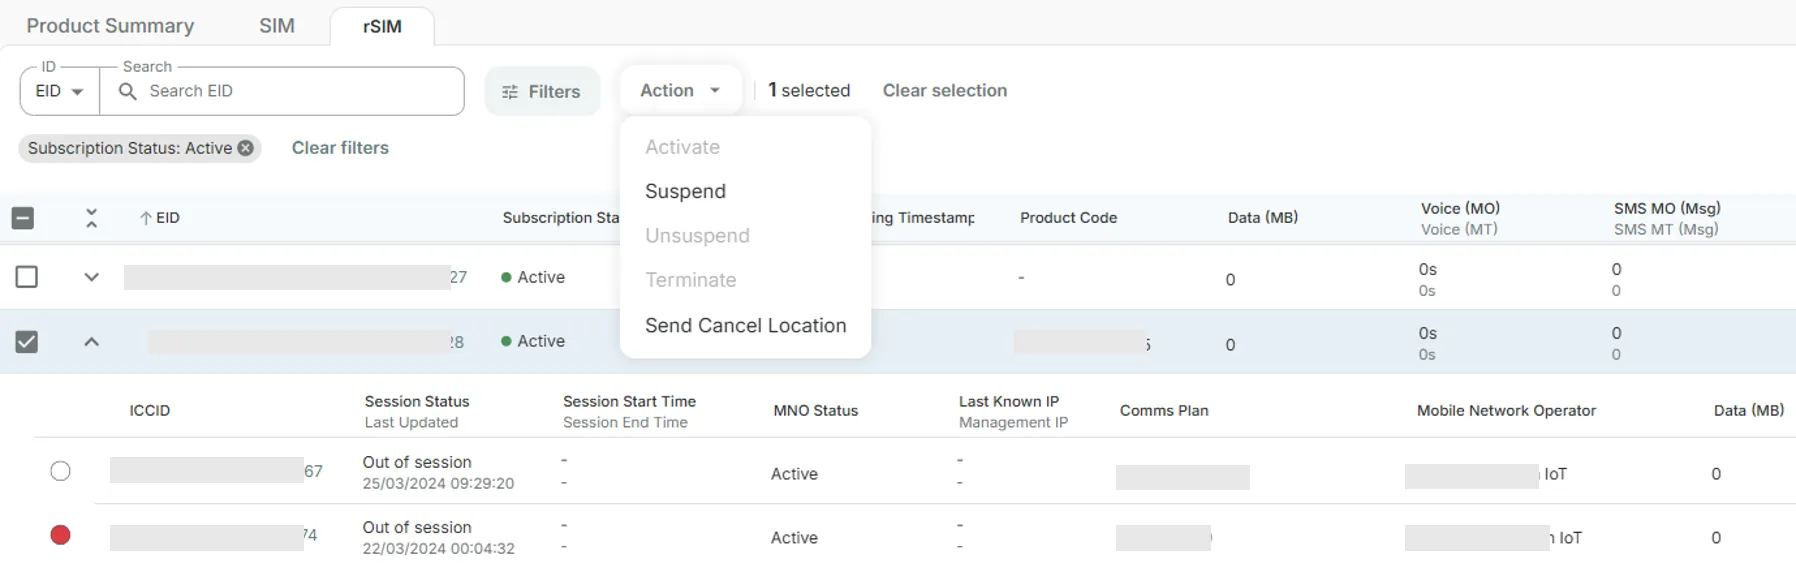
Use Suspend to move an eligible product from Test Ready or Active to Deactivated. Use Unsuspend to return an eligible Deactivated product to Active.
Suspend and Unsuspend are available to authorised CSL and customer users within their permitted account scope. The available option is determined by the product’s current status and the user’s role.
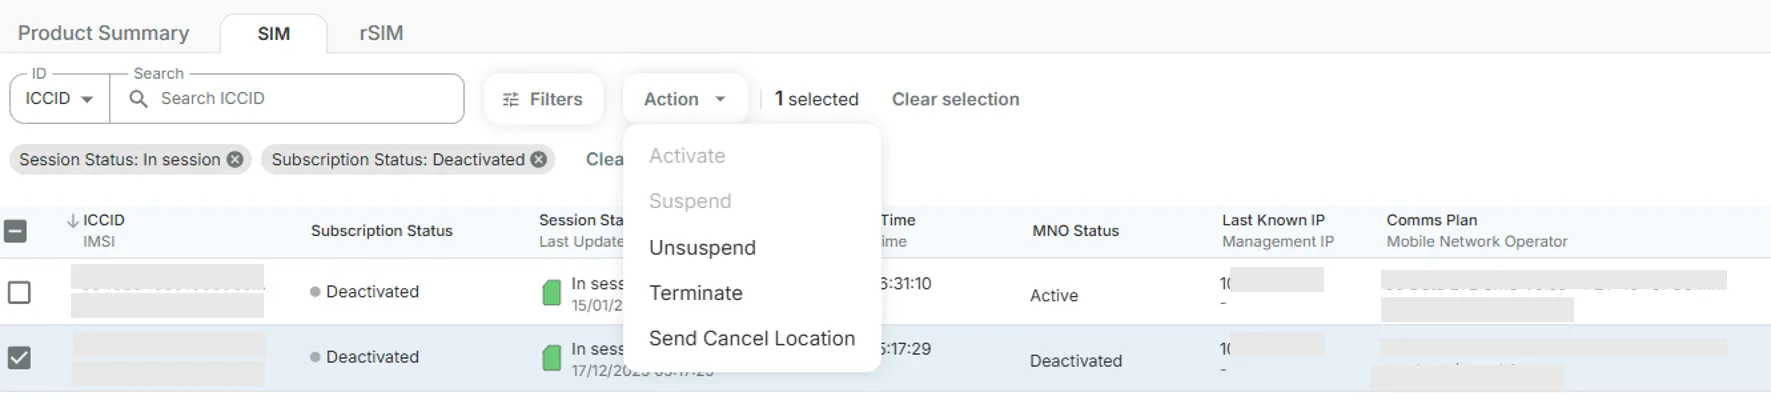
Terminate a product
Termination moves a product from Deactivated to Terminated. The Terminate action is available only to authorised CSL users and is not available to customer users. A product must be Deactivated before the termination action is available.
Important: Termination is a controlled end-state action. Review the selected product carefully before confirming the request.
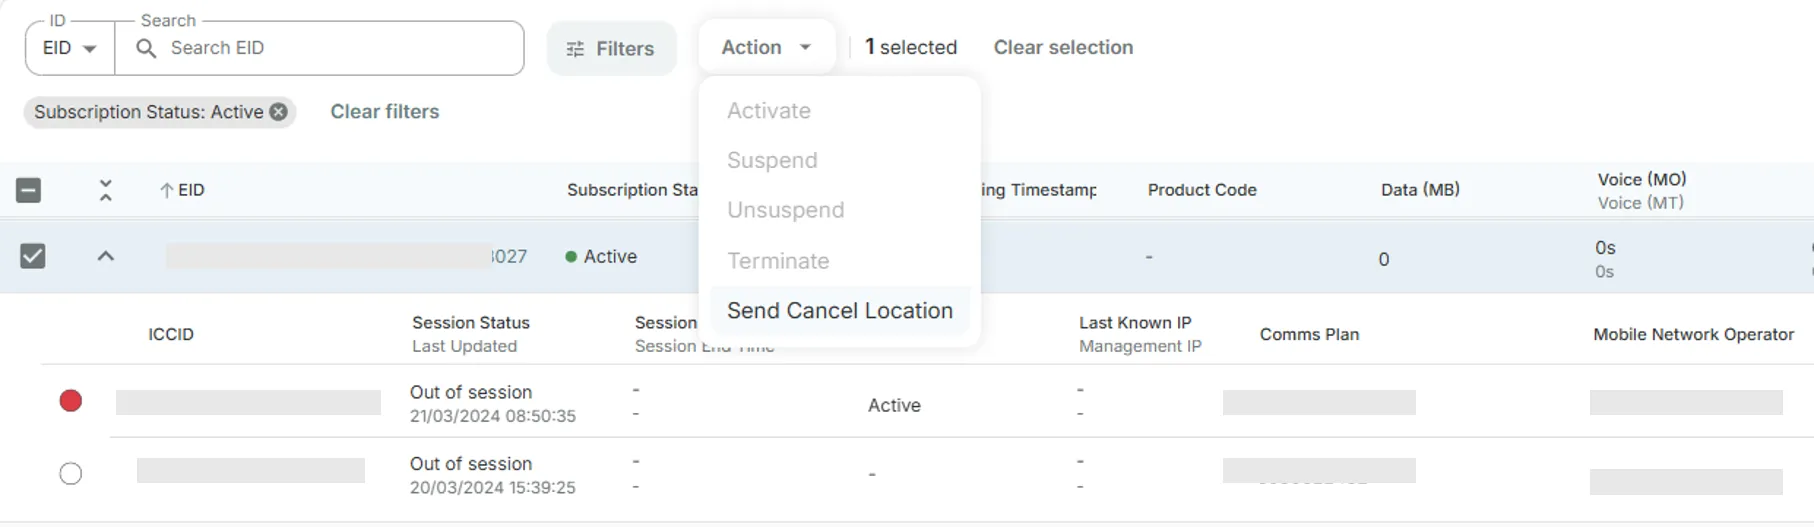
Cancel Location
Cancel Location is an operational request available for eligible products. It does not change the product’s lifecycle status and does not represent a transition between lifecycle states.
- Available to authorised CSL and customer users, subject to product status and account permissions.
- Processed as a request-based action.
- Does not change the product’s current lifecycle status.
- Not available for products in Inventory or Terminated status.
Manage Multiple Products
You can select multiple products on the current Products page and submit a supported lifecycle action for them together.
- Select one or more products.
- Select all products on the current page.
- Remove individual products from the selection.
- Clear the full selection.
Selection scope: Selection applies only to the current paginated page.
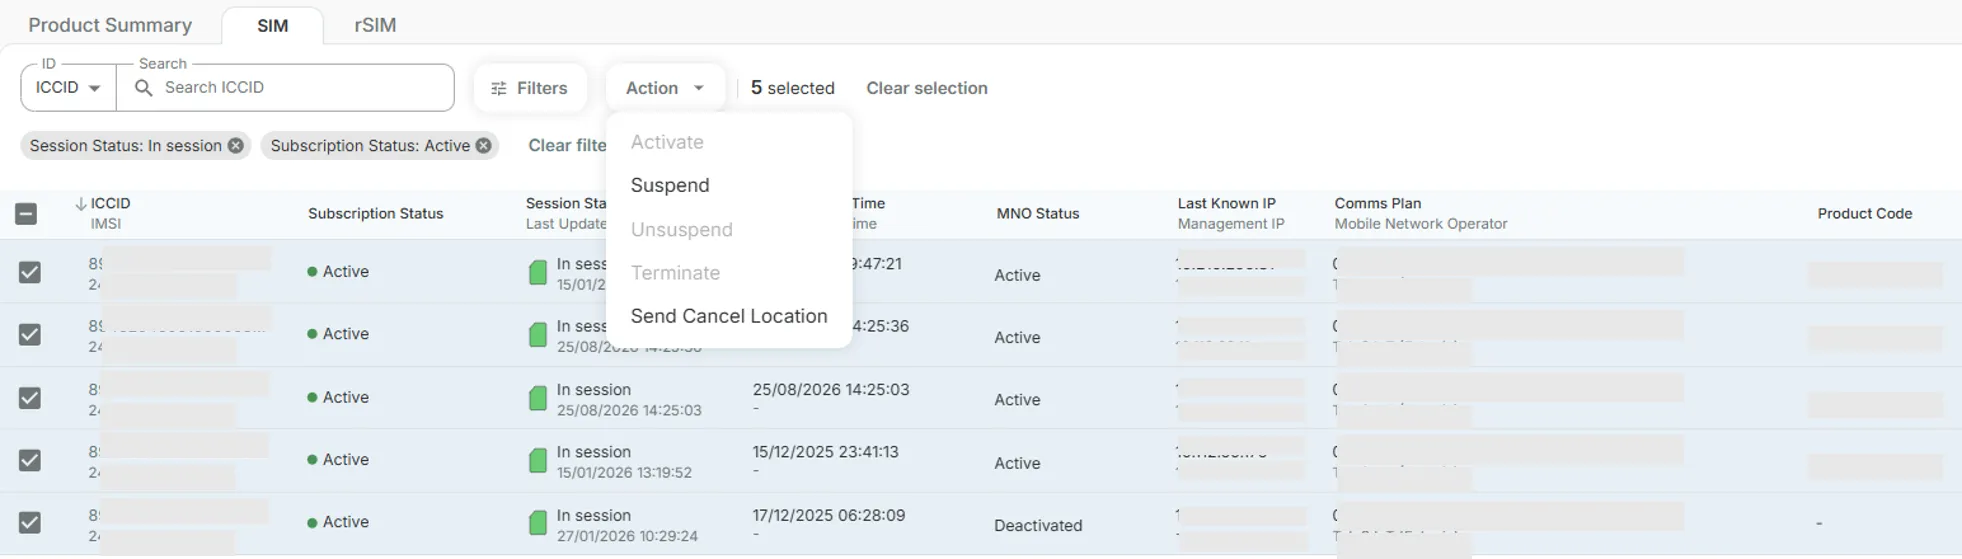
Understand Action Availability
- An action is enabled when at least one selected product supports it.
- An action is disabled when none of the selected products supports it.
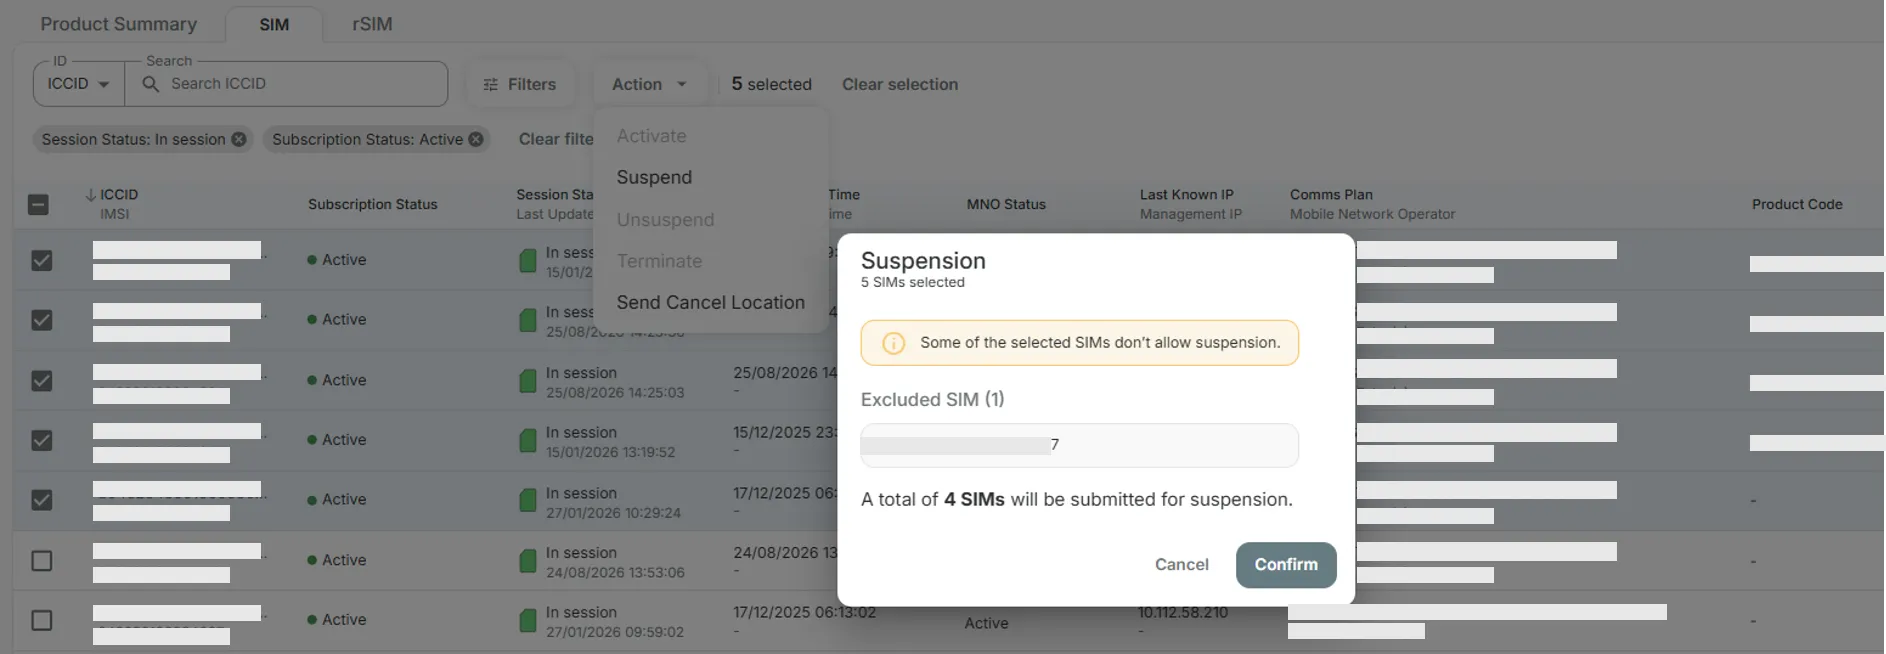
- If some selected products are not eligible, the confirmation view identifies the affected products before submission.
Before execution, the confirmation view displays the action, the number of selected products and the available confirmation and cancellation controls.
Use Products Management
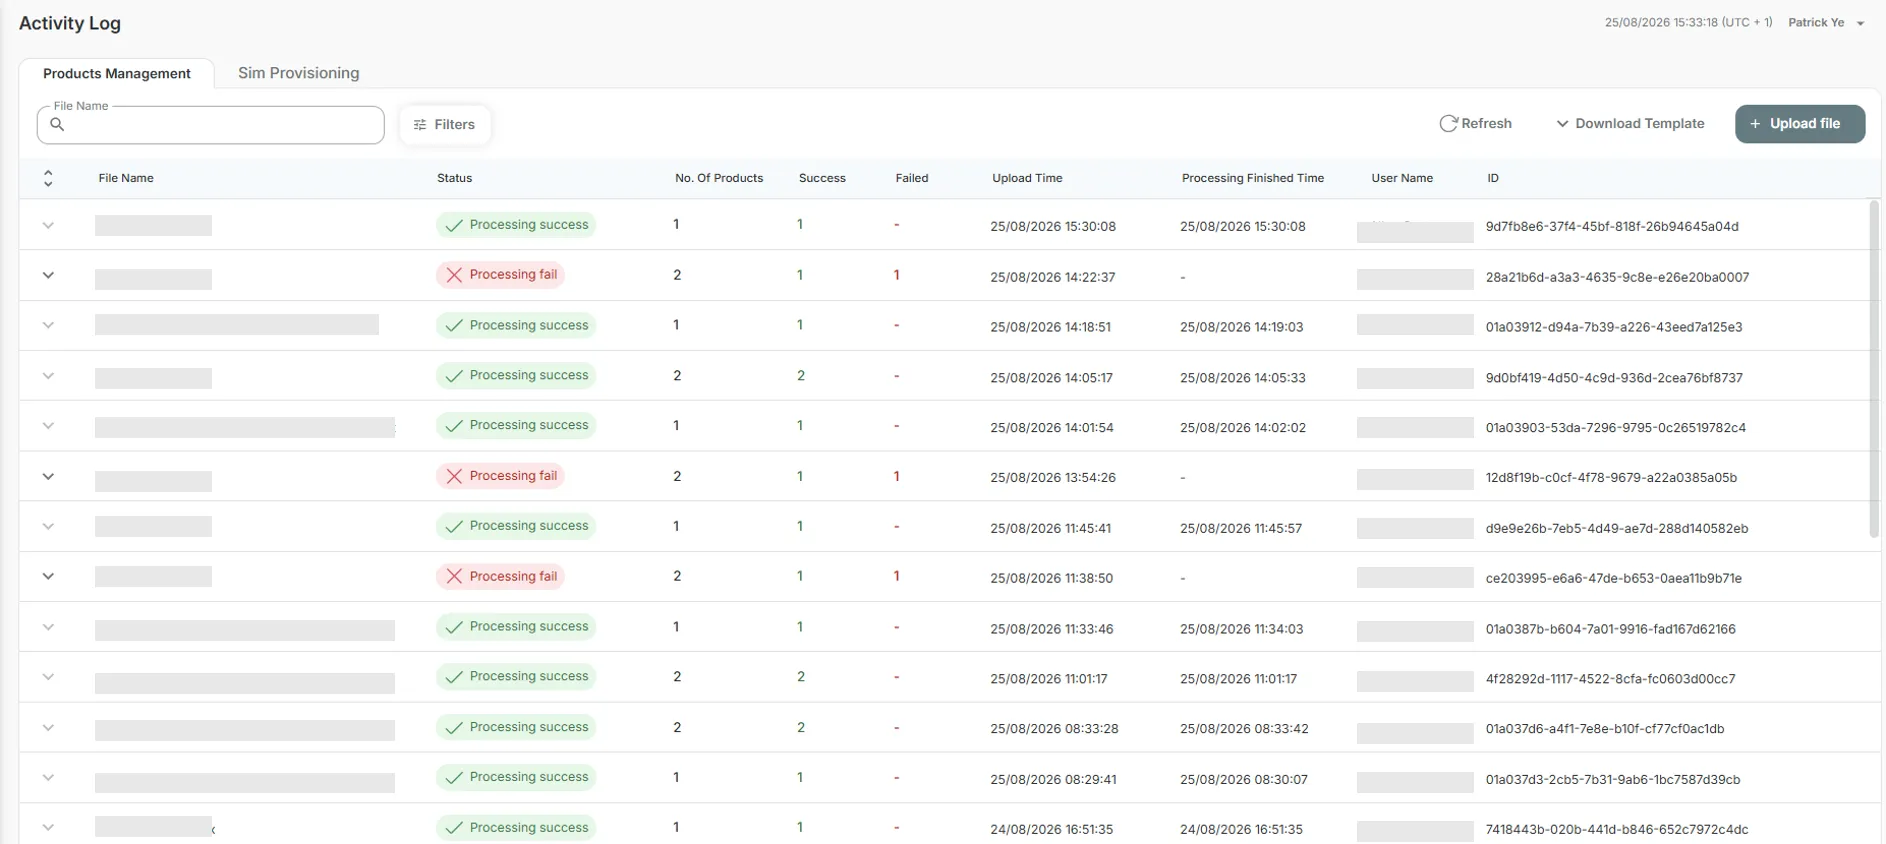
Products Management, within Activity LogActivity Log, provides a dedicated view for lifecycle requests submitted from the Products Action menu and for file-based bulk updates.
Use Products Management to:
- download the Product Management template;
- submit lifecycle actions for multiple products using a completed file;
- review the processing outcome of individual, multi-select and file-based requests.
An activity record is created when a supported lifecycle request is submitted.
Submit a Bulk Lifecycle Update
- Open Activity Log and select Products Management.
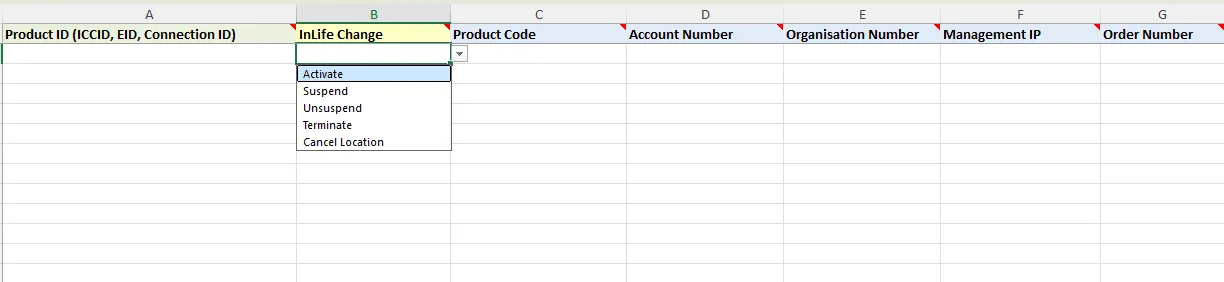
- Select Download Template, then download the Product Management template.
- Add the required product identifiers and select the lifecycle action for each product.
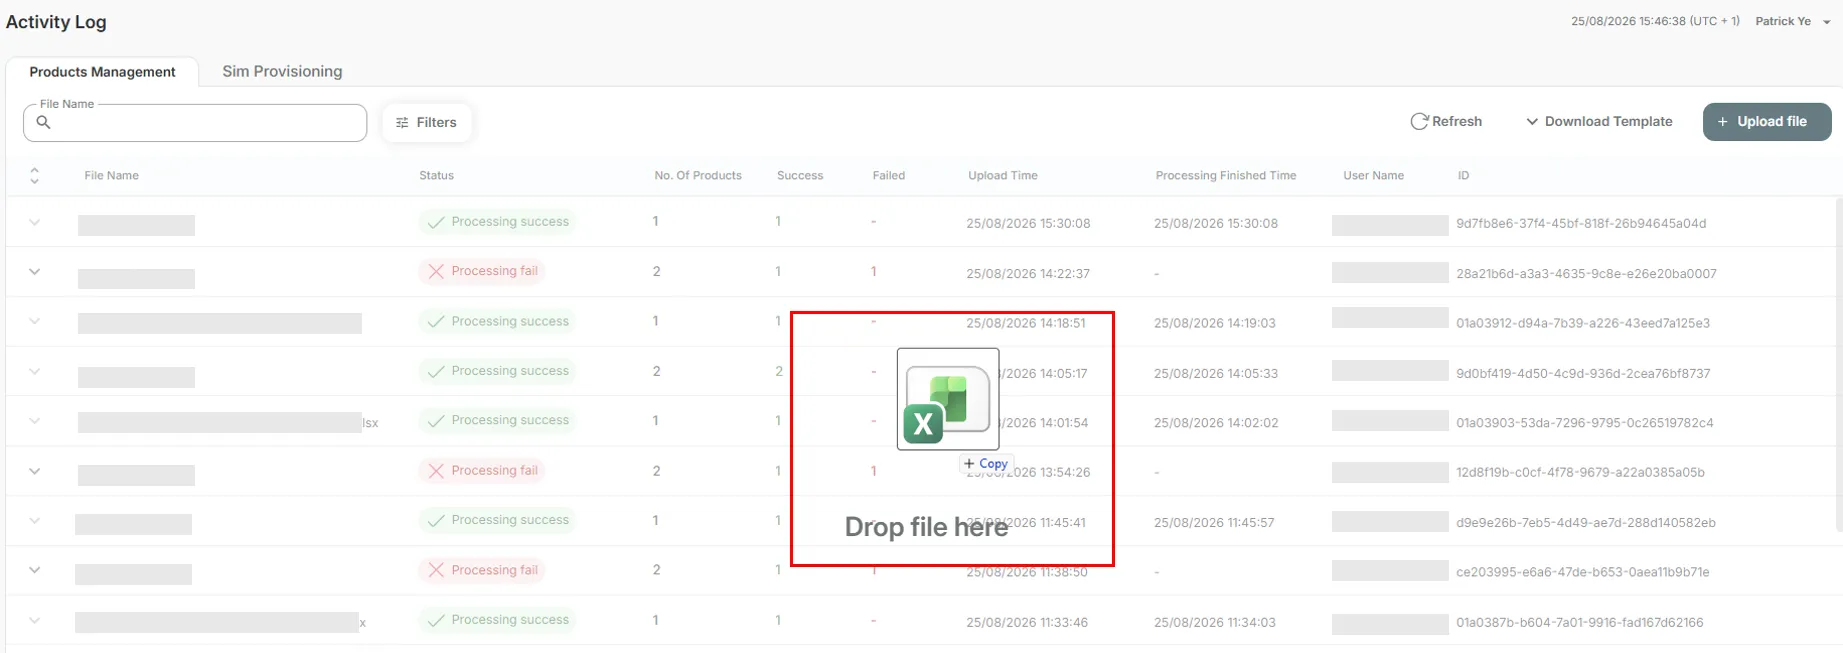
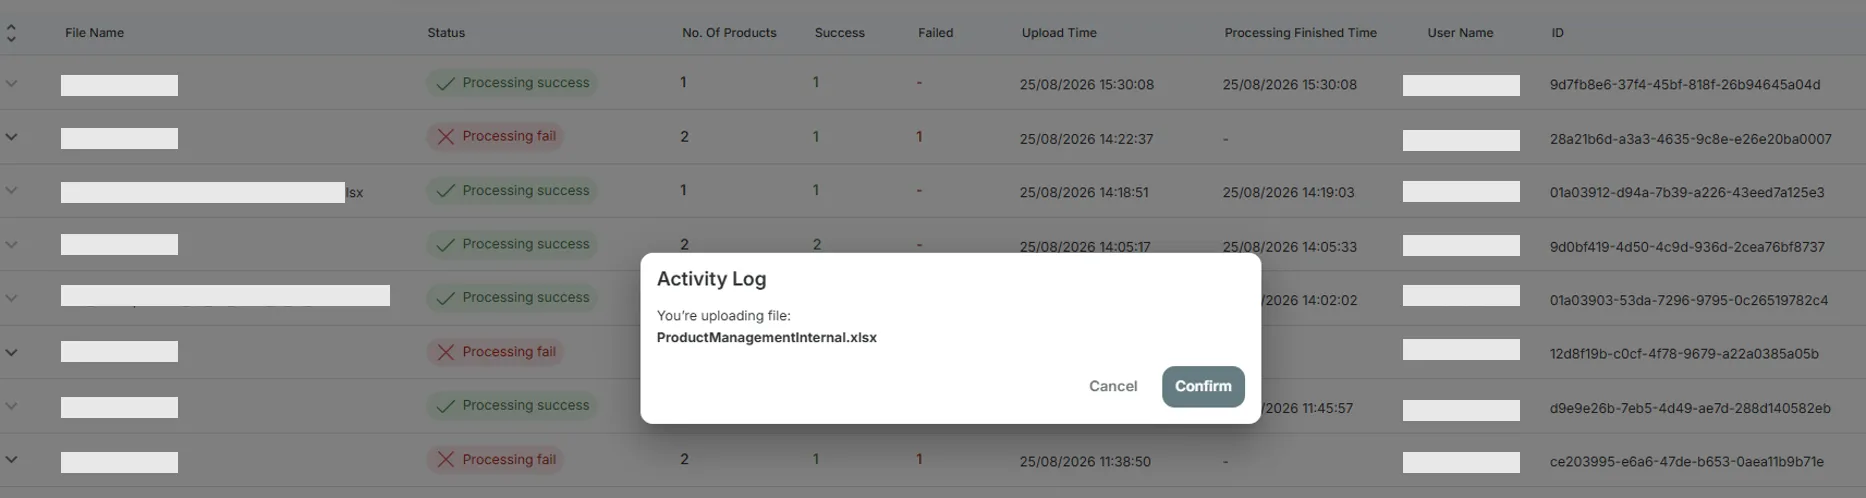
- Upload the completed file.
- Review the resulting activity record in Products Management.
Products can be identified using ICCID, EID or Connection ID. Customer users can act only on products within their own account. CSL users can manage products across accounts, subject to their permissions.

Monitor a Lifecycle Request
After a lifecycle action is confirmed, IoT.live acknowledges that the request has been accepted for processing. This acknowledgement is not the final processing result.
Use Products Management within Activity LogActivity Log to review processing status, product counts, successful items, failed items and available validation details.
Related guidance: See Activity LogActivity Log for information about processing statuses, filters, successful and failed records, and downloadable results.
Review Product Audit Trail
Product Audit Trail provides a historical view of lifecycle-related activity for an individual product. It supports product-level investigation, operational traceability, change verification and historical review.
Product Audit Trail is available to CSL Admin and Tech roles. It is not available to customer users or CSL users with the User role.
Understand Validation Messages
Validation messages are shown when:
- The product status does not permit an action.
- Your user role does not permit an action.
- Required information is missing.
- Some selected products are eligible, and others are not.
- A lifecycle request has been submitted successfully.
Review the message displayed in IoT.live and correct any identified issue before submitting the request again.
Access by Role
Capability | CSL users | Customer users |
|---|---|---|
Activate from Inventory | Yes | No |
Activate from Test Ready | Yes | Yes |
Suspend | Yes | Yes |
Unsuspend | Yes | Yes |
Terminate | Yes | No |
Cancel Location | Yes | Yes |
Products Management | Yes | Yes |
Product Audit Trail | Yes | No |
The precise actions shown in IoT.live remain subject to the user’s role, account scope and the current status of the selected product.
Info: Data recency
Important: Product data may update at different intervals. Review the relevant timestamp or product detail view before relying on the information as a current operational status.