Customer Tagging and User Management
6.4. End Customers Tagging
End customer is a special type of tag, since a device can only be mapped to a single end customer. Both adding and deleting end customer tags can be executed in the same location on the platform in the Account Management section by clicking on the ‘Import Device/Customer’ call-to-action button.
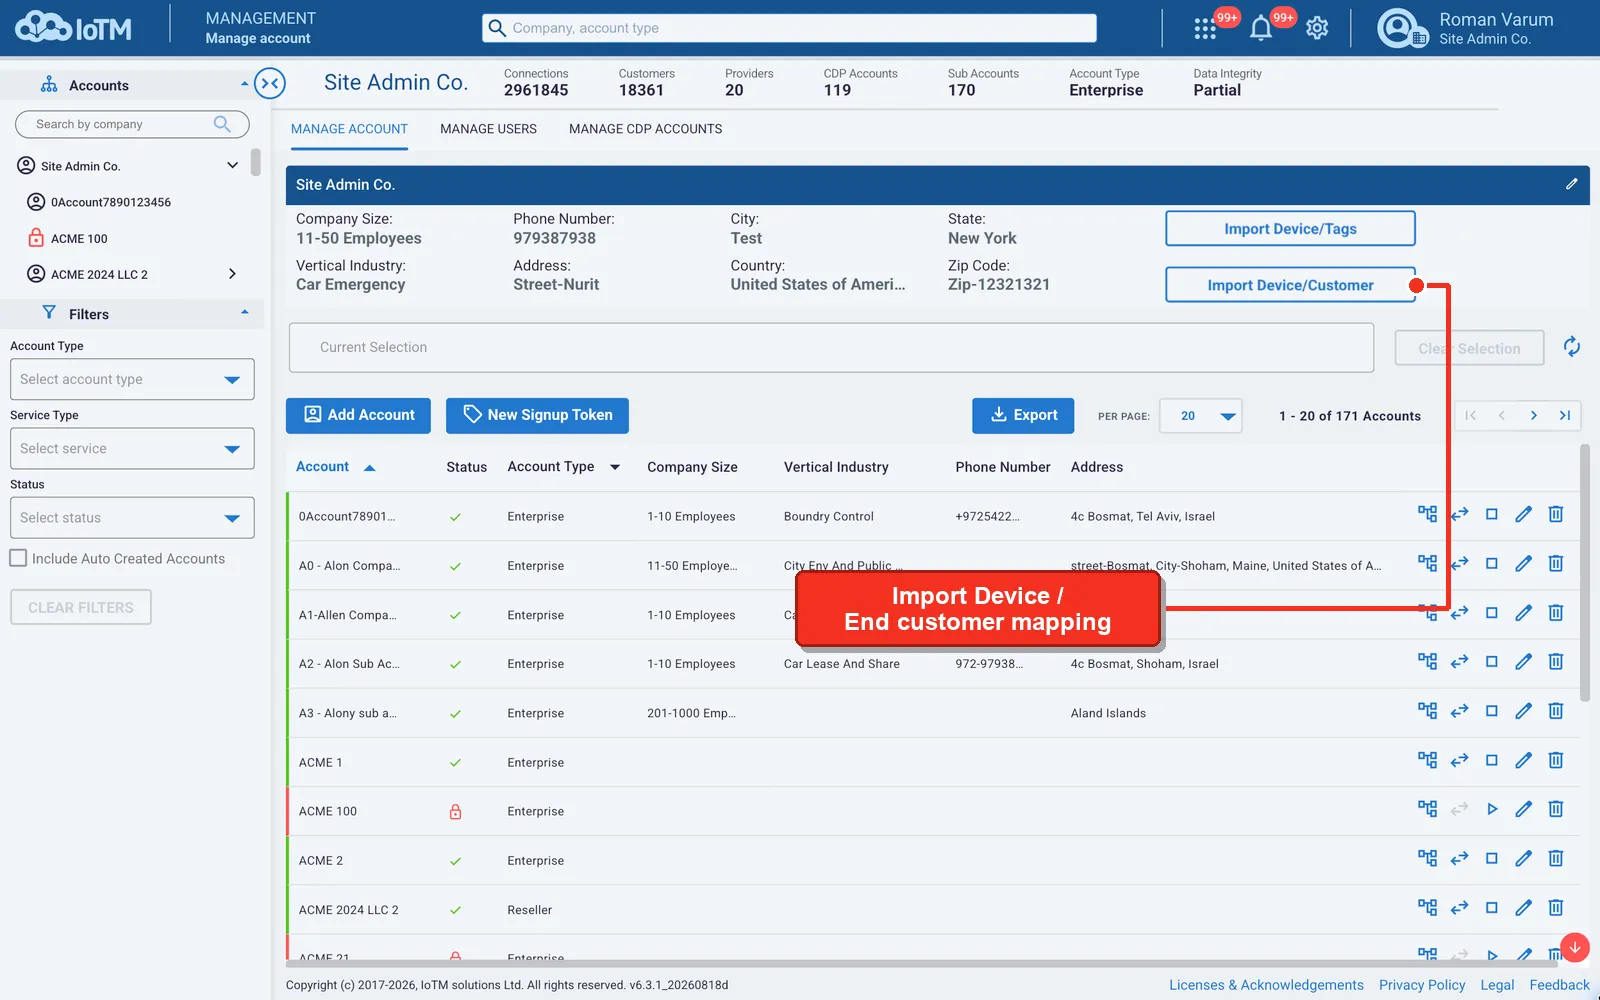
Trigger the Device / End Customer CSV import dialog
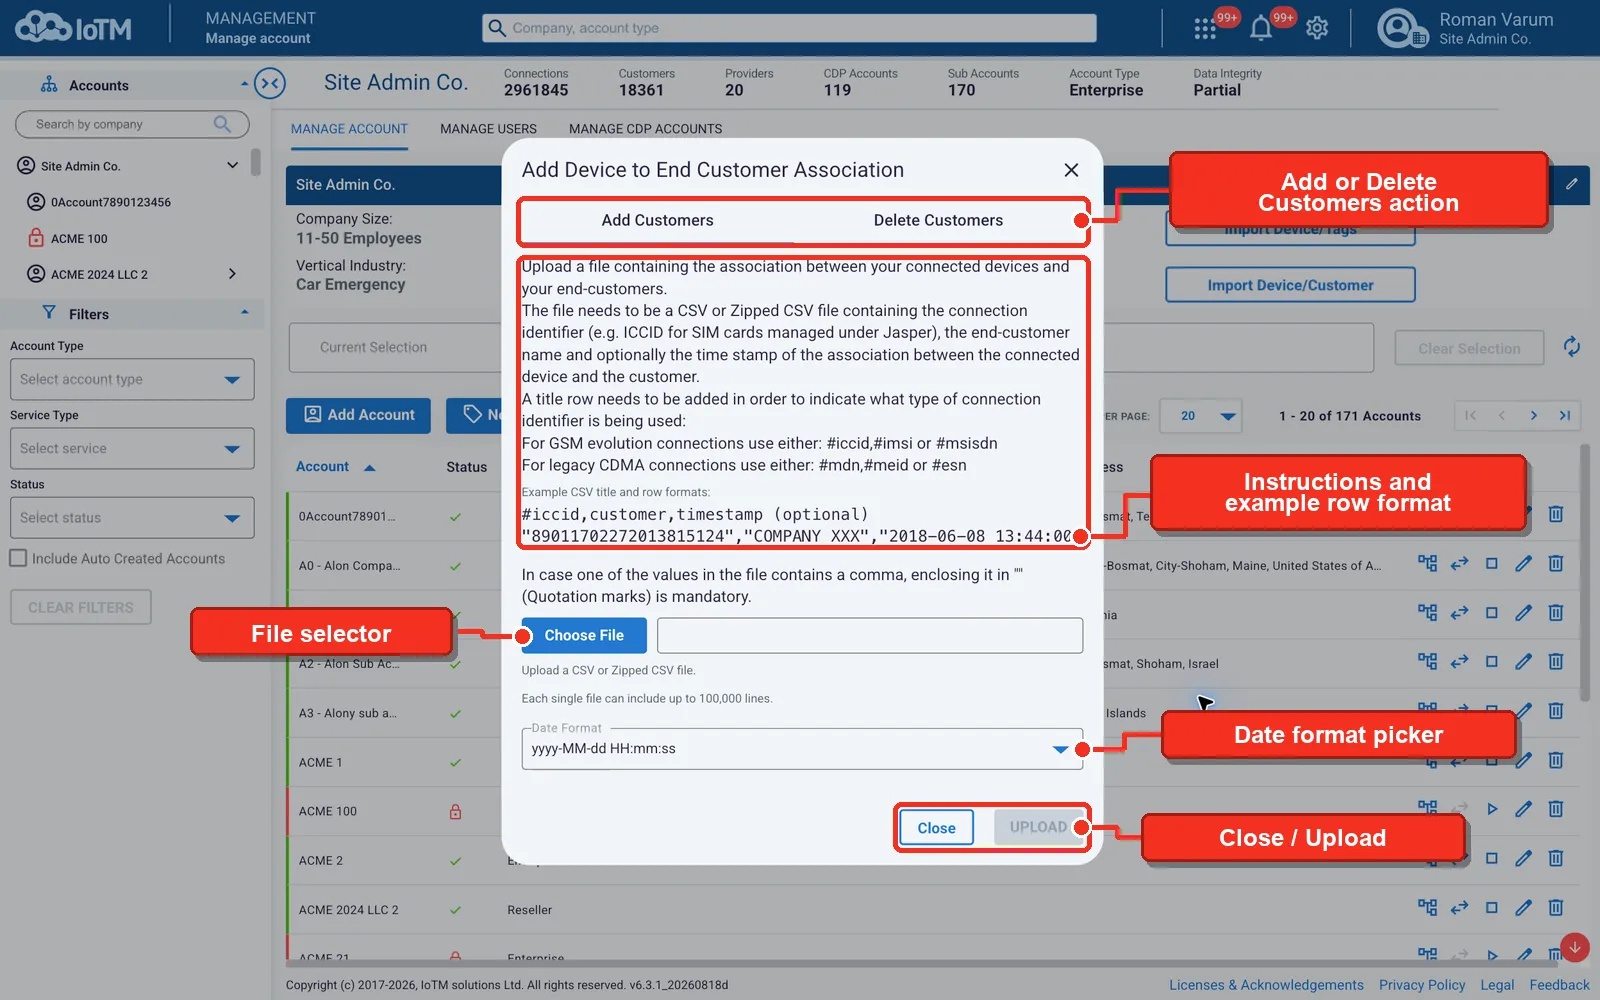
Device / End Customer CSV import dialog
Control descriptions
Control | Description |
|---|---|
Import Device / End customer mapping | Button to trigger the end customer CSV import dialog. |
Add or Delete Customers Action Selection | Tab selector to select which action to execute, either adding a device / end customer association or deleting it. |
Instructions and example row format | Instructions and an example of the correct row format in the CSV. In this case, [Subscription ID - ICCID in case of a GSM evolution U/SIM card], [End Customer Name], <Optional Data of association between the subscription and the customer> In case a value contains a comma, then the value should be wrapped with parentheses (“), so it is preferable to wrap all field values in parentheses for format safety. E.g. #ICCID, customer 89148837762557289,ACME Inc Or #IMSI 24137746553772, ACME Inc These would be alternative examples of a minimal valid format, containing the necessary fields. See Adding and Deleting customer tags sections below for more details on each action operation. |
File selector | The file selector button opens the native browser file system selection dialog. |
Date format picker | Allows you to pick from several date time formats, in case you provide the optional 3rd column in the CSV. |
Close / Upload buttons | Cancel closes the dialog with no changes. Upload executes a synchronous upload of the file to the IoTM platform for processing. |
6.4.1 Adding End Customer Tags
To add end customer tags, upload a file containing the association between your connections and your end-customers. The file should contain 2 mandatory columns, an optional 3rd column, and up to 100,000 rows per file and be no larger than 10 MB. The first (left) column should be the connection identifier and the second column should be the end customer name value. The optional 3rd column is a timestamp that defines when the device was initially associated to the respective end customer.
A title row needs to be added to indicate what type of connection identifier is being used:
- For GSM evolution connections, either : #iccid, #imsi. #msisdn can be used as well, but MSISDN is not necessarily unique within the context of a given CDP, so it is not advisable.
- For legacy CDMA connections, use either: #mdn, #meid or #esn
Note: Device identifier types cannot be mixed within the same file. Therefore, if you need to mix them, upload a separate file for each identifier type.
The file needs to be formatted in the following way:
E.g. Without the optional 3rd timestamp column:
#iccid, customer 89011702272013815124,”ACME, Inc" 89011702272013815235,"Mars, rockets LLC"
#iccid, customer 89011702272013815124,ACME Inc 89011702272013815235,Mars rockets LLC
Note that if the customer name includes a comma (,) then they must be enclosed in quotes.
Including the optional 3rd timestamp column:
#iccid, customer, timestamp "89011702272013815124","ACME, Inc",”2017-04-02 00:00:00” "89011702272013815235","Mars, rockets LLC", “2018-06-08 13:44:00”
6.4.2 Deleting End Customer Tags
To delete end customer tags, upload a file containing the list of connections to remove the end-customer association from. Since a customer tag represents an association to a single customer, the file should contain only a single mandatory column of the connection identifier. Each file may contain up to 100,000 rows and be no larger than 10 MB.
A title row needs to be added to indicate what type of connection identifier is being used:
- For GSM evolution connections, either : #iccid, #imsi. #msisdn can be used as well, but MSISDN is not necessarily unique within the context of a given CDP, so it is not advisable.
- For legacy CDMA connections, use either: #mdn, #meid or #esn
Note: Device identifier types cannot be mixed within the same file. Therefore, if you need to mix them, upload a separate file for each identifier type.
The file needs to be formatted in the following way:
#iccid 89011702272013815124 89011702272013826126
6.5. Device ‘Free’ Tagging
A device can be mapped to an unlimited amount of ‘free’ tags (e.g. Firmware:<FW version>, Model:<Model name>, Division:<organizational division name>, etc.). Both adding and deleting end device free tags can be executed in the same location on the platform in the Account Management section by clicking on the ‘Import Device/Tags’ call-to-action button.
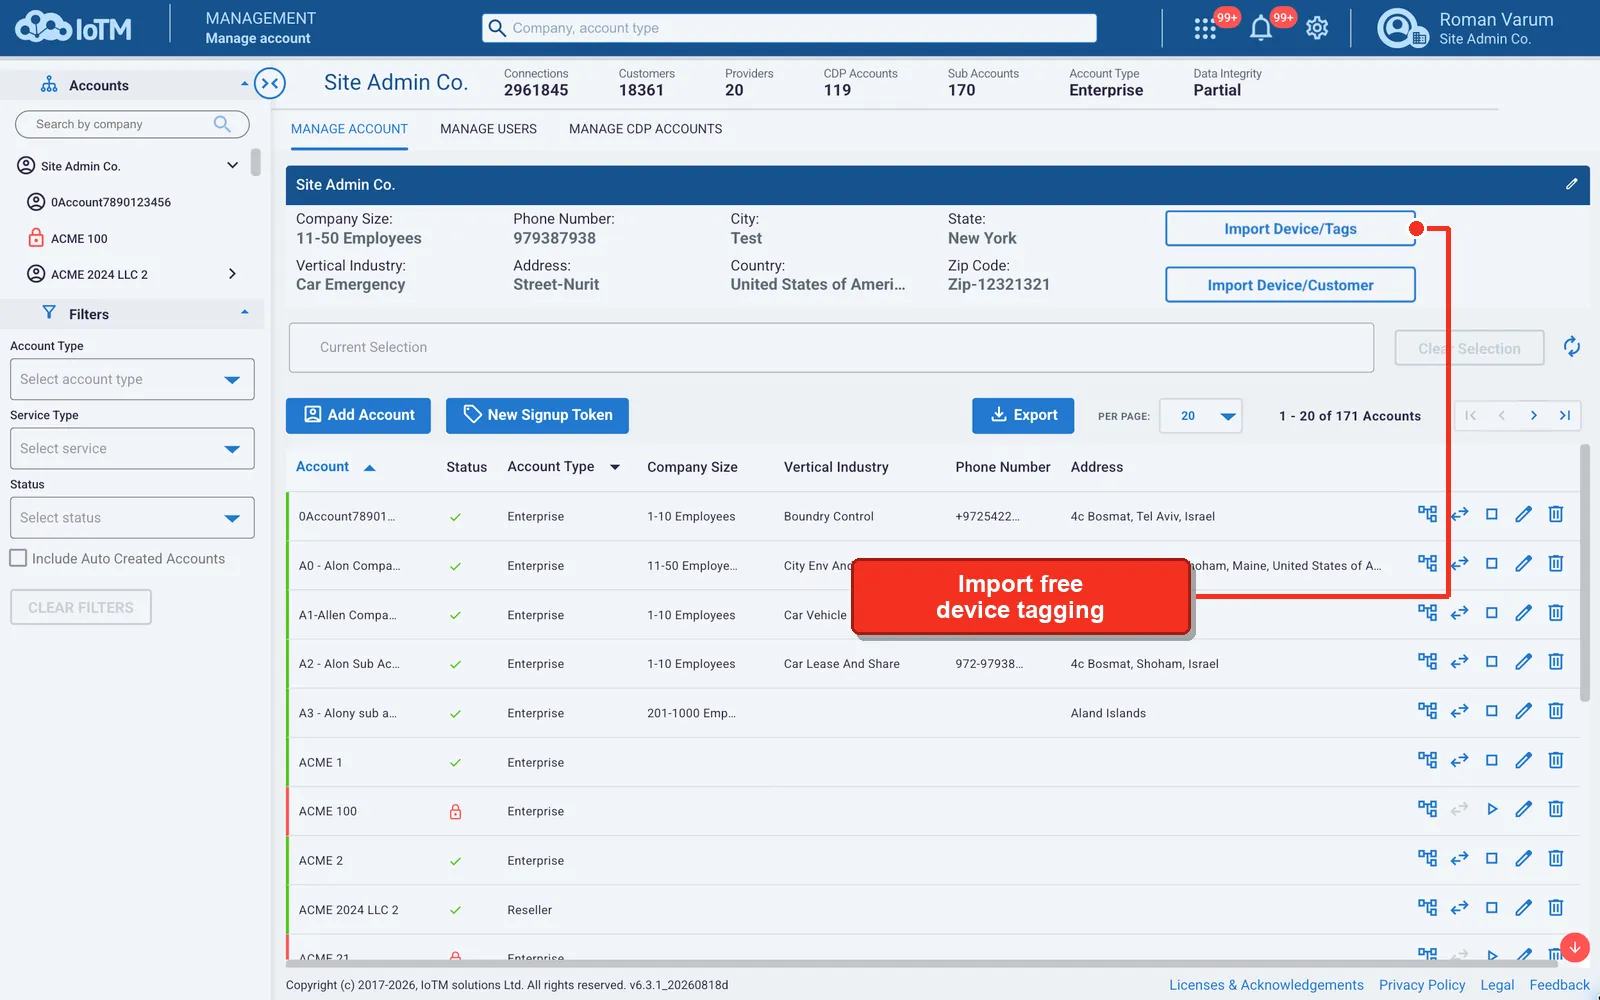
Trigger the Device free tagging CSV import dialog
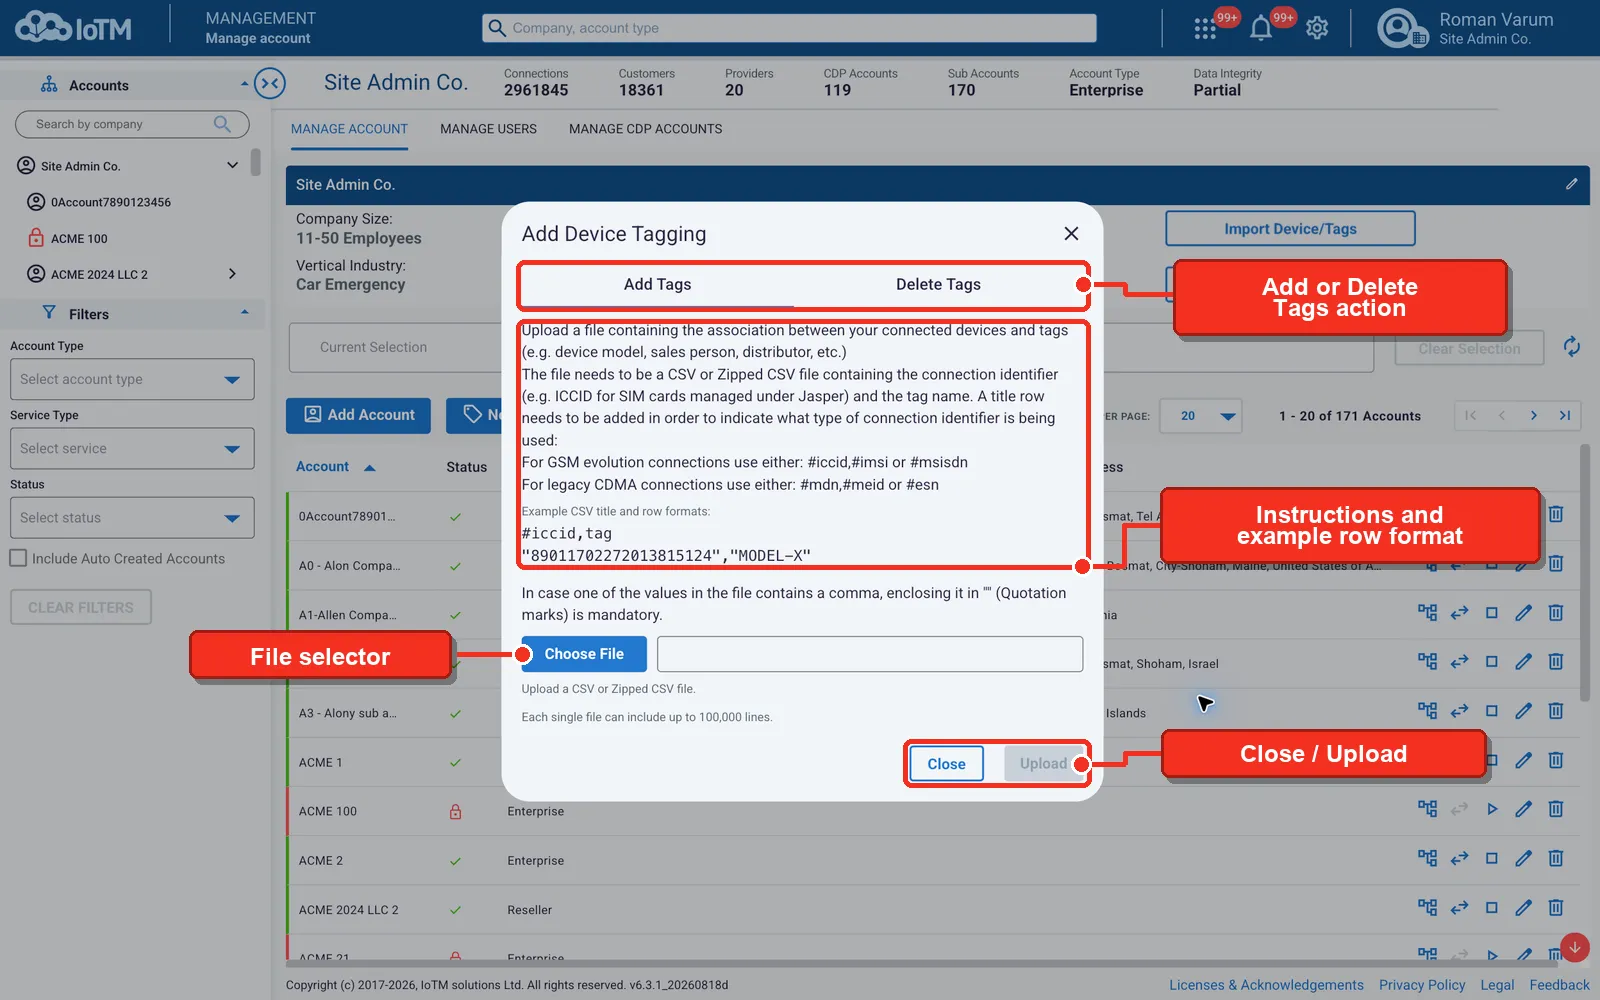
Devices / Tags CSV import dialog
Control descriptions
Control | Description |
|---|---|
Import free device tagging. | Button to trigger the device tagging CSV import dialog. |
Add or Delete Tags action selection. | Selector to select which action to execute, either adding a device / tag association or deleting it. |
Instructions and example row format | Instructions and an example of the correct row format in the CSV. In this case, [Subscription ID - ICCID in case of a GSM evolution U/SIM card], [Tag Value] In case a value contains a comma, then the value should be wrapped with parentheses (“), so it is preferable to wrap all field values in parentheses for format safety. E.g. #ICCID, tag 89148837762557289,Model:FX-40 Or #IMSI 24137746553772,Model:FX-40 These would be alternative examples of a minimal valid format, containing the necessary fields. See Adding and Deleting Device ‘Free’ tags sections below for more details on each action. |
File selector | The file selector button opens the native browser operating system file system selection dialog. |
Close / Upload buttons | Cancel closes the dialog with no changes. Upload executes a synchronous upload of the file to the IoTM platform for processing. |
6.5.1 Adding Device ‘Free’ Tags
To add device to free tag associations, upload a file containing the association between your connections and tags (e.g., Firmware:<FW version>, Model:<Model name>, Division:<organizational division name>, Serial:<Number>, etc.).
The file should contain 2 columns and up to 100,000 rows per file and be no larger than 10 MB. The first (left) column should be the connection identifier and the second column should be the tag value. Unlike with End Customer tags, a connection can have multiple ‘free’ tags, and the way to convey this information in the file is to provide each connection-tag association on its own row so that the same connection identifier may appear more than once.
A title row needs to be added to indicate what type of connection identifier is being used:
- For GSM evolution connections, either : #iccid, #imsi. #msisdn can be used as well, but MSISDN is not necessarily unique within the context of a given CDP, so it is not advisable.
- For legacy CDMA connections, use either: #mdn, #meid or #esn
Note: Device identifier types cannot be mixed within the same file. Therefore, if you need to mix them, upload a separate file for each identifier type.
The file needs to be formatted in the following way:
#iccid, tag 89011702272013815124,MODEL:X 89011702272013815124,FW:v1.02 89011702272013816236,MODEL:X 89011702272013816236,FW:v1.03
Important Operational Note: if your tag uses a <prefix>:<value> structure, this is called prefix-based tagging, and it is the recommended type of tagging. The reason prefix-based tagging is preferable to non-prefix-based tags is that if you upload a prefixed based tag with a new value, the old tag with this prefix will be overridden and updated.
For instance, if you tagged
#iccid, tag 89011702272013816236,FW:v1.03
And later, you upload a new tag file with
#iccid, tag 89011702272013816236,FW:v1.04
Then the FW:v1.03 value will be replaced with the FW:v1.04 value without the Need to delete the FW:v1.03 first, and you will not have a duplicate FW tag on the ICCID.
6.5.2 Deleting Device ‘Free’ Tags
To delete device to free tag associations, upload a file containing the association you wish to delete between the connection and tags. The file should contain 2 columns and up to 100,000 rows per file. The first (left) column should be the connection identifier and the second column should be the tag value. Note that a connection can have multiple ‘free’ tags, therefore the same connection identifier may appear more than once in the file – for however many tags you wish to delete.
A title row needs to be added to indicate what type of connection identifier is being used:
- For GSM evolution connections, either : #iccid, #imsi. #msisdn can be used as well, but MSISDN is not necessarily unique within the context of a given CDP, so it is not advisable.
- For legacy CDMA connections, use either: #mdn, #meid or #esn
Note: Device identifier types cannot be mixed within the same file. Therefore, if you need to mix them, upload a separate file for each identifier type.
The file needs to be formatted in the following way:
#iccid, tag 89011702272013815124,MODEL:X 89011702272013815124,FW:v1.02 89011702272013816236,MODEL:X 89011702272013816236,FW:v1.03
Important Operational Note: If you want to delete all the tags from a connection, then simply upload only the identifier with no specific tag to delete.
e.g.
#iccid 89011702272013815124
7. User Management
7.1. Overview
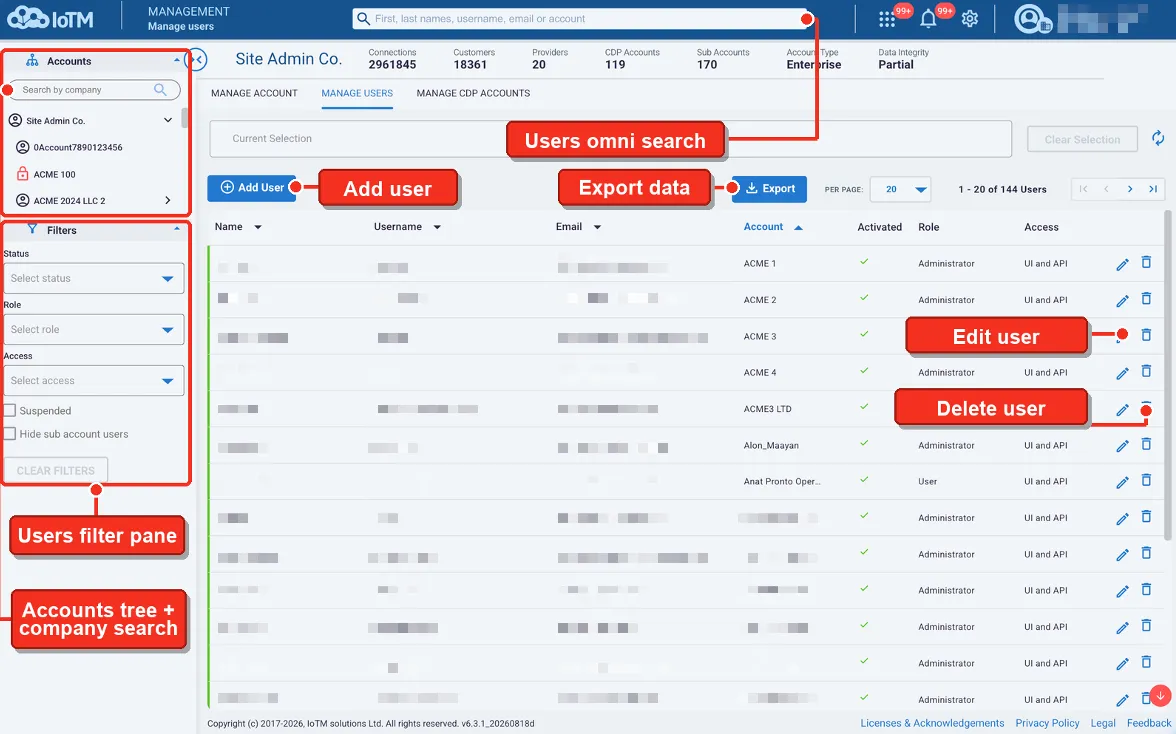
Main user management view.
Control descriptions
Control | Description |
|---|---|
Sub-account tree search | Shows a tree view of the sub-accounts and a “search as you type” line above the tree. Once a sub-account is selected from the tree, then it is filtered in, other accounts are filtered out, and edit actions are performed on the selected account. |
Users Filter Pane | Offers common filters when searching for users. |
Add user button | Triggers the “Add user” dialog. |
Users omni search | Search for users based on name, username or email. |
Export data button | Offers to download the current users' data in Microsoft Excel © or CSV formats. |
Edit User button | Edit another user in the account or in a sub-account. Available only to account administrators. |
Delete User button | Delete a user in the account or in a sub-account. Available only to account administrators. |
7.2. Adding / Editing Users
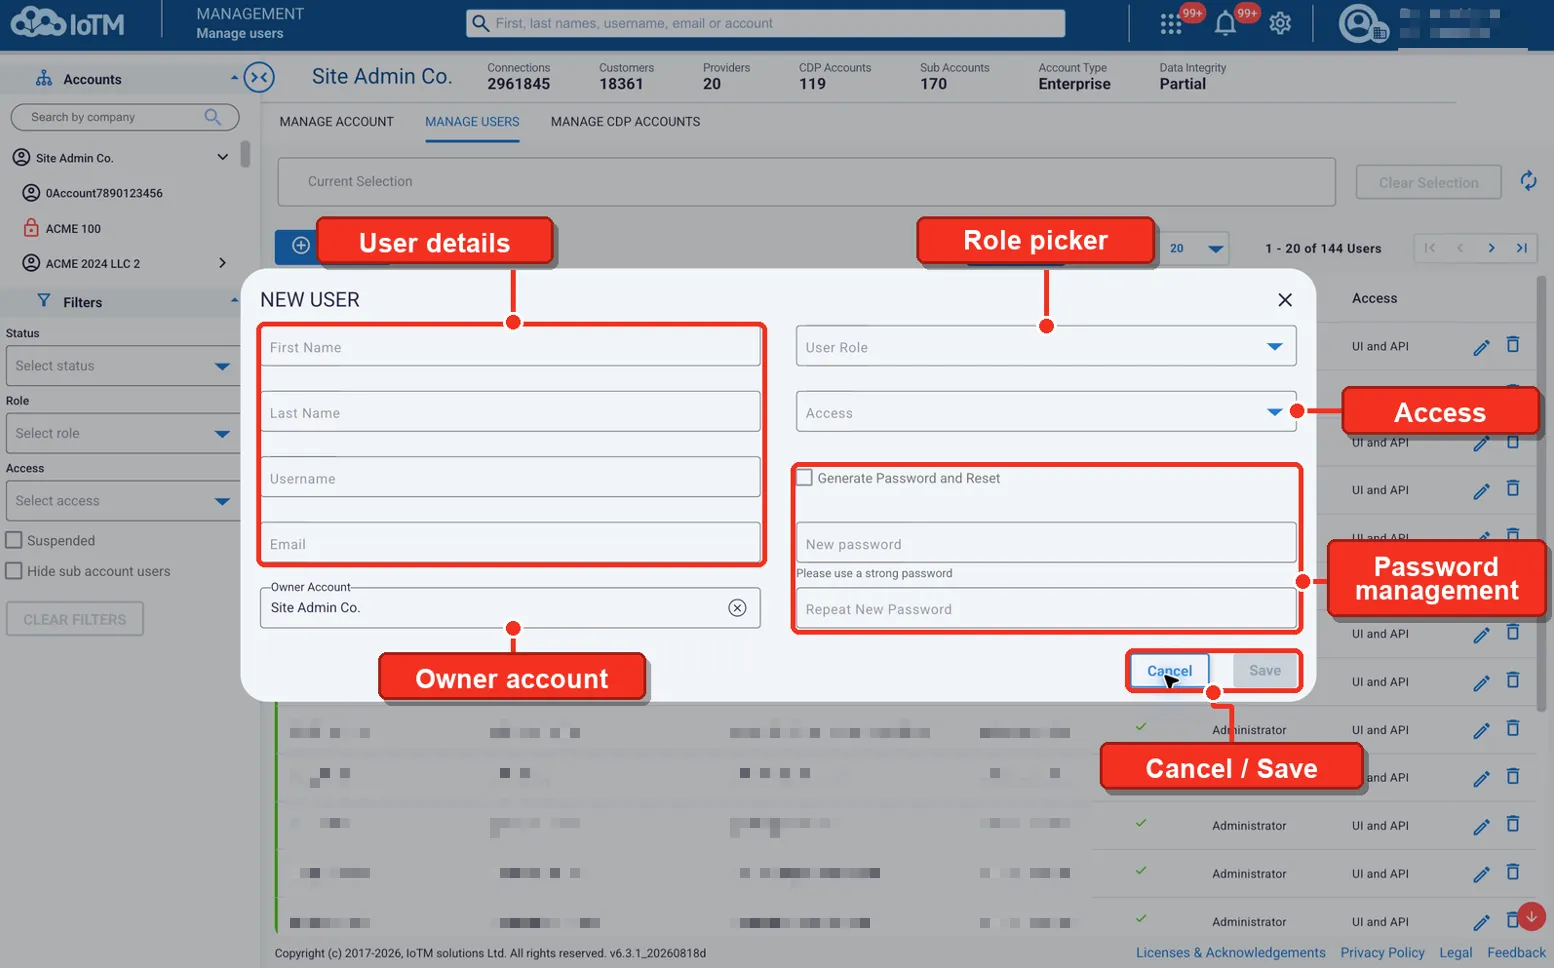
Add User dialog
Control descriptions
Control | Description |
|---|---|
User Details | Fill in First, Last name, Username and email – the email must be valid. The system will validate it by sending a verification email with a link. Clicking on the Activate button is required to activate the user. Click the pencil to change the user email address (available when editing an existing user). This action will send a notification email to the current address notifying of the change request and offering to reset the password, and a notification with a 6-digit code will be sent to the new email and a notification to both operations. The user will need to enter the code to affect the change as proof of ownership of the requested target email address. The user needs to have access to both the current and new email addresses in order to effect the email change. |
Owner Account | By default, the pre-selected account company name will be set in this field. This is a searchable field where you can look for any sub-account of the top-level parent account that is adding the user. This account will own the new user and the new user can log in to this account subject to the user role and access type. |
Password Management | There are 2 options in this case: Click the checkbox and the user will receive an email with a link to create their initial password. This email also doubles as a verification of the target user’s ownership and ability to access the target email. Create the first password for the user. In this case, the user will receive the password determined by the account administrator in the welcome email and can change it later at their discretion. The email notification also doubles as a verification of the target user’s ownership and ability to access the target email. |
Role Picker | Assigns an authorization role to the user and determines whether the new user will be assigned an Administrator, User, Viewer, or Finance User/Viewer role. Only an account administrator can create a new user. |
Access | Determines the access type. Whether the access is allowed for UI only, API only, or UI and API. It is not possible to log in to the IoTM web frontend with an API only user. A user with this access type can only execute API calls. |
Cancel / Submit buttons | Cancel the dialog with no changes, or submit to commit the user details and create the user. |
Editing users is similar to adding users in the sense that it is handled using the same dialog. When editing users, the fields that can be modified will be enabled. The username cannot be modified, the email address that is associated with the user can be modified subject to entering a 6-digit code verification sent to verify ownership of the new email. The Administrator role cannot be downgraded if the user being edited is the last remaining Administrator on the account. An account Administrator can modify the authorization role of other users. Non Administrator users cannot elevate their authorization level. The access type (UI, API or UI and API) cannot be modified after the user is created. For additional details, see IoTM First Level Support Guide - Resellers in the References Section.
7.3. Deleting Users
Delete user confirmation dialog
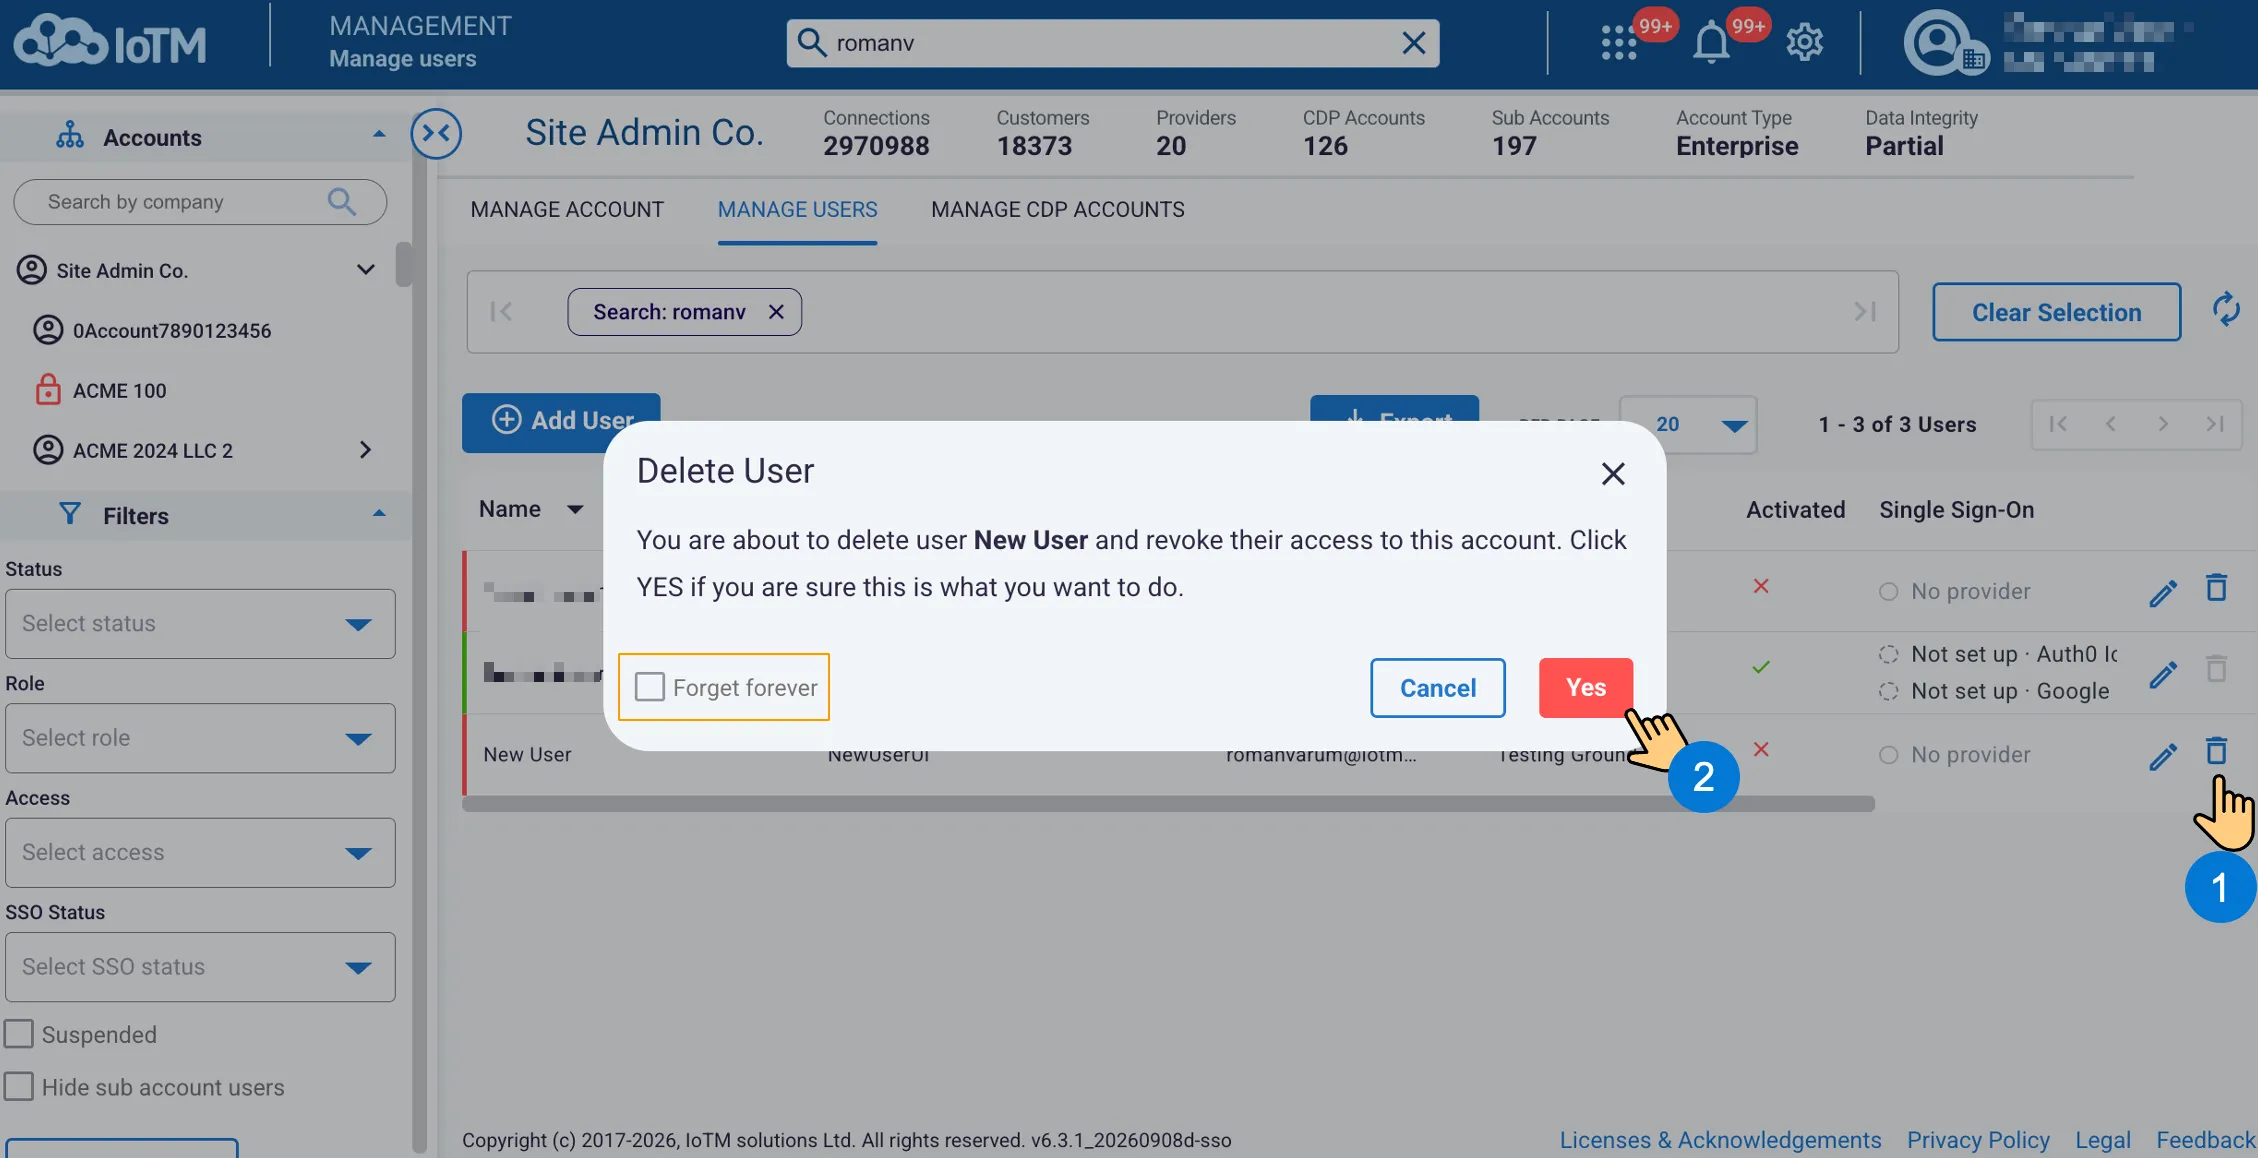
Control descriptions
Control | Description |
|---|---|
Forget forever checkbox | The user requests a total and prompt purge and in this case, all user data will be prioritized for complete purge in the purge queue. |
Cancel / YES buttons | Cancel the dialog with no changes or submit, commit changes and delete the user. |