Rate Plan Changes
10.3. Selectively Assigning a Rate Plan to a Single Connection
You can manually assign a Rate Plan to a single Connection from the Inventory Management Items List.
Location: ➀ ‘INVENTORY MANAGEMENT’ > ➁ ‘Rate Plan’ List drop-down > ➂ Select desired Rate Plan on the relevant connection grid line(*)➃ > Press Change in the guard pop-up notification.
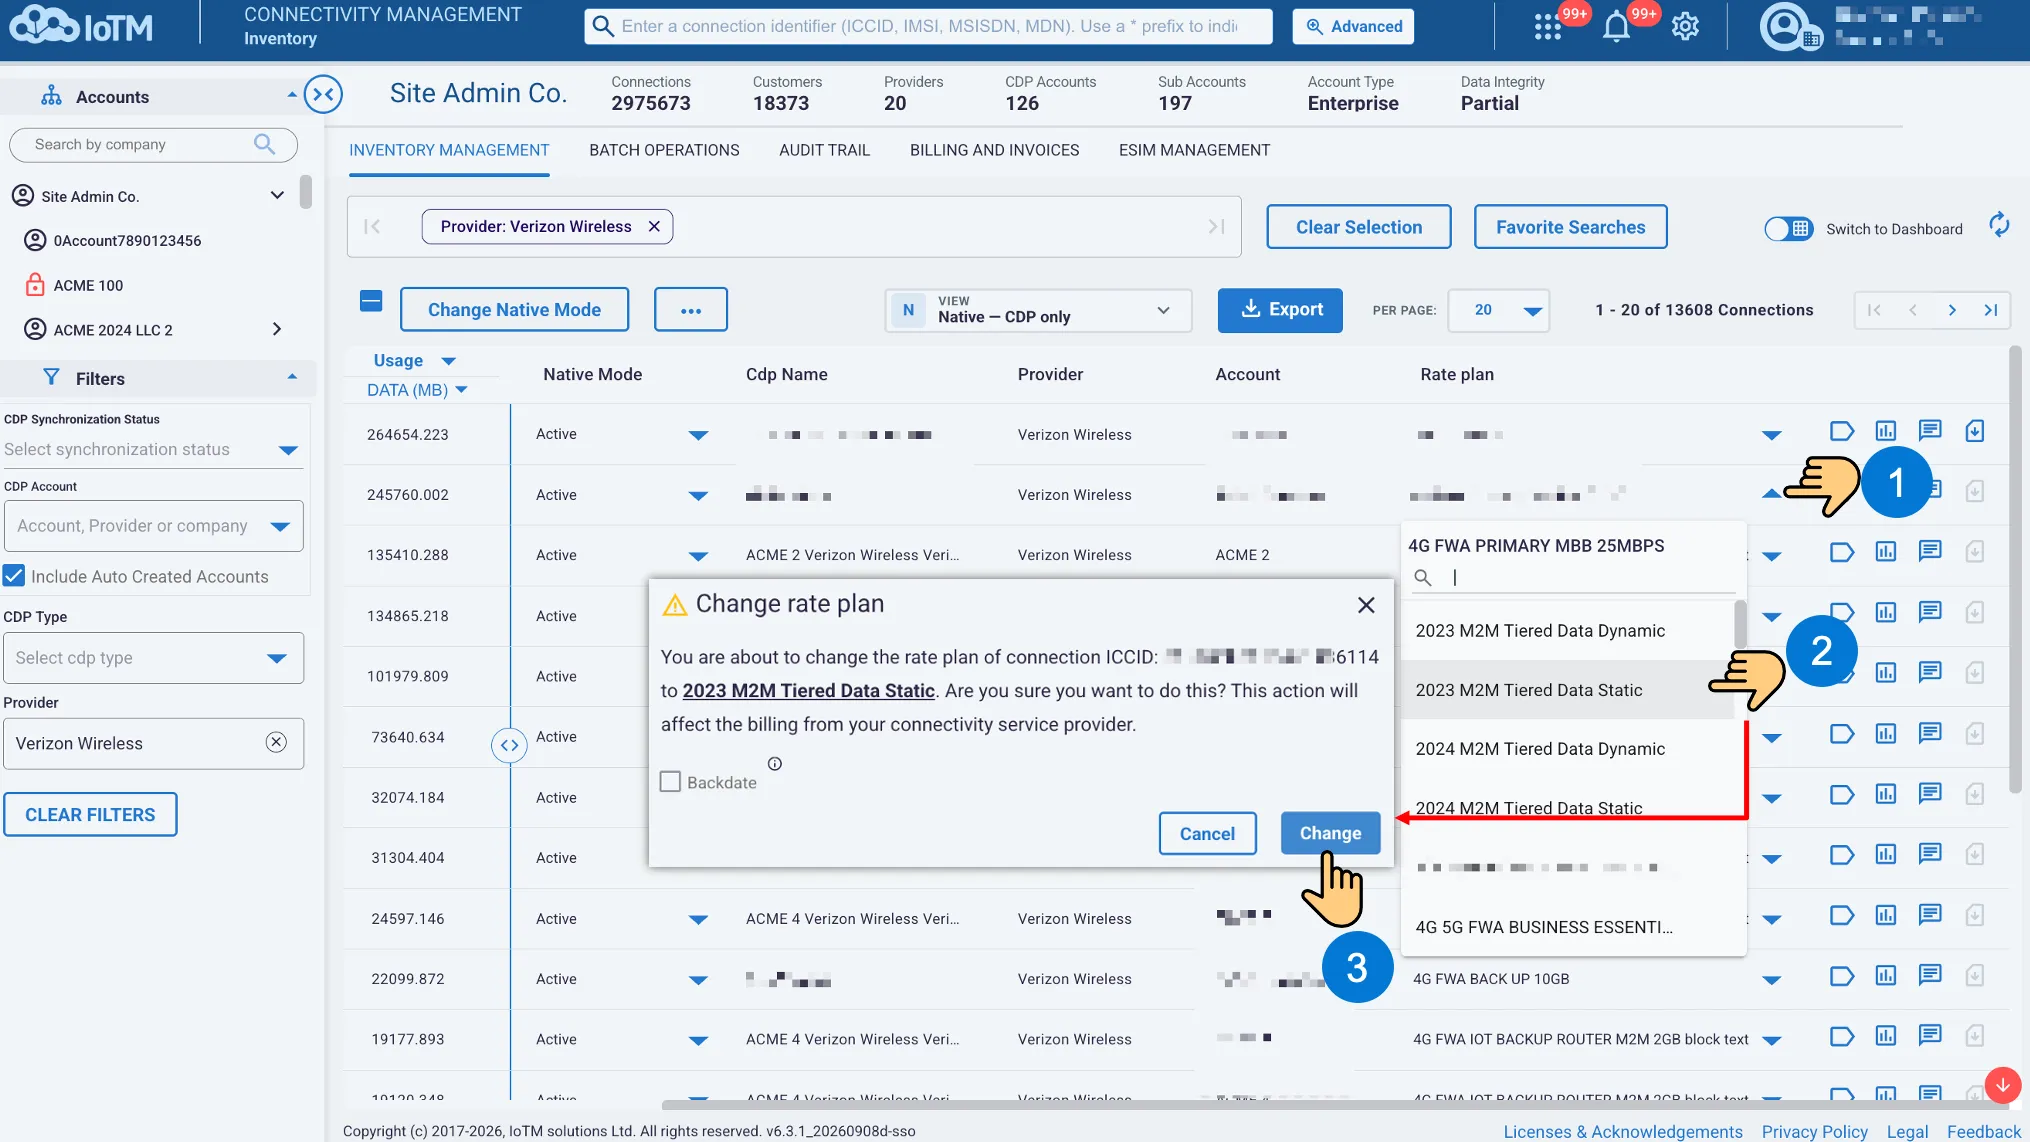
(*) The Rate Plan selection includes both a (1) Rate plan search field allowing Users to search for a Rate Plan and (2) Rate plans list allowing the user to select one rate plan item from a list contained within a static, multiple - line text box.
10.3.1. Selectively Assigning a Rate Plan to a Single Connection from The Single Device’s Detailed Page
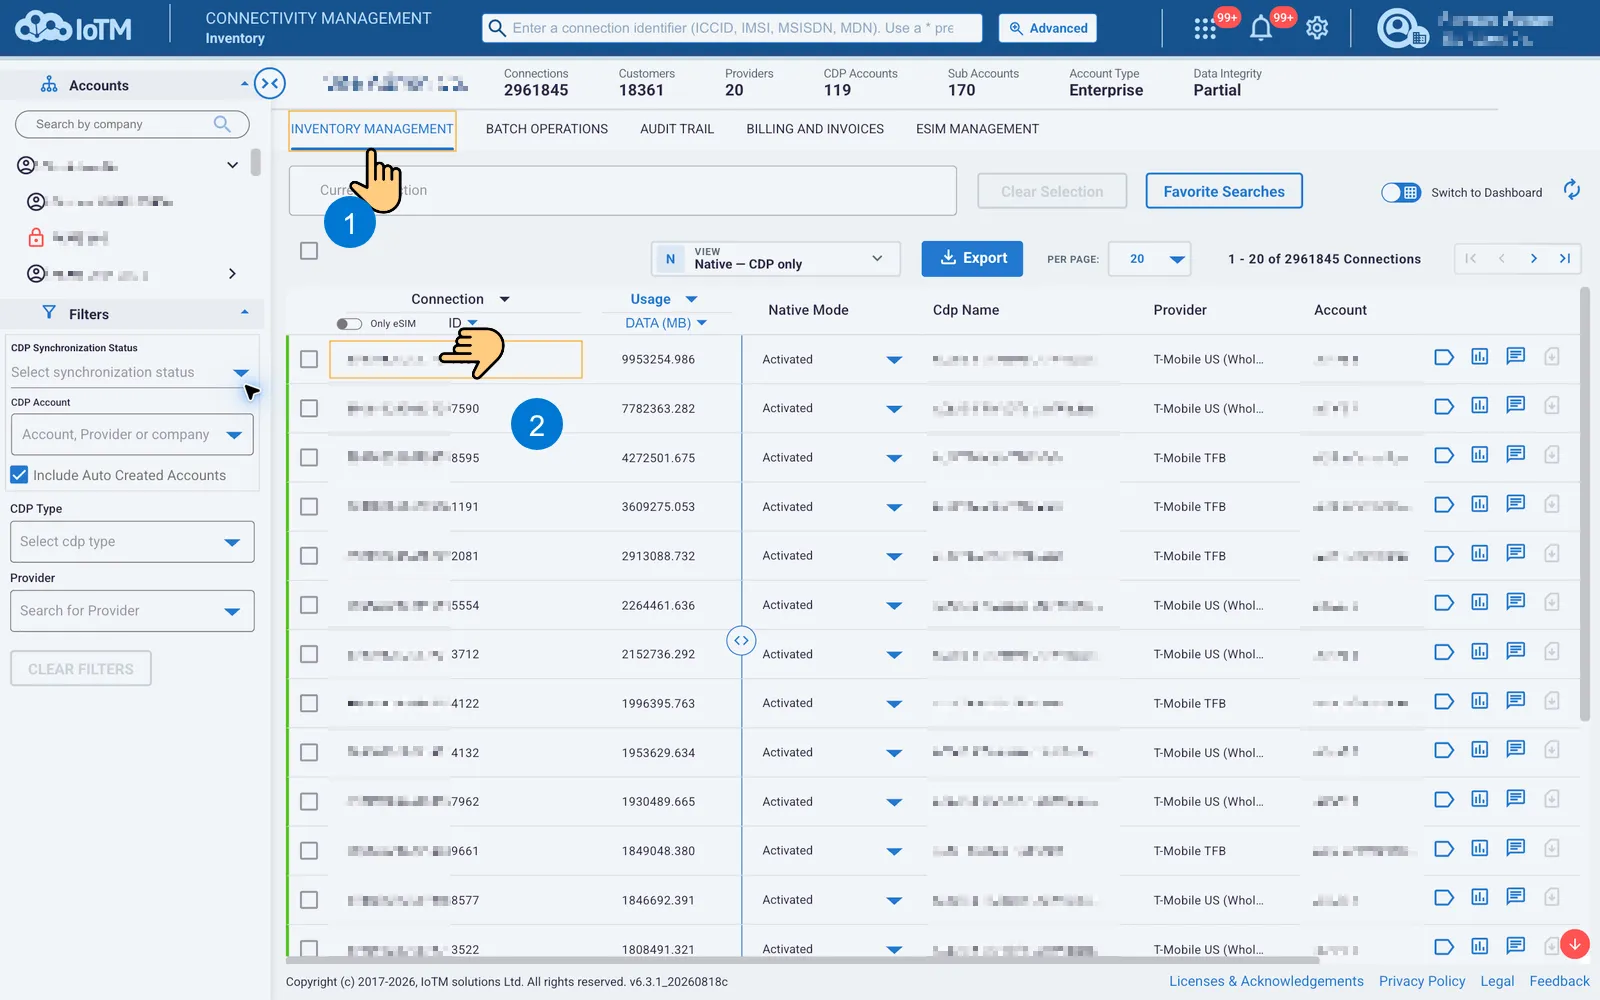
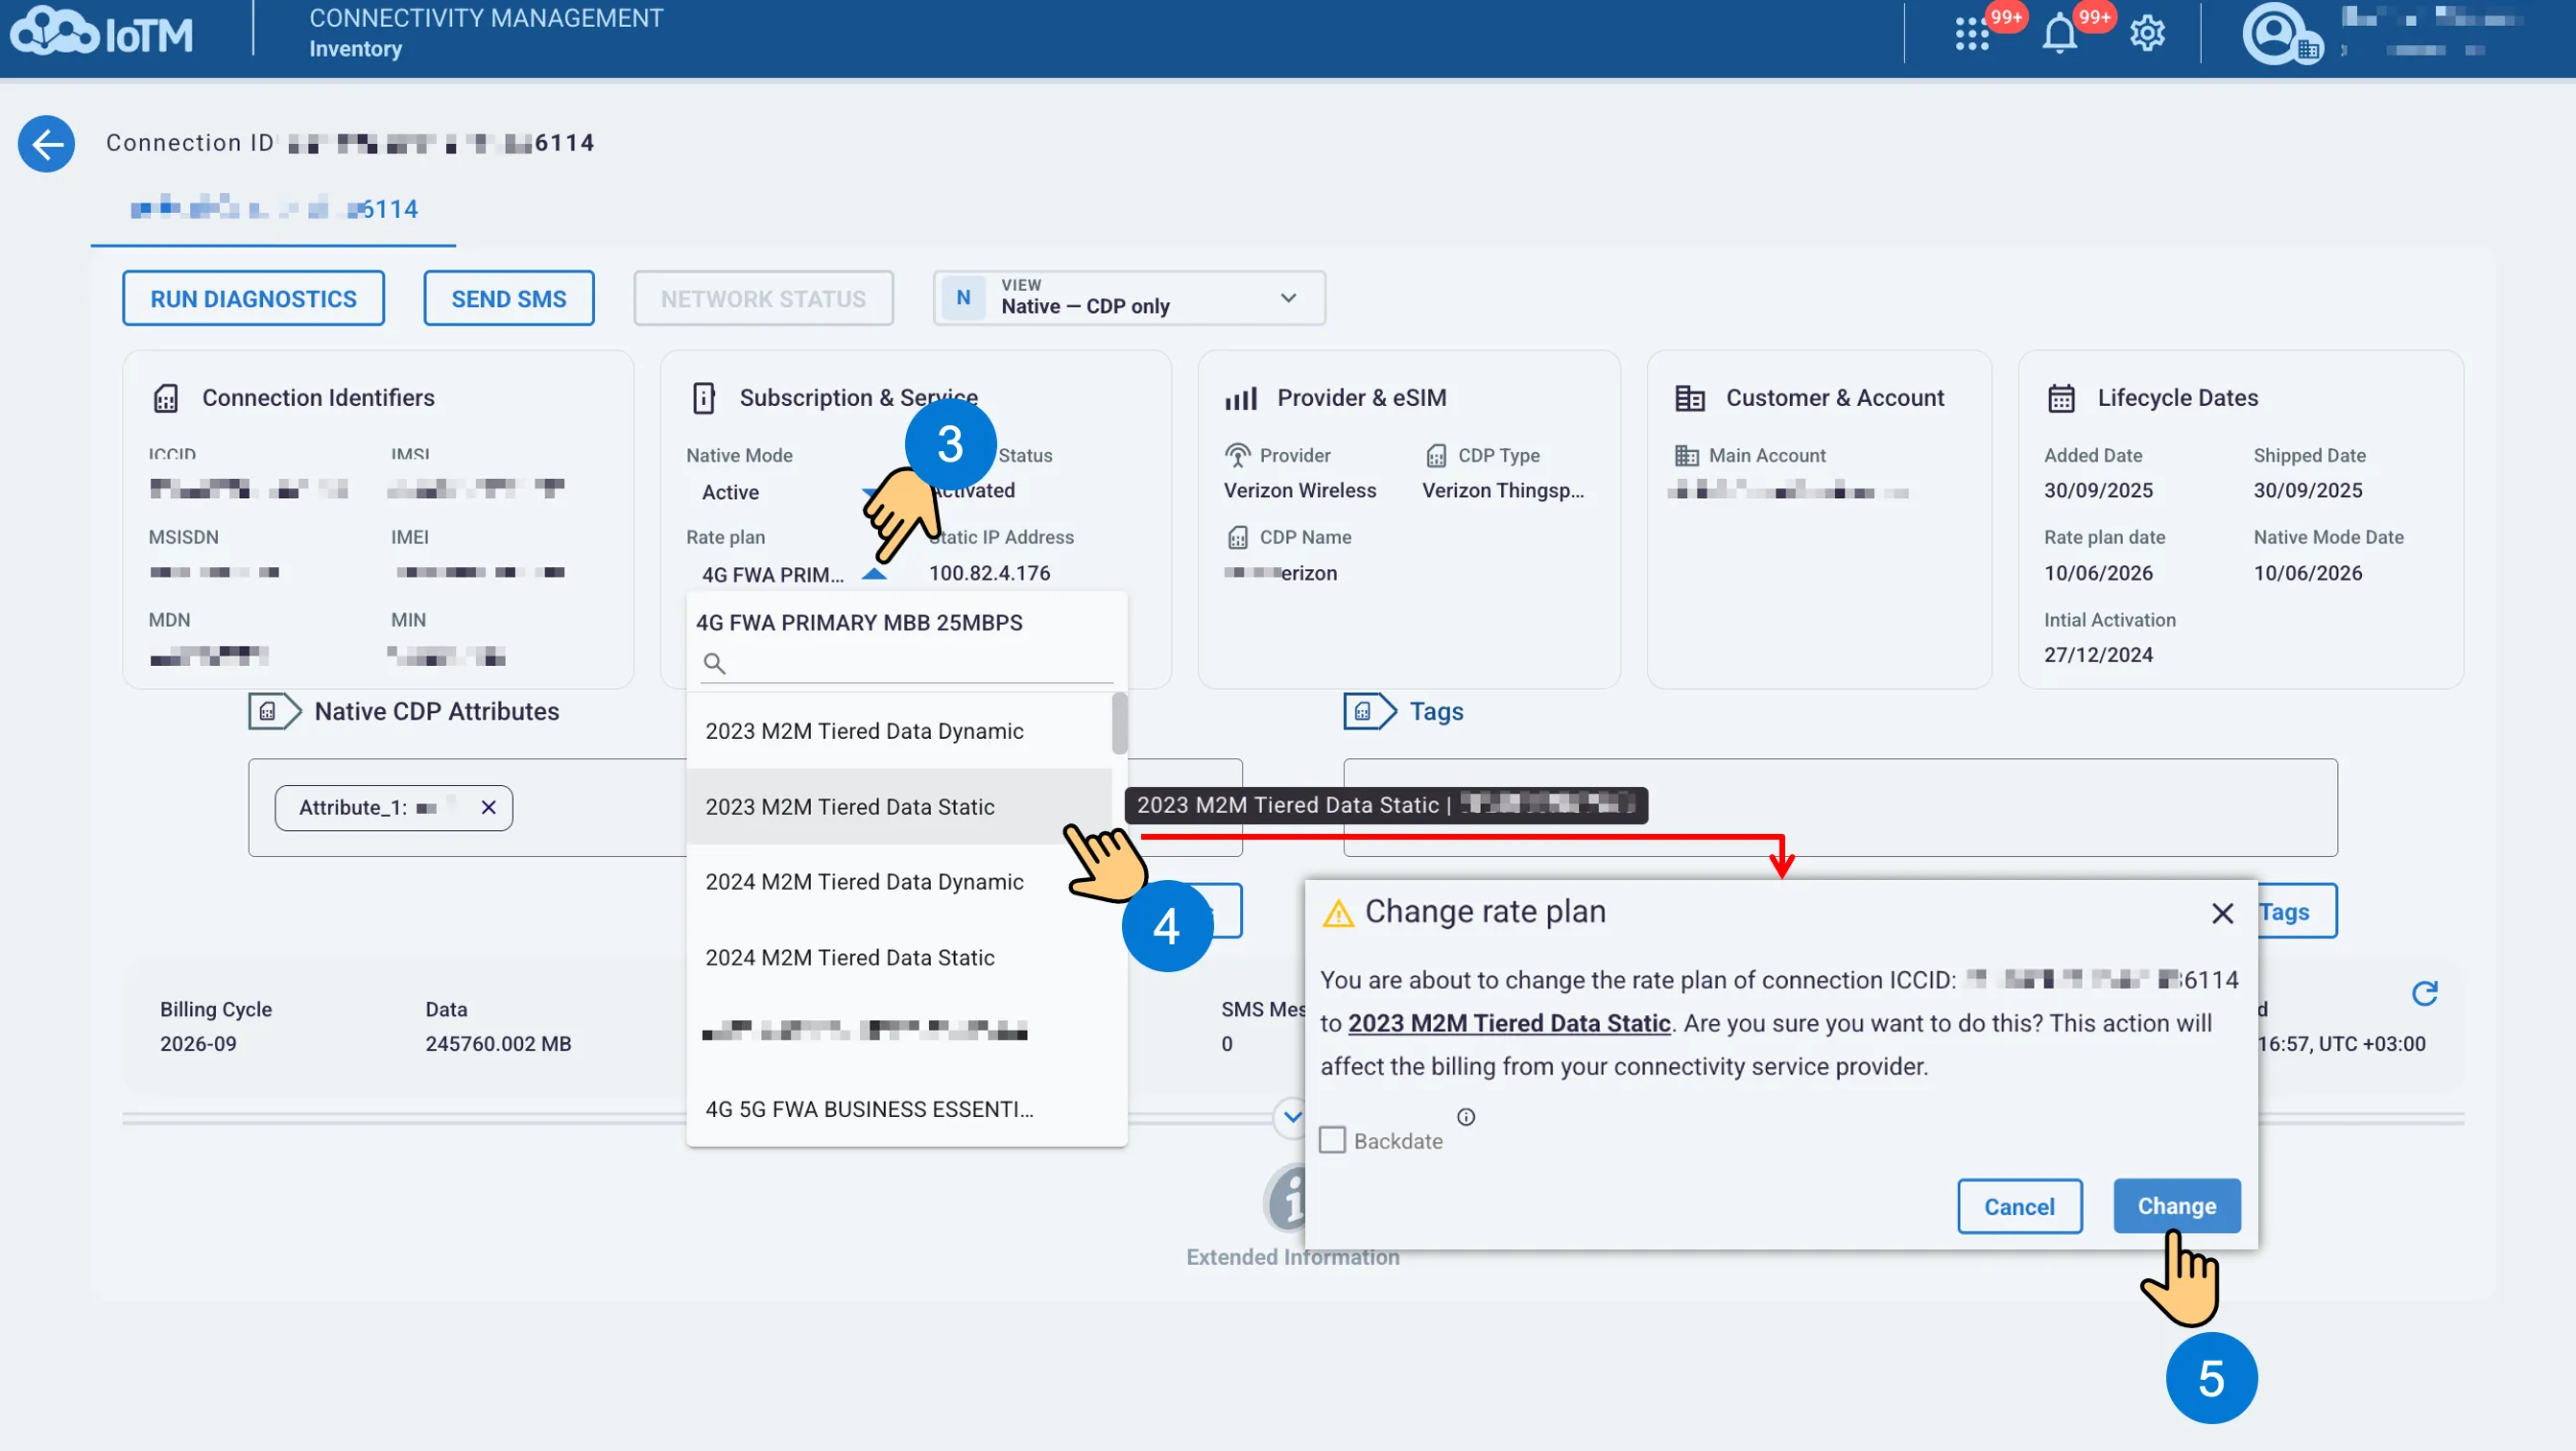
You can manually assign a rate plan to a single Connection from the Inventory Management Detailed Page.
Location: ➀ ‘INVENTORY MANAGEMENT’ > ➁ Select Connection > ➂ ‘RATE PLAN’ drop-down > ➃ Select desired rate plan > ⑤ Press ‘CHANGE’ in the pop-up Notification
10.4. Selectively Assigning a Rate Plan to Multiple Connections
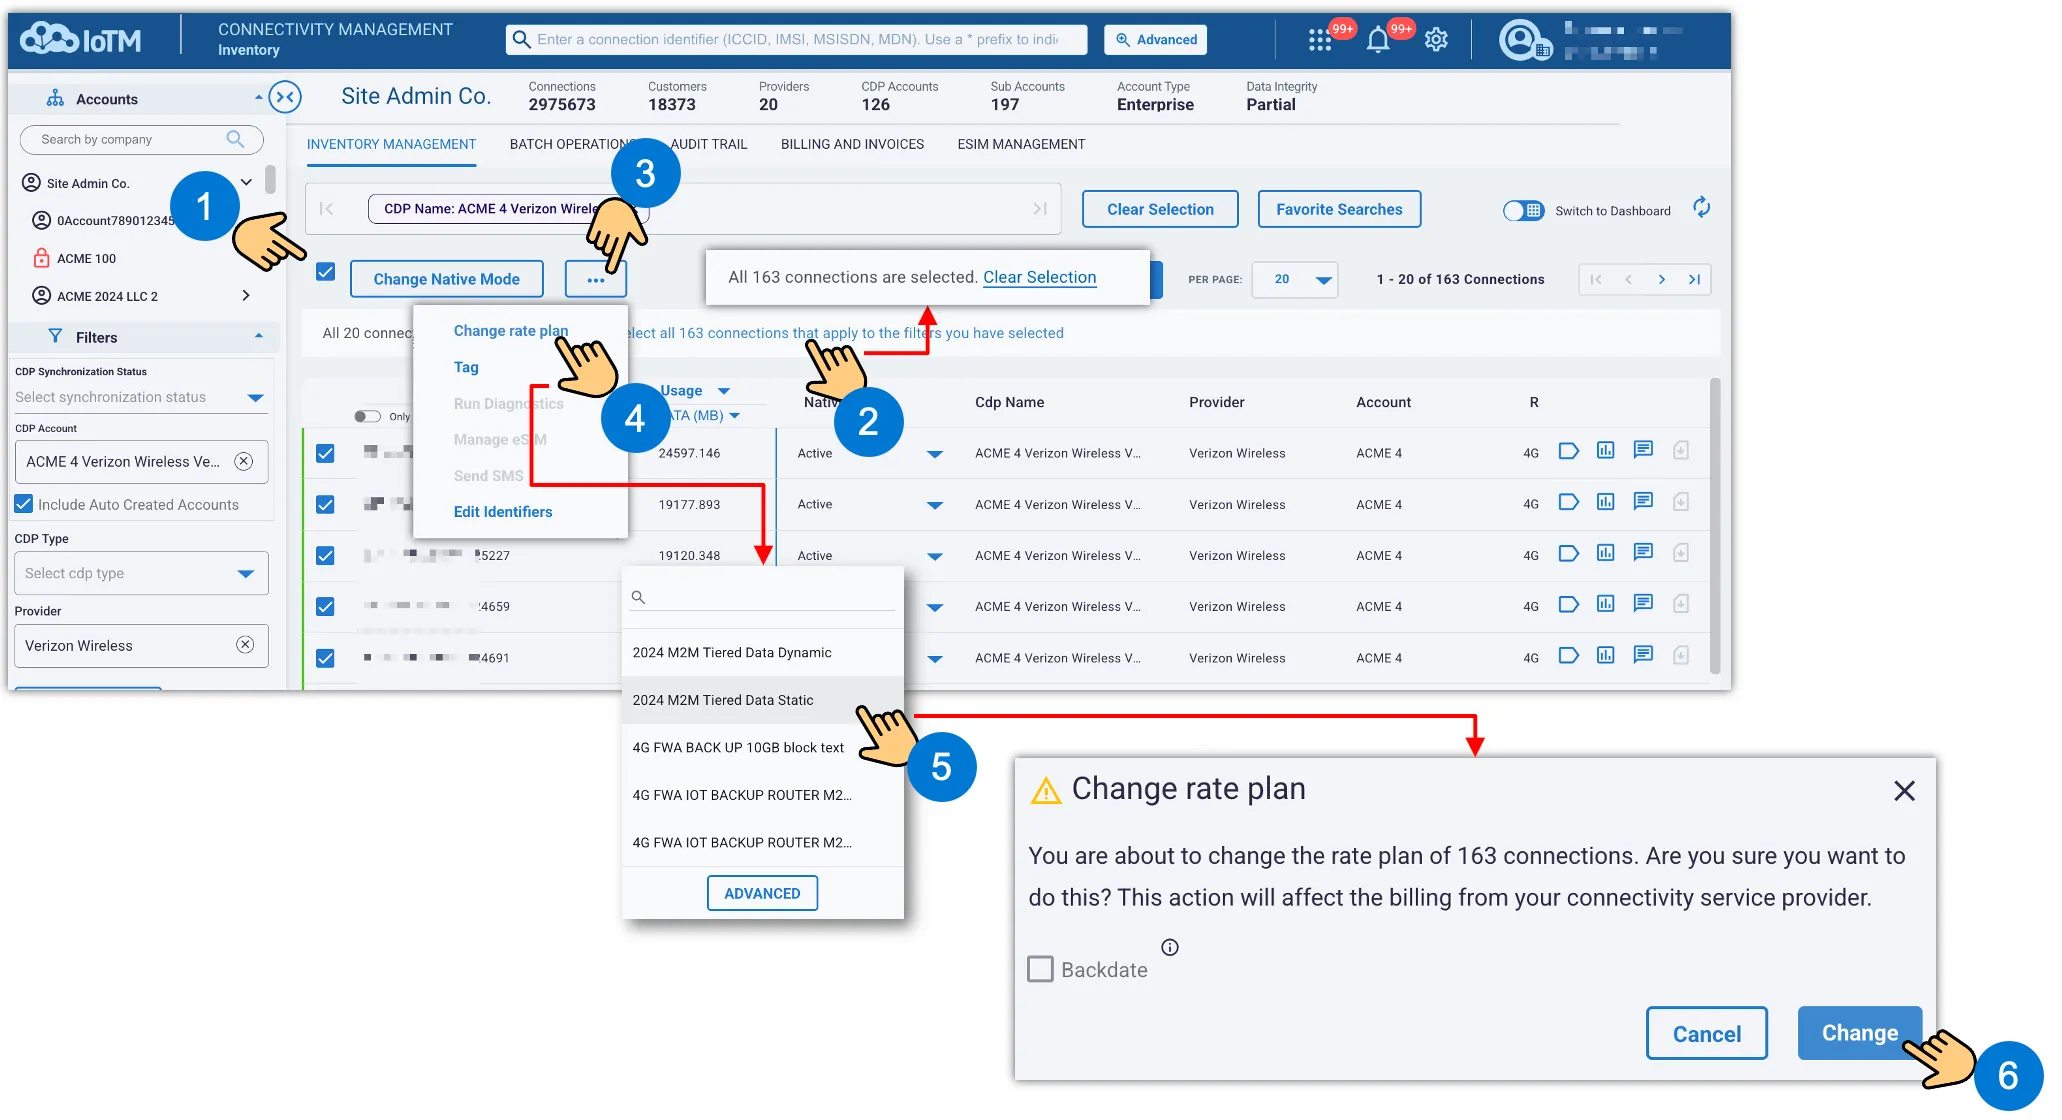
You can selectively assign a rate plan to multiple Connections from the Inventory Management Items List using the Connections checkbox, allowing the user to select several of the choices.
Location: ➀ ‘INVENTORY MANAGEMENT’ > ➁ Select target Connections by clicking the Checkbox > ➂ ‘Change Rate Plan’ action control > ➃ Select desired Rate plan > ⑤ Press ‘CHANGE’ in the guard pop-up notification
10.5. Large-Scale Batch Assignment of Rate Plan to Connections
You can perform large-scale assignment of rate plan to connections from the Inventory Management Items List using the Inventory Management batch operations campaign management functionality.
First step: Select the connections population you want to affect using the available search functions and filters. A single batch operation can perform assignment of a rate plan to up to 100,000 in each job.
Second Step: After you specify the target connections population, you need to select it and hand it over to batch operations.
Location: ➀ check the Select All checkbox > ➁ Press the Beyond Visual Range Selection link> ➂ Press ‘CHANGE RATE PLAN’> ➃ Optionally, you can press the ‘ADVANCED' control button.
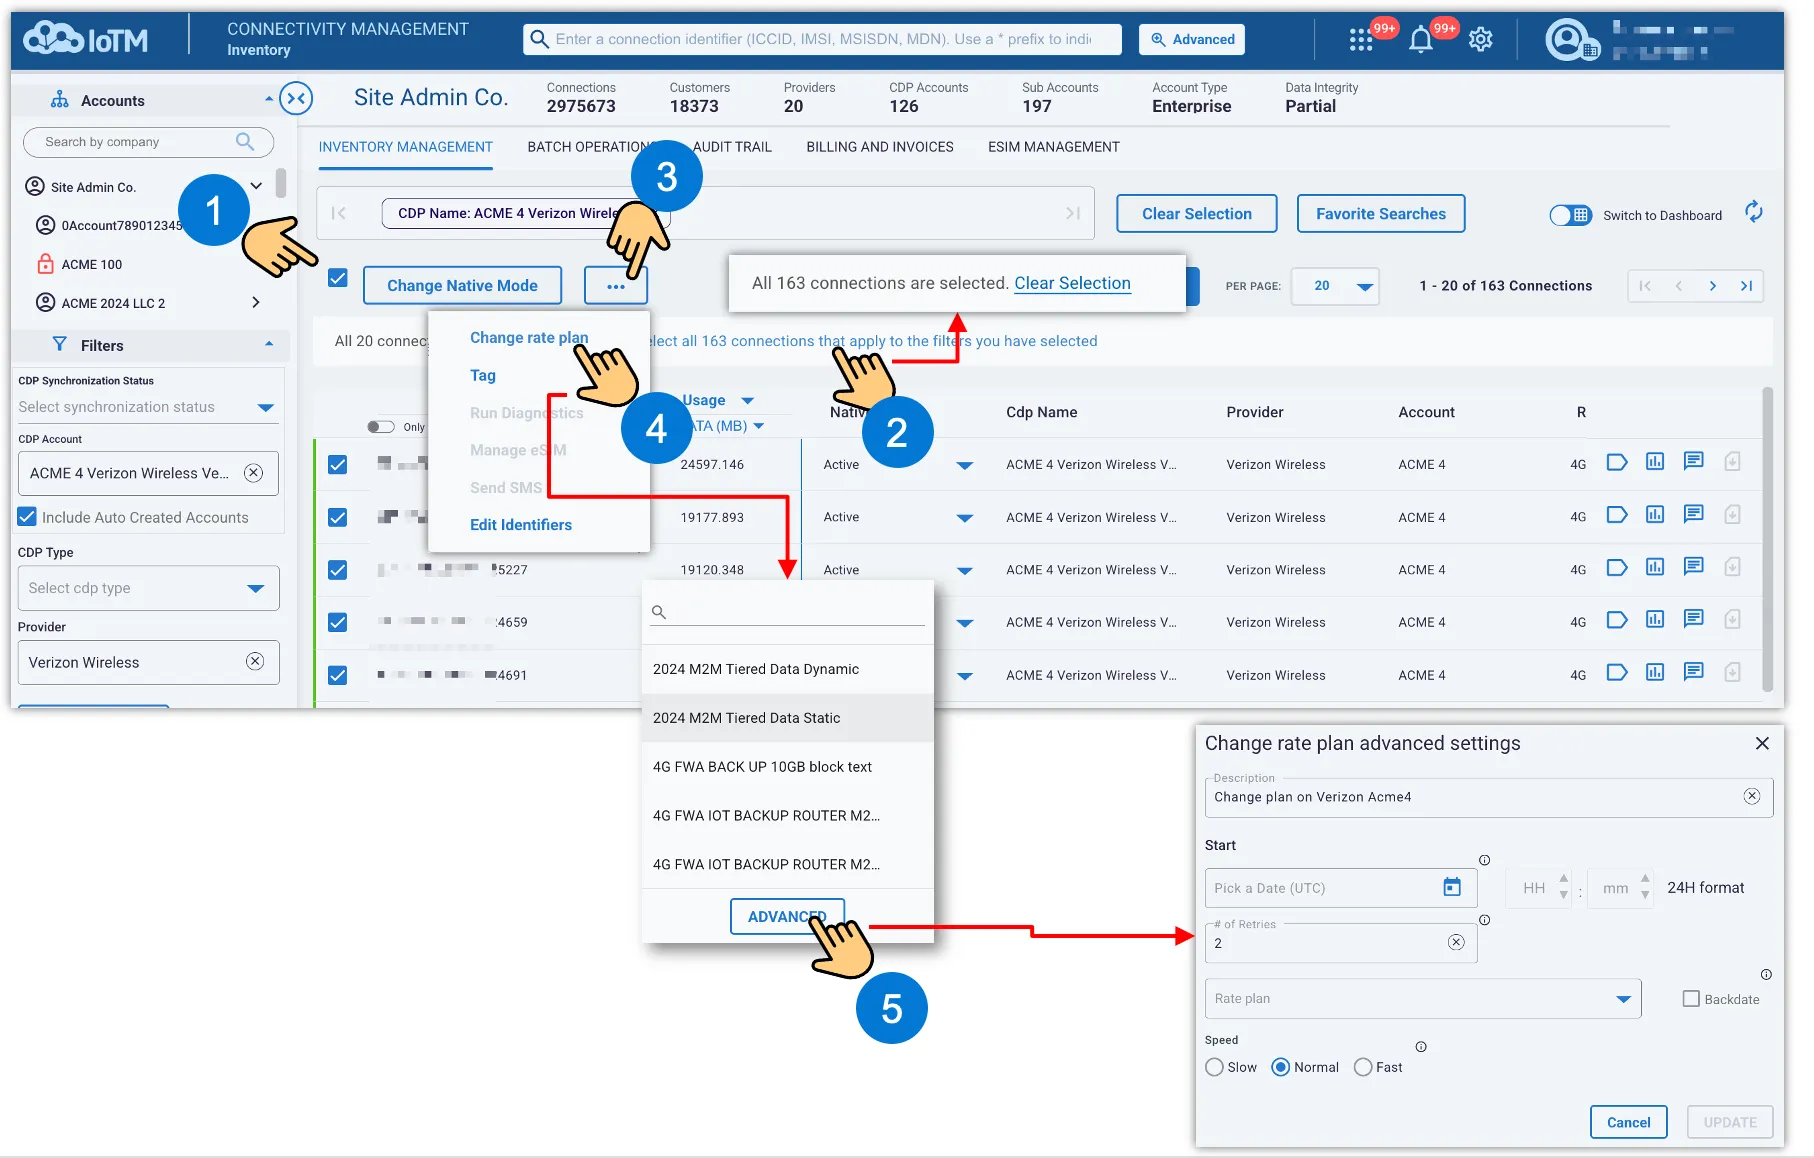
Third Step: you can optionally configure the batch jobs parameters using the Change Rate Plan Advanced Settings dialog, allowing you to submit a job for batch processing with a custom configuration.
Batch Job form Interface Components
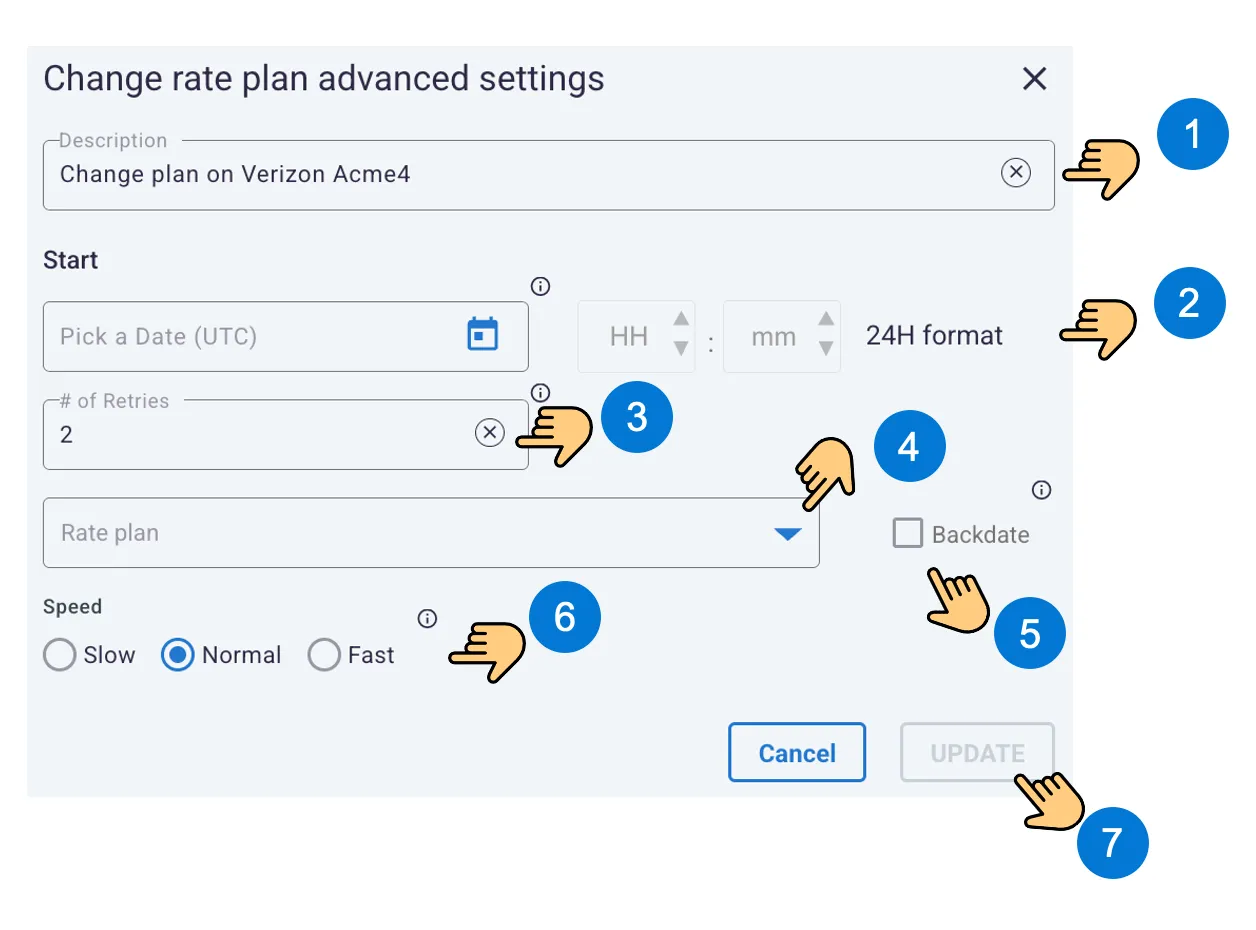
Batch Job form Interface Components
Interface Control | Description |
|---|---|
Description | Text entry box that enables the user to input text information for reference purposes, e.g. “Change rate plan for devices consuming between 10 MB to 100 MB”. |
Start | Popup calendar graphical user interface widget which allows the user to select a batch job start date from a calendar. Click on the icon of a calendar such that when the icon is clicked on, the calendar appears. No input means start immediately. |
# of Retries | Dropdown list displaying a list of values representing the number of retries to automatically execute failed actions in the batch operation, from which the user may select one. The list of options includes 0,1,2,3. |
Rate Plan | Search field and Dropdown list displaying a list of available Rate Plans, from which the user may select one. Check “Backdate” to backdate the change plan request to the start of the current cycle. In the case of AT&T EoD CDP type, this will backdate the change request either to the start of the cycle, or to the previous rate plan change on this connection, depending on which one happened last. |
Speed | Select the frequency towards the underlying connectivity provider CMP platform. A high call frequency may result in shorter campaign times, but it might cause issues due to call rate limitations and require multiple retries. Includes a radio button that permits the user to choose from ‘Slow’, ‘Normal’ and ‘Fast’ one exclusive option. Normal is the default option. |